Using the ATC Manager UI

ATC Manager includes a simple web interface for monitoring and configuring clusters and their nodes. When you log into ATC Manager, you automatically land on the Clusters page.

The Clusters Page

The Clusters page provides options to create new clusters and monitor and manage existing clusters.
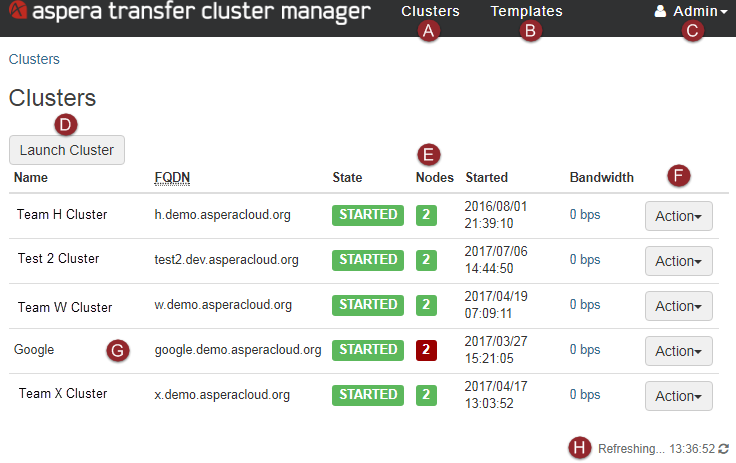


Figure Marker Item Description
A Clusters Go to the Clusters page.
B Templates Go to the Templates page. See the following section for more information.
C User drop-down menu Click to edit your user preferences (see Configuring Your Preferences) or logout.
D Launch Cluster Click to launch a cluster that uses a prepared template. For more information, see Creating a Template and Finalizing and Launching a Cluster.
E Nodes column Shows the number of nodes and their states. The color of the box around the number indicates node status, and more than one box can be present. A green box indicates that the nodes are healthy and running or idle, a red box indicates that the nodes are degraded, and a black box indicates the node is terminating. Click the number to open the Monitor Nodes page for that cluster. For details, see Monitoring Cluster Nodes.
F Action Click the button to take the following actions on the cluster:
  • Monitor Transfers: Open the transferring monitoring page, in which you can view inbound and outbound transfers, as well as transfer sessions that are in progress, completed, cancelled, or failed. For details, see Monitoring Transfers.
  • Monitor Nodes: Open the Monitor Nodes page for that cluster (same as clicking the node number). For details, see Monitoring Cluster Nodes.
  • Edit Auto Scaling Policy: Open a page on which you can edit the auto scaling policy. For details, see Configuring the Auto Scaling Policy.
  • Edit Transfer Configuration: Open a page in which you can edit the aspera.conf configuration file that is used by the cluster nodes. For descriptions of the transfer settings, see Aspera Enterprise Server Admin Guide for Linux: aspera.conf - Transfer.
  • Edit Cluster Configuration: View and edit the entire configuration file as a JSON object. For details, see Updating the Cluster Configuration.
  • Disable Auto Scaling: Disable auto scaling after confirming that you want to continue this action. The cluster remains active but uses only the current number of active nodes and does not launch new nodes if the transfer load increases.
  • Terminate Cluster: Terminate the cluster after confirming that you want to continue this action.
G The row of a cluster Click the row to view and edit the cluster's configuration settings. Nine tabs appear below the cluster summary table:
  • Status: View a status table of ATC Manager services.
  • Description: View details of the cluster, license, state store, and version information.
  • Infrastructure: View details of the storage provider and DNS service.
  • Auto Scaling: View the current configuration and status of the Auto Scaling policy, with options to edit the configuration or disable auto scaling. For details, see Configuring the Auto Scaling Policy.
  • Access Keys: Click New to create a new access key (see Creating Access Keys in the Cluster Manager for details). Shows a status table of existing access keys associated with the ATC Manager. Click Details to view the access key ID and secret, click Edit to change the access key configuration, and click Delete to remove a key.
  • Node API: View the Node API configuration and node user credentials. Click Test to confirm that the credentials can be used to connect to the cluster.
  • SSL: View the private key and SSL certificate of the cluster. Click Edit to edit the text. For more information, see Installing SSL Certificates.
  • Transfer Configuration: View the contents of the aspera.conf file that is used by the cluster nodes. Click Edit to edit the text in a well-formed XML format.
  • Firstboot Script: View the firstboot script that is applied to nodes when they are first launched, if any. Click Edit to update the firstboot script. Updates are not applied to existing nodes, only to nodes that are launched after the update. To refresh the nodes, terminate nodes one-by-one so that they are relaunched by ATC Manager using the new firstboot script.
H Refreshing View the last time the ATC Manager updated the status of the clusters.

The Templates Page

The Templates page shows a table of available node configuration templates.


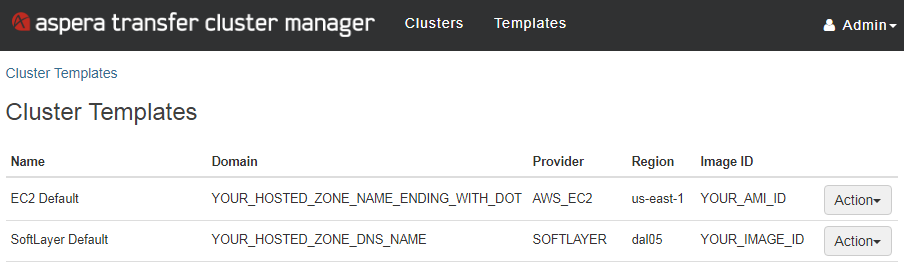
Click Action and select one of the following from the drop-down menu:

  • Edit Template: Edit all components of the template, including the template name, ATCM settings, auto scaling policy, provider, DNS configuration, state store, aspera.conf, and firstboot script. Click Advanced to edit the configuration as a single JSON object. For details, see Creating a Template.
    Note: Aspera recommends making duplicates of the default templates provided to you by Aspera and editing those rather than editing the original templates.
  • Launch Cluster: Launch a cluster using that template. For details, see Finalizing and Launching a Cluster.
  • Duplicate: Duplicate the selected template. The duplicate is added to the list of templates with the name "copy of" followed by the original template name. To rename the template and edit its configuration, click Action > Edit Template.
  • Delete: Delete the template.