Installation
- Guided Installation: The most common way of installing Connect. If Connect is not installed or needs upgrading when you try to upload or download files from an Aspera web app, such as Aspera Faspex or Aspera Shares, you are prompted to install Connect and guided through the process.
- Manual Installation: A fallback method for users with non-typical web apps. You first install the Connect web extension for your browser. You then install the Connect application by running a desktop installer you download from the Aspera website.
Both methods include adding a Connect web extension.
System Requirements: For information on supported operating systems and browsers, see the release notes for this release of IBM Aspera Connect.
- Before performing a system-wide installation (all users of the machine), uninstall any per-user installations. For details, see Uninstalling.
- Remove all previous Connect installers before downloading the new installer.
- Connect requires local storage to be enabled on your browser.
Guided Installation
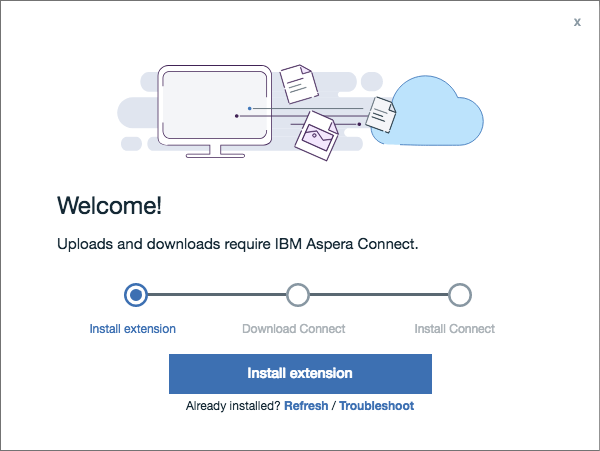
If you do not have Connect installed and you attempt to transfer packages or files using an Aspera web application (such as Faspex or Shares), the Connect Welcome screen appears and prompts you to install Connect:
Depending on your browser/platform combination, the screens shown in these instructions may vary.
- To begin, click Install extension.
Your browser's page for the Connect extension opens. See the instructions for your browser in Adding the Connect Browser Extension to install the Connect extension. If successful, you'll see the message confirming the extension has been added.
- The welcome screen now prompts you to download the Connect application:
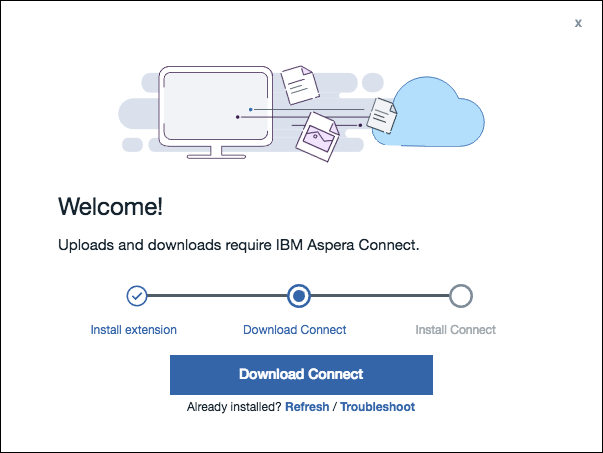
Click Download Connect. The installer file (.exe, .dmg, or .rpm depending on your OS) is downloaded to your Downloads folder. - The welcome screen now prompts you to install the Connect application:
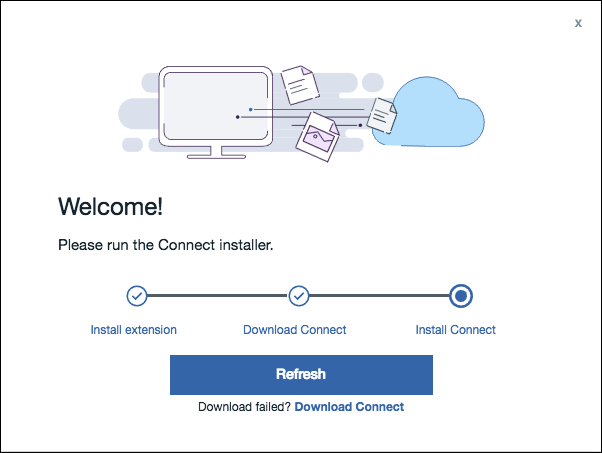
To install the Connect application, locate the installer file you just downloaded, open it, and follow the instructions to install the Connect application. Once the Connect application has been installed, return to the above screen and click Refresh to refresh the browser.
Manual Installation
Step 1. Install the Connect extension for your browser.
For instructions about obtaining the Connect extension for your browser, see Adding the Connect Browser Extension.
Step 2. Download and run the Connect application installer.
You can download the Connect installer DMG directly from http://downloads.asperasoft.com/connect/. Once downloaded, close your Web browser and run the installer on your machine. You will need to accept the terms and conditions and click Install.
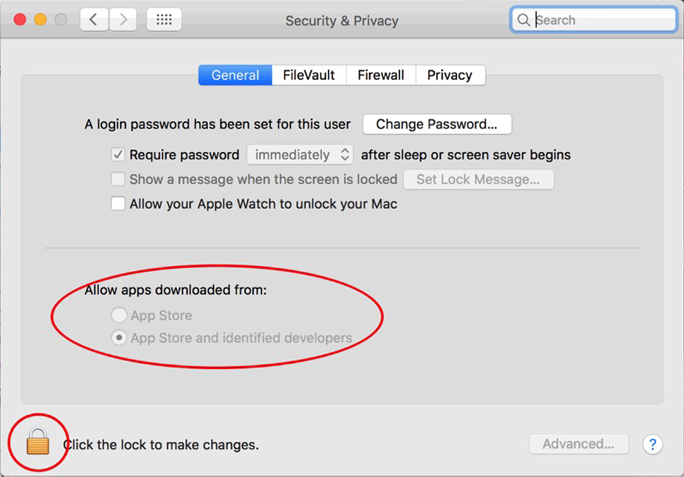
If macOS complains that Connect cannot be installed because the app did not come from the Apple App store, you'll need to enable the installation in your Mac's security settings:
- Open the System Preferences > Security & Privacy > General tab. The Security & Privacy window opens.
- Unlock the screen to make changes by clicking on the padlock icon in the lower-left corner, circled in the screenshot below.
- Set Allow apps downloaded from: to App Store and identified developers.
Adding the Connect Browser Extension
For supported web browsers, this section explains how to obtain and add the IBM Aspera Connect extension to the browser you will use. The Connect extensions are specific to the browser; the procedure for adding an extension to a browser is the same regardless of which OS platform that browser is running on. With a guided install, clicking Install extension opens the extension link for the browser you are using. With a manual install, be sure to download the extension for the browser you intend to use with Connect.
Chrome
To obtain and install the Connect extension for Chrome, follow the procedure below:
- Click Install extension (guided install method), or
open the IBM Aspera Connect page on the Chrome Web
Store (manual install method). The following page opens:

- Click Add to Chrome. The Add "IBM Aspera Connect"? popup appears.
- Click Add extension.
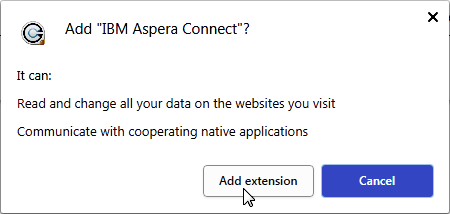
If successful, you'll see the message "IBM Aspera Connect has been added to Chrome".

Firefox
To obtain and install the Connect extension for Firefox follow the procedure below:
- Click Add extension (guided install method), or open
the IBM Aspera Connect page on the Firefox
Add-Ons page (manual install method). The following page
opens:
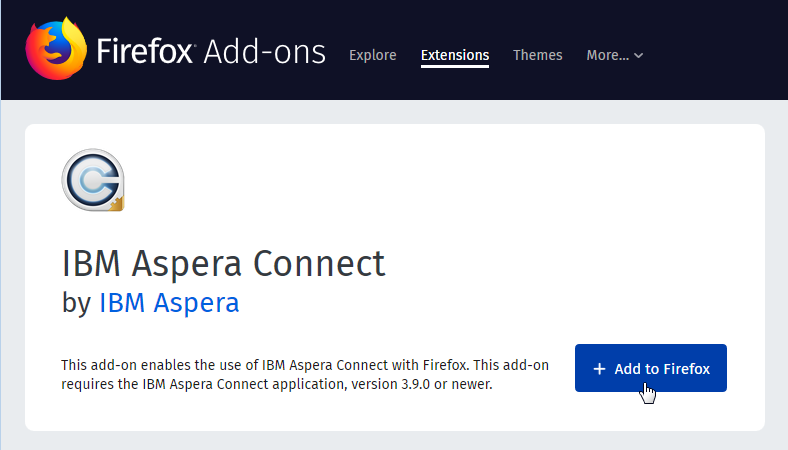
- Click + Add to Firefox. The Add IBM Aspera
Connect? popup appears.
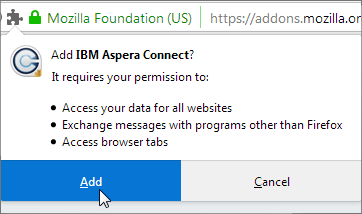
- Click Add.
If successful, you'll see the message "IBM Aspera Connect has been added to Firefox".
Safari 12
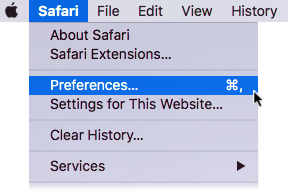
For Safari the Connect browser extension is provided with the macOS installer for Connect. For this reason, the extension cannot be added to Safari until after the installer has been run. Once Connect is installed, add the Connect extension to Safari as follows:
- Open Safari > Preferences (not Safari
Extensions):
- Select the Extensions tab. The Extensions window
appears.
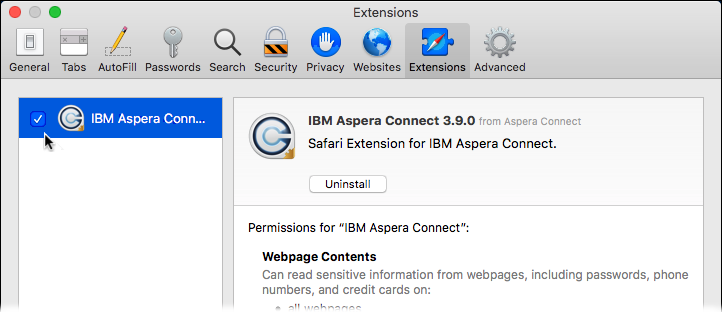
- Look for the IBM Aspera Connect extension listed in the left panel, and click the checkbox to select it.
- Close the dialog. The Connect extension has been added to your browser.
After Installation
Once Connect is installed, you can open it from one of the following locations:
For a system-wide installation (all users on the machine): Macintosh HD > Applications > Aspera Connect
For per-user installations: Macintosh HD > Users > home_dir > Applications > Aspera Connect
|
Tip: Aspera provides a web-based diagnostic tool that can be helpful
in identifying connection issues. You can access the IBM Aspera Connect
Diagnostic Tool here: |