IMPORTANT NOTE: If this is a product upgrade, ensure that you have
reviewed all prerequisites detailed under the topic "Before Upgrading."
Aspera Connect Server is a web-based file
server that enables file access through a browser, and transfers files using the
Aspera Connect browser plugin. Additionally, you can set up HTTP Fallback to
establish HTTP- or HTTPS-based file transfers with clients that don't have
fasp connectivity.
To install Aspera Connect Server, log into your computer with root
permissions, and follow the steps below.
-
Download the Aspera product installer
Download the installer from the link below. Use the credentials provided to
your organization by Aspera to access:
If you need help determining your firm's access credentials, contact Technical Support.
-
(For product upgrades) Ensure that you have prepared your machine to
upgrade to a newer version.
Although the Aspera Connect Server
installer performs your upgrade automatically, we highly recommend
completing the tasks identified in the topic "Before
Upgrading." If you do not follow these steps, you risk
installation errors or losing your former configuration settings.
-
Run the installer
When downloaded, run the installer using the following
commands and with the proper administrative permissions. Replace the file
name accordingly.
| OS |
Commands |
| RedHat |
$ rpm -Uvh aspera-entsrv-[version].rpm
|
| Debian |
$ dpkg -i aspera-entsrv-[version].deb
|
-
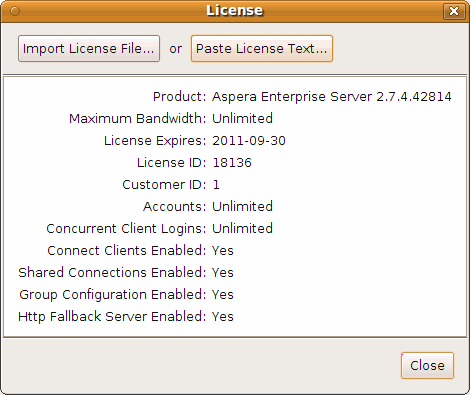
Install the license
There are two ways to install the license: through
the GUI or via command line.
| Method |
Instructions |
| GUI |
To install the license via the GUI, execute asperascp
in a Terminal (as a root user) to launch the application. If this is
a fresh install, an Enter License window will appear. You may
click the Import License File... and select
the license file, or Paste License Text... to
copy-and-paste the license file's content. When finished, the
license information will appear in the window. Verify that it is
correct and click Close.
|
| Terminal |
To install the license through command line, create the
following file and paste your license key string into it:
/opt/aspera/etc/aspera-license
When finished,
save and close the file. Use this command to verify the license
info: $ ascp -A
|
If you are updating your product license after the installation, refer to
Updating Product License.
-
Review or update OpenSSH authentication methods
Open your SSH Server configuration file with a text
editor:
/etc/ssh/sshd_config
To
allow public key authentication, set PubkeyAuthentication
yes. To allow password authentication, set
PasswordAuthentication yes. Here is a configuration
example:
...
PubkeyAuthentication yes
PasswordAuthentication yes
...
When modified, execute the command to reload
SSH:
| OS Version |
Instructions |
| RedHat |
$ sudo service sshd restart
|
| Debian |
$ sudo /etc/init.d/ssh restart
|
To further review your SSH Server's configuration to strengthen security,
refer to Securing your SSH Server.
-
Convert the old aspera.conf file manually (Step necessary only when
upgrading from product version 2.2 and earlier)
For product versions 2.5+, the docroot settings have been moved to the Aspera
configuration file, aspera.conf. When upgrading from product version
2.2 or earlier, the installer converts your old configuration files to the
new format, using a "strict" method. If the old aspera.conf file has
errors or unrecognized directives, the conversion will fail. To review the
errors, run a manual strict conversion. Change aspera.conf's path if
it is not in the default location.
$ cd /opt/aspera/etc
$ sudo asconfigurator -T -F convert_conf_V1_data ./aspera.conf
If error occurs during the conversion, use the relaxed conversion method.
$ cd /opt/aspera/etc
$ sudo asconfigurator -F convert_conf_V1_data ./aspera.conf
-
(For upgrades) Check aspera.conf for errors
When upgrading your Aspera product to a newer version, it is recommended that
you check the aspera.conf configuration file for errors. Run the
following command in a Terminal window to validate
aspera.conf:
$ /opt/aspera/bin/asuserdata -v
-
Set up your new Connect Server's Web UI (or verify your Web UI settings after
an upgrade).
At this point, your Aspera transfer product is installed; however additional
steps are required to configure the Web UI. Please continue to the Chapter
"Connect Server Web UI Setup" and review
the topics contained herein.
IMPORTANT NOTE: When upgrading from Connect Server versions older than 3.0,
system-level security settings are not preserved and must be
reconfigured. For instructions on enabling or disabling
system-level security, please refer to the topic "Configuring Apache" (second-to-last step).