Introduction
Keeping your data secure is critically important. Aspera strongly encourages you to take additional steps in setting up and configuring your SSH server so that it is protected against common attacks. Most automated robots will try to log into your SSH server on Port 22 as root, with various brute force and dictionary combinations in order to gain access to your data. Furthermore, automated robots can put enormous loads on your server as they perform thousands of retries to break into your system. This topic addresses steps to take in securing your SSH server against potential threats, including changing the default port for SSH connections from TCP/22 to TCP/33001.
Why Change to TCP/33001?
It is well known that SSH servers listen for incoming connections on TCP Port 22. As such, Port 22 is subject to countless, unauthorized login attempts by hackers who are attempting to access unsecured servers. A highly effective deterrent is to simply turn off Port 22 and run the service on a seemingly random port above 1024 (and up to 65535). To standardize the port for use in Aspera transfers, we recommend using TCP/33001.
The following explains how to change the SSH port to 33001 and take additional steps for securing your SSH server. The steps all require root access privileges.
-
Add new SSH port
Note: Before changing the default port for SSH connections, please verify with your network administrators that TCP/33001 is open.
The OpenSSH suite included in the installer uses TCP/22 as the default port for SSH connections. Aspera recommends taking the following measures:
- Open TCP/33001 and keep TCP/22 open until users are notified they should switch to TCP/33001.
- Once users are notified, block TCP/22 to prevent security breaches, and only allow traffic on TCP/33001.
Note: When changing the SSH port, you must also update the SshPort value in the <WEB...> section of aspera.conf. Please refer to Configuring your Web UI Settings for details.
To enable TCP/33001, open 33001 within your /etc/services file. Note that you cannot put two entries of the same name in the /etc/services file to make SSHD run on two ports. Thus, you need to add a second SSH process to the /etc/services file (e.g. ssh2), which is demonstrated in the sample below.
...
ssh   22/tcp      # SSH Remote Login Protocol
ssh2  33001/tcp   # SSH Remote Login Protocol (secure port)
...
Save a backup of the /System/Library/LaunchDaemons/ssh.plist file to ssh.plist.bak. Then edit ssh.plist to use the second SSH port (which is demonstrated in the sample below).
ORIGINAL:
...
<key>Sockets</key>
     <dict>
        <key>Listeners</key>
        <dict>
            <key>SockServiceName</key>
            <string>ssh</string>
            <key>Bonjour</key>
            <array>
                <string>ssh</string>
                <string>sftp-ssh</string>
            </array>
        </dict>
     </dict>
...
NEW:
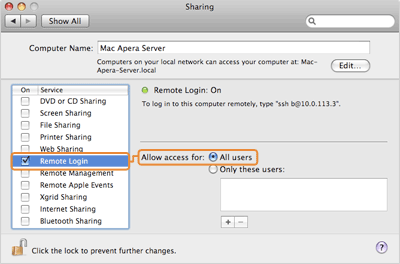
...
<key>Sockets</key>
     <dict>
        <key>Listeners</key>
        <dict>
            <key>SockServiceName</key>
            <string>ssh</string>
            <key>Bonjour</key>
            <array>
                <string>ssh</string>
                <string>sftp-ssh</string>
            </array>
        </dict>
        <key>Alternate Listeners</key>
        <dict>
            <key>SockServiceName</key>
            <string>ssh2</string>
        </dict>
     </dict>
...
You need to restart your SSH service to apply the changes. Restarting your SSH server will not impact currently connected users. To restart your SSH Server, go to . Uncheck and then re-check Remote Login from the left panel. In the Allow access for: option, select All users, or specify individual user accounts for the fasp connections.
Once your client users have been notified of the port change (from TCP/22 to TCP/33001), you can modify /etc/services so that the only open SSH port is TCP/33001.
Note: Aspera recognizes that disabling the default SSH connection port (TCP/22) may affect your client users. When you change the port, ensure that you advise your users on configuring the new port number. Basic instructions for specifying the SSH port for fasp file transfers can be found below. To change the SSH port for Aspera Client, click Connections on the main window, and select the entry for your computer. Under the Connection tab, click Show Advanced Settings and enter the SSH port number in the SSH Port (TCP) field.

To make an impromptu connection to TCP/33001 during an ascp session, specify the SSH port (33001) with the -P (capital P) flag. Please note that this command does not alter ascp or your SSH server's configuration.
$ ascp -P 33001 ...
-
Restrict user access
Restricting user access is a critical component of securing your server. By default, all user accounts are allowed to browse and read all files on the server. To limit a user's access to a portion of the system, set the account's shell to the Aspera secured shell (aspshell) and create a document root (docroot) for that user. The aspshell permits only the following operations:
- Run Aspera uploads and downloads to or from this computer.
- Establish connections in the application and browse, create, delete, rename or list contents.
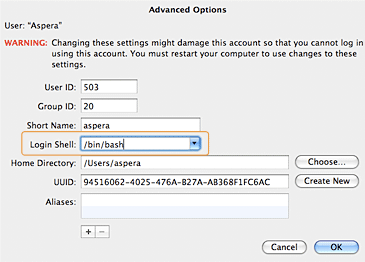
The following instructions demonstrate how to change a user account so that it uses the aspshell. Keep in mind that this is an example, and there may be other ways to do so for your system. Go to , select Click the lock to make changes and enter admin credentials to allow changes. Right-click the account to set up aspshell and select Advanced Options.
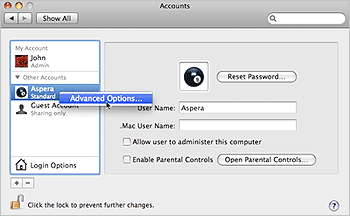
Under Advanced Options, locate Login Shell and replace the default value (/bin/bash) with /usr/bin/aspshell (note that the Mac installer creates a symlink between /usr/bin/aspshell and /Library/Aspera/bin/aspshell).
You can also restrict a user's file access by setting a Document Root (docroot). You can set a user's docroot from the product GUI by going to . Input a path in the blank field and ensure that Override is checked.


Once you have set the user's docroot, you can further restrict access by disabling read, write and/or browse. You may do so via the product GUI (as shown in the screenshot above).
Field Description Values Absolute Path The area of the file system (i.e. path) that is accessible to the Aspera user. The default empty value gives a user access to the entire file system. Path or blank Read Allowed Setting this to true allows users to transfer from the designated area of the file system as specified by the Absolute Path value. - true
- false
Write Allowed Setting this to true allows users to transfer to the designated area of the file system as specified by the Absolute Path value. - true
- false
Browse Allowed Setting this to true allows users to browse the directory. - true
- false