Product Setup

A walkthrough of the setup process.

Important: If this is a product upgrade, ensure that you have reviewed all prerequisites detailed under the topic "Before Upgrading."

Aspera Connect Server is a web-based file server that enables file access through a browser, and transfers files using the Aspera Connect browser plugin. Additionally, you can set up HTTP Fallback to establish HTTP- or HTTPS-based file transfers with clients that don't have fasp connectivity.

To install Aspera Connect Server, log into your computer with root permissions, and follow the steps below.

  1. Download the Aspera product installer

    Download the installer from the link below. Use the credentials provided to your organization by Aspera to access:

    If you need help determining your firm's access credentials, contact Technical Support.

  2. (For product upgrades) Ensure that you have prepared your machine to upgrade to a newer version.

    Although the Aspera Connect Server installer performs your upgrade automatically, we highly recommend completing the tasks identified in the topic "Before Upgrading." If you do not follow these steps, you risk installation errors or losing your former configuration settings.

  3. Run the installer

    When downloaded, double-click the installer package and start the installation. Follow the instructions to go through the installation process.

  4. Install the license
    Important: FOR OS X 10.7+: When running Enterprise Server for the first time, you will be prompted to install Java (since OS X 10.7+ does not come with the JRE pre-installed).

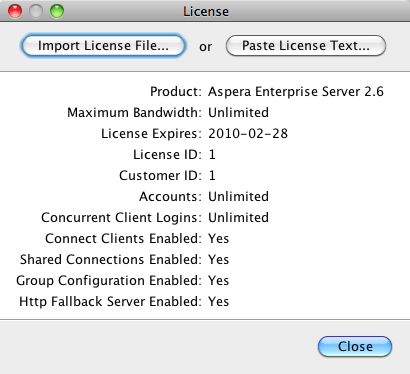
    If this is a fresh install, an Enter License window appears. Either click Import License File and select the license file, or Paste License Text to copy-and-paste the license file's content. When finished, the license information appears in the window. Verify that it is correct and click Close.

    The Enter License window.

    If you are updating your product license after the installation, refer to Updating the Product License.

  5. Review or update OpenSSH authentication methods

    Open your SSH Server configuration file with a text editor:

    /etc/sshd_config

    To allow public key authentication, set PubkeyAuthentication yes. To allow password authentication, set PasswordAuthentication yes. Here is a configuration example:

    ...
    PubkeyAuthentication yes
    PasswordAuthentication yes
    ...

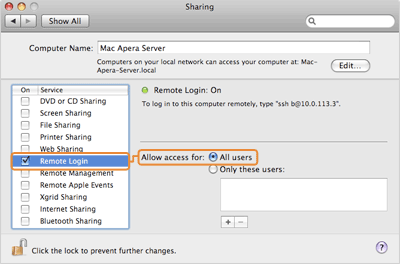
    When modified, restart SSH to apply new settings. Go to Apple menu > System Preferences > Sharing. Uncheck and then re-check Remote Login from the left panel. In the Allow access for: option, select All users, or specify individual user accounts for the fasp connections.

    Enable the remote login on 10.6+

    To further review your SSH Server's configuration to strengthen security, refer to Securing your SSH Server.

  6. (For upgrades) Check aspera.conf for errors

    When upgrading your Aspera product to a newer version, it is recommended that you check the aspera.conf configuration file for errors. Run the following command in a Terminal window to validate aspera.conf:

    $ /Library/Aspera/bin/asuserdata -v 
  7. Set up your new Connect Server's Web UI (or verify your Web UI settings after an upgrade).

    At this point, your Aspera transfer product is installed; however additional steps are required to configure the Web UI. Please continue to the Chapter "Connect Server Web UI Setup" and review the topics contained herein.

    Important: When upgrading from Connect Server versions older than 3.0, system-level security settings are not preserved and must be reconfigured. For instructions on enabling or disabling system-level security, please refer to the topic "Configuring Apache" (second-to-last step).