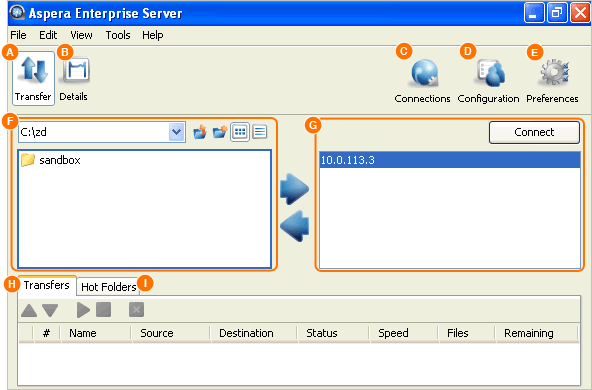
The Connect Server application Overview.
To launch the application, go to .
Note:
The Configuration button shown in the screenshots below is
only enabled when the application is run as an Administrator.

| Item | Description |
|---|---|
| A | The transfer mode. Reveal the local/remote file browsers. |
| B | The transfer details mode. Show the selected transfer session's details and the transfer control options. |
| C | Bring up the Connection Manager window to manage the remote endpoints. |
| D | Bring up the Server Configuration window to configure the computer's fasp transfer settings. |
| E | Set the local computer's default transfer settings such as the fasp global bandwidth and the number of simultaneous transfers in the queue, and the SMTP server's information for transfer notifications. |
| F | Browse the local file system to find files to transfer. |
| G | When not connected, this panel shows connections that lists the saved connections. When connected, it becomes the remote file browser. |
| H | Display previous, ongoing, and queued transfers. Manage the priority. |
| I | Display all configured Hot Folders. Start or manage Hot Folders. |
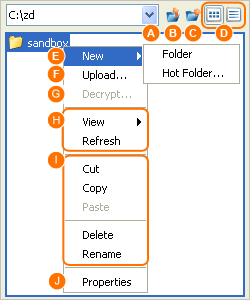
All options in the File Browser, including the file browser's contextual menu (Mouse right-click):

| Item | Description |
|---|---|
| A | Path indicator/selector. |
| B | Go to the parent directory. |
| C | Create a new folder, or set up a Hot Folder. |
| D | Choose between the list views and the detail view. |
| E | Create a new folder, or set up a Hot Folder. |
| F | Bring up the advanced upload or download window. |
| G | Decrypt the selected file if it is encrypted with the content protection. |
| H | Choose between the detail or the list views. Refresh the folder. |
| I | Options to manipulation the selected files. |
| J | Show the selected files' properties. |