The steps below show how to set up Connect Server as a transfer server for Shares. The procedure assumes you have already set up your Shares application. For general information on setting up a transfer server (using the Node API), see Managing the Node API.
-
Install Enterprise/Connect Server.
Follow the instructions in Standard Installation to install Connect Server either locally (on the same host as Shares) or remotely.
The steps below must be performed with administrator permissions.
-
Create a Node API username.
Aspera's Web applications authenticate to the remote node service using a Node API username and password. The following command creates a Node API user/password and associates it with a file transfer user, asp1, which you will create in the next step. The Node API credentials can then be used to create nodes. Note that different nodes may use different Node API username/password pairs.
> asnodeadmin.exe -a -u node_api_username -p node_api_passwd -x asp1Note that adding, modifying, or deleting a node-user triggers automatic reloading of the configuration and license files, as well as the user database.
-
Create a file transfer user.
The file transfer user authenticates the actual ascp transfer, and must be an operating system account on the node. Create a transfer user—for example, asp1—on your operating system (Control Panel > User Accounts). (Creating a user account requires administrator permissions.)
Note: After creating a Windows user account, log in as that user as least once in order for Windows to set up the user's home folder—for example, C:\Users\asp1. Once the user's home folder has been created, log back in as an administrator and continue the steps below.After you've created the operating system account, set up this user in Connect Server. For instructions on setting up a user, see .
Note: The file transfer user requires a docroot. After setting a user's docroot, be sure to perform a reload, as described in aspera.conf for Nodes.CAUTION:Aspera recommends that you not use spaces in your docroot. If your docroot contains spaces, you may not receive all email notifications relating to transfer activity. -
Copy the public key to the transfer user’s SSH file.
For example, if the file transfer user is asp1, the standard location for the public key is in the user's home folder, as follows:
Windows XP, 2003 C:\Documents and Settings\asp1\.ssh\authorized_keys Windows Vista, 2008, 7, 8 C:\Users\asp1\.ssh\authorized_keys The Aspera-provided key file is located in:
C:\Program Files [(x86)]\Aspera\Enterprise Server\var\aspera_id_dsa.pub
Open a command prompt window and run the following commands to create the user's public key folder:
> cd user_home_folder
> md .ssh
Use a text editor to create the following file (with no file extension), if the file does not already exist:
user_home_folder\.ssh\authorized_keys
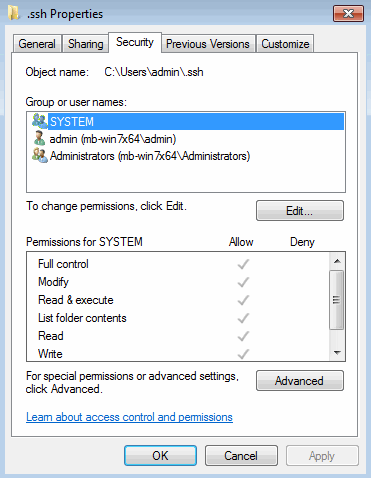
Copy the contents of aspera_id_dsa.pub to the authorized_keys file. Update the folder permissions in Windows Explorer by right-clicking the .ssh folder, selecting Properties, and then selecting the Security tab. Here, you can set permissions to read, write, and execute (full control).

-
(Optional) Change HTTPS port and/or SSL certificate.
The Aspera Node API provides an HTTPS interface for encrypted communication between node machines (on port 9092, by default). To modify the HTTPS port, see aspera.conf for Nodes. For information on maintaining and generating a new SSL certificate, see Setting up SSL for your Node(s).
-
Modify aspera.conf
Make the following changes in the aspera.conf file, located in C:\Program Files [(x86)]\Aspera\Enterprise Server\etc:
- In the <central_server> section, look for <persistent_store> and be sure that it is set to enable (the default value). This setting allows the retention of historical transfer data used by the stats collector.
- In the <server> section, look for the <server_name> tag, and replace server_ip_or_name with the name or IP address of your server. If the <server> section does not exist, create it.
<central_server>
    <persistent_store>enable</persistent_store>
</central_server>
<server>
    <server_name>server_ip_or_name</server_name>
</server>
Whenever you change these settings, you must restart asperacentral and asperanoded.
To restart these services, go to Control Panel > Administrative Tools > Services, right-click Aspera Central and Aspera NodeD, and select Restart.
-
In aspera.conf, enable token authorization for transfer users.
If you haven't done so already, set up the transfer user with an SSH public key as described in Setting Up Token Authorization.
In your aspera.conf file, add an authorization section for a transfer user as shown for the user asp1 in the example below. The authorization section should specify the following:
- a <transfer> section specifying that both incoming and outgoing transfers (in and out) should use token encryption
- a <token> section with an encryption key, which is a string of random characters (at least 20 characters recommended).
<user>
    <name>asp1</name>
        <authorization>
            <transfer>
                <in>
                    <value>token</value>
                </in>
                <out>
                    <value>token</value>
                </out>
            </transfer>
            <token>
                <encryption_key>gj5o930t78m34ejme9dx</encryption_key>
            </token>
        </authorization>
        <file_system>
              ...
              ...
        </file_system>
</user>
Alternatively, you can configure token-authorization settings in a <group> section to be applied to all users in the group. Or, you can configure the settings in the <default> section to apply them globally for all users.
For additional details on configuring token authorization, see Setting Up Token Authorization.
-
Ensure that the firewall is set up correctly on your transfer server
For details, see Configuring the Firewall.