You can use Drive to collaborate across your team, with clear "ownership" while a user is editing a document. With the checkin/checkout feature, users check out a copy of a file, make local changes, and then check in the edited file. While the first user has the file checked out, other users can view but not modify the master copy.
Basic Checkin/Checkout Workflow
- In Windows Explorer, navigate to Aspera Drive > FilesAccountName > workspaceName to the file you want to work on.
- Right-click the file and select Check out.
When you do this, Drive downloads a copy of the file to your local computer and places a lock on it, so that others can't edit it until you check it back in.
The file opens in the default application for that file type.
- Edit the file and save your changes.
- Back in Windows Explorer, check in the file. There are two ways to do this:
- In the Files location where you checked out from, right-click the file and select Check in.
- In Aspera Drive > My Checkouts, right-click the file and select
Check in.
Note: If My Checkouts does not appear in Explorer, either
- You do not have any files checked out.
or
- You need to refresh the Explorer window.
- You do not have any files checked out.
When you check in the file, Drive uploads your edited copy to the Files workspace and releases the lock. Now others can see or check out the version with your changes.
Checking Out Files from Within an Application
In addition to checking out files from Windows Explorer, you can also check out files while you are working in an application (such as Word, Photoshop, Notepad, or any other common application).
To check files out from within an application, do the following:
- Select File > Open.
- Browse to Aspera Drive > account_name and navigate to the file you want to work on.
- Click Open.
When you open a file in this way, you are also checking it out through Drive.
Reverting a Checkout
- Go to My Checkouts.
- Right-click the checked-out file and select Revert.
Drive alerts you that reverting will discard any changes you have made to the file.
- Click Yes to finish.
Checkout Versus Open
Opening a file through Drive and checking it out look very similar in behavior: in both cases, Drive downloads a local copy to your computer and opens it in the default application. But with checkout, Drive also places a lock on the file so that other users cannot edit it.
If you double-click a file, this opens it but does not check it out. Take care to note the difference in your collaboration workflow.
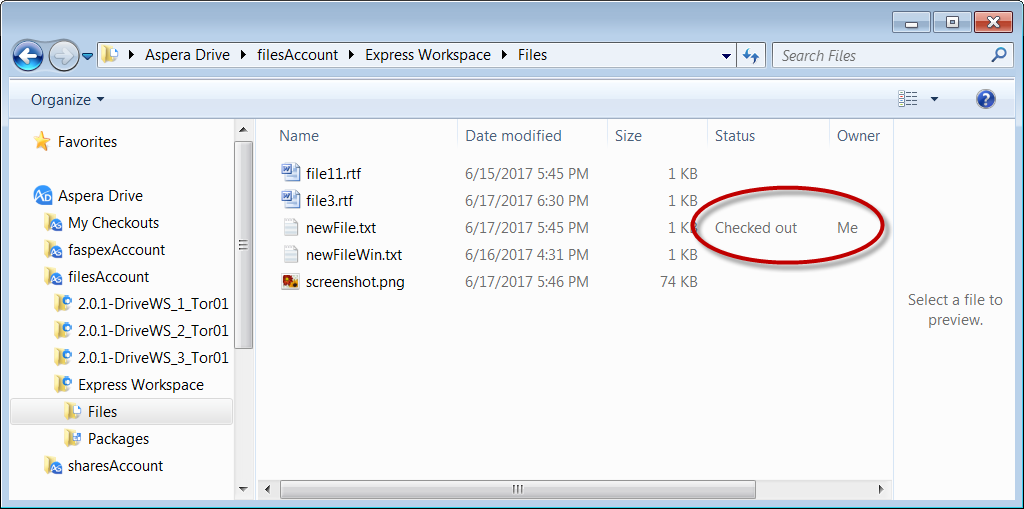
Viewing File Locks
You can use Drive to see who has a particular file checked out from the Files repository.
- In Windows Explorer, navigate through Files to the location of the content you want information about.
- Select it.
The entry in Windows Explorer shows you which user has checked out the file.