
Aspera faspex Administrator Guide
All Platforms
Version 1.5.2
- Chapter 1 Introduction
- Chapter 2 Getting Started
- 2.1 faspex Overview
- 2.2 Manage your faspex Account
- 2.3 Configure the Server
- Chapter 3 Administration
- 3.1 faspex Users
- 3.2 faspex Workgroups
- 3.3 Packages
- 3.4 Post-Processing
- 3.5 Email Notifications
- Chapter 4 Transfer Files
- Download Packages
- Send Packages
- Appendix 1 Restart faspex
- 2 The Log Files
1. Introduction
Aspera faspex is a file exchange application that built upon Aspera Enterprise Server for centralized transfer solution. With a web-based graphical user interface, faspex allows more advanced management options for fasp high-speed transfer to match your organization's workflow. faspex provides the following features:
- fasp™ transport server
- Installed upon the Enterprise Server, a transport server that handles fasp™ connections.
- Web- and Email-based Interface
- Simple web and email interface for exchanging files and directories.
- Package Forwarding
- A permitted user can forward packages on the server to others without re-transferring.
- Permission Management
- Manage user permissions through workgroup assignment or direct-configuration.
- Post-Processing
- Execute custom scripts after a transfer when certain conditions are met.
- Email Notification
- Customizable Email Notification of faspex events such as when receiving a package.
The most up-to-date document can be found at http://asperasoft.com/support/documentation/faspex.
For further assistance, please contact us at http://asperasoft.com/support.
2. Getting Started
2.1 faspex Overview
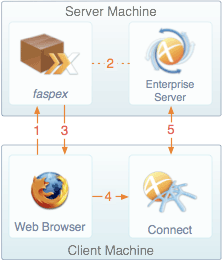
2.1.1 faspex Transfer Overview
The faspex Transfer is illustrated step-by-step in Figure 1:
|
- 1. User opens faspex website through web browser. faspex website will trigger the Aspera Connect on the client's computer.
- 2. When the user successfully logged in, faspex communicates with Aspera Enterprise Server to acquire the file and directory information.
- 3. faspex returns either the file listing or the upload screen to the client.
- 4. When the user clicks on a file's download link, or initiates a file upload, the browser passes the transfer information to the Aspera Connect.
- 5. Once Aspera Connect receives the transfer information, it establishes a connection with the server's Enterprise Server and start the file transfer.
|
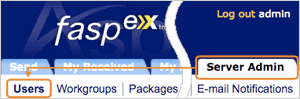
faspex menu includes six options to administrators:

- Send
- To send a file package.
- My Received
- Lists all the file packages you have received.
- My Sent
- Lists all the file packages you have sent
- Workgroup Packages
- Lists all the file packages sent to your workgroups.
- Preferences
- Configure your account preferences.
- Server Admin
- Configure and manage the faspex.
2.2 Manage your faspex Account
Follow these steps to log in and manage your faspex user account:
- Step 1 Install Aspera Connect
-
faspex requires having Aspera Connect installed on your computer to start transfers. You can download it at http://asperasoft.com/connect.
You cannot transfer files using faspex if you are running on the machine that hosts it.
- Step 2 Log in faspex
-
To start faspex, bring up a web browser and enter the faspex's address. For example:
faspex address:
http://10.0.0.10/aspera/faspexUsername:
adminPassword:
aspera
- Step 3 Modify the account information
-
When logged in, go to Preferences from the faspex menu. You can change the following info:
-
E-mail Settings
- E-mail address
- The Email address to receive faspex notifications.
- E-mail me when I receive a package
- Check to have faspex notify you of new packages through email.
- E-mail me when someone first downloads a package I sent
- Check to receive notification when the package you sent is downloaded the first time.
-
Lists
- Max row per page
- Set how many rows of entry to display in one faspex page.
-
Change Password
- New Password / Confirm Password
- Enter the new password in both fields, then click Update Password.
It is strongly recommended to change the default password the first time you log in.
To configure faspex, go to Server Admin from the faspex menu. The server-related settings are located in the following tabs:

faspex Server
Configuration options for the faspex web applicationAspera Central Server
fasp™ transport options
- Address and Ports
-
- Server's external address or name
Enter the faspex Server's IP address or domain name. For example, myfaspex.com. faspex users can access the server through http://myfaspex.com/aspera/faspex.
- HTTP Port
Specify the port number for HTTP connection. (Default: 80)
- HTTPS Port
Specify the port number for Secure HTTP (HTTPS) connection. (Default: 443).
- Enable alternate address
Specify an alternative address. When checked, enter the server's address in the specified field.
- Display Settings
-
Date display format:
Enter the date format that faspex uses. The following list shows the variables can be used, the display examples, and the their description:
%A Sunday
The weekday name.%a Sun
The abbreviated weekday name.%B January
The month name.%b Jan
The abbreviated month name.%m 01~12
Month of the year.%d 01~31
Day of the month.%j 001~366
Day of the year.%Y 2009
The year.%y 09
The abbreviated year.
- Package Files
-
-
Package Directory
Enter the directory that faspex uses to store all the file packages.
- Windows
- C:\faspex\faspex_packages
- Linux
- /home/faspex/faspex_packages
-
Package path prefix
The prepended string to the uploaded packages' directory pathname. For example, if the string PKG - is used, an uploaded package named textFiles will be stored in the path PKG - textFiles.
-
Automatically delete packages
When checked, the packages will be deleted from server automatically after the specified number of days.
- Security
-
-
Session timeout
Sessions will timeout after the specified number of minutes of inactivity.
-
Deactivate users
Deactivate the user account when the login attempts fail under specified circumstance.
-
Prevent concurrent login
When checked, users can only be logged in from one client at a time.
-
Use strong passwords
Require new user passwords to contain at least one letter, one number, and one symbol; existing passwords will remain valid.
-
Use Encryption-at-Rest
When checked, users will be required on upload to enter a password to encrypt the files on the server.
-
Allow sending packages to outside email addresses
When checked, packages can be sent to people not set up as faspex users.
Package link expires
When checked, the package link sent to outside email address does not remain valid forever.
- Expire after:
Number of days before package link expires.
- Expire after successful download:
When checked, package is only downloadable once.
- SOAP
-
faspex SOAP listener URI
The address for Aspera Central to connect to.
(default: http://127.0.0.1:3000/direct_aspera_observer/api)
- General
-
-
System user
Enter the system user's name that you have configured for faspex file transfers. The default name is faspex. You can go to the following locations to look up the user name:
- Windows
- Start Menu > All Programs > Aspera > Aspera Enterprise Server > User Manager. Under Users.
- Linux
- ...
-
SSH TCP port
Set the TCP port for SSH connection sessions. (Default: 22)
-
fasp UDP port
Set the UDP port for fasp file transfers. (Default: 33001)
-
Server external address or name
Enter the faspex Server's IP address or domain name. For example, if the value is myfaspex.com, faspex users can access the server using the address http://myfaspex.com/aspera/faspex.
-
Enable alternate address
If it is impossible to set up a fully qualified domain name that resolves to the appropriate address, you can enable this feature to set up a secondary address for the faspex server. All Email notifications and links will be replaced. When checked the option, enter the following information:
- Address or name
Enter the alternative address.
- Client address
If the client's address matches this, assign the alternate address.
- Requested server address or name
If the requested server address matches this, assign the alternate address.
Alternative Address Example 1:
If the user is access the faspex server from internal (192.168.1.* subnet), use the faspex server's internal IP address (192.168.1.111)
Server's external address or name:
faspex.mycompany.comAddress or name:
192.168.1.111Requesting client address:
192.168.1.*Requested server name or address:
<blank>
Alternative Address Example 2:
If the user is accessing the faspex server with url 'https://faspex.mycompany.com', use this address instead of IP address.
Server's external address or name:
192.168.1.111Address or name:
faspex.mycompany.comRequesting client address:
blankRequested server name or address:
faspex.mycompany.com
- HTTP Fallback Settings
-
- Enable HTTP fallback
If you have HTTP Fallback configured during the faspex installation, check this option to enable the HTTP Fallback feature. Refer to the installation guide for your platform to set up the HTTP Fallback feature.
- HTTP fallback port
Specify the TCP port for Http Fallback file transfer. Default HTTP transfer uses 80.
- Transfer Encryption
-
Encrypt transfers
When checked, fasp™ transfers will use AES-128 transfer encrypted for higher security, which requires additional transfer time, or none for higher transfer speed.
- Default User Transfer Settings
-
-
Initial Transfer Rate
Specify the default transfer rate for all fasp™ transfers on faspex. Enter the value in both Upload Rate and Download Rate. To disable the user's control of minimum transfer rate and transfer policy, check the option Lock minimum rate and policy.
-
Maximum Allowed Rate
Specify the maximum transfer rate allowed for all fasp™ transfers on faspex. Enter the value in both Upload Rate and Download Rate.
- Server-to-Server Relay Transfer Settings
-
If you have more than one faspex server in your organization and have faspex's server-to-server relay set up, specify both the outgoing and incoming bandwidth between servers. To set up the server-to-server relay, please contact Aspera Support.
- SOAP Connection to Central
-
If faspex and Aspera Enterprise Server are not running on the same machine, you can use the following options to configure the SOAP connection between the Aspera Central on Enterprise Server and faspex:
- Protocol
The protocol for SOAP connection. (Default: http)
- Server Address
Specify the address of the machine that runs Aspera Enterprise Server. (Default: localhost, Aspera Central is on the same machine)
- SOAP Port
Specify the port for SOAP connection. (Default: 40001)
- Aspera Connect Version
-
Enforce minimum Connect version
When checked, warn the users to install the minimum Connect version specified in the text fields in order to enable certain faspex features.
3. Administration
3.1 faspex Users
A faspex user is a login account for Aspera faspex and consists of specified permissions. You can modify the following user permissions to implement faspex into your organizational workflow:
- Download packages
- Upload packages
- Forward packages
- Send packages to external email
- Send packages to all faspex users instead of only your workgroup members
|
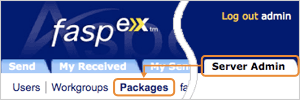
To access all faspex user management options, go to Server Admin in the faspex menu, and locate the Users tab. The following tasks are performed under this page.
|
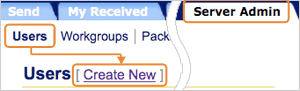
3.1.1 Create a new user account
|
To create a new user account, click the Create New under the Users tab.
The following table contains all options in the Create New User form. When finished, click Create:
|
- Account Details
-
- Login (Required)
Enter the account's login name.
- Administrator
Check this option if this is an administrator account.
- Password (Required)
Enter the account's password. You can enable the Use strong password option in the faspex Server configuration to require a more secured combination. Refer to 2.3 Configure the Server.
- Confirm Password (Required)
Repeat the account's password.
- Password expires
Check the option to expire the password every specified number of days.
- Account active
Check this option to enable this account.
- Account expires
Check the option to expire the account on the specified date.
- Comments
Enter the account's comments.
- User Permissions
-
- Package Uploads
Allow the user to upload file packages.
- Package Downloads
Allow the user to download file packages.
- Package Forwarding
Allow the user to forward file packages he or she received to other users. The package will be made accessible to the forwarded users on faspex.
- Sending to external email
Allow the user to send a download link to external emails.
- Sending to all faspex users
Allow the user to send file packages to all faspex users, as opposed to only able to send packages to the user's workgroup members.
- Allowed IP address for login
Specify the accepted IP address of the computer which the user uses to log in faspex. Wildcard (asterisk, *) can be used in this option, such as 192.168.10.*. To allow multiple IP addresses, use commas to separate.
- Allowed IP address for download
Specify the user's IP address permitted to download file packages. Wildcard (asterisk, *) can be used in this option, such as 192.168.10.*. To allow multiple IP addresses, use commas to separate.
- Allowed IP address for upload
Specify the user's IP address permitted to upload file packages. Wildcard (asterisk, *) can be used in this option, such as 192.168.10.*. To allow multiple IP addresses, use commas to separate.
- Personal Details
-
- First Name (Required)
Enter the user's first name.
- Last Name (Required)
Enter the user's last name.
- E-mail (Required)
Enter the user's e-mail address. This e-mail will be used to receive the faspex E-mail notifications.
To modify the E-mail template, refer to 3.5 E-mail Notifications.
- E-mail cc: list for "package received" notifications
Enter the emails that you want to copy the user's faspex notifications. Use separate lines for each email address.
- Transfer Settings
-
- Overwrite default settings
Check this option to specify this user account's transfer settings. When checked, specify the Initial Transfer Rate and the Maximum allowed rate. For default settings, refer to 2.3 Configure the Server, Aspera Central Server Configuration section.
- Welcome E-mail
-
- Send welcome message
Check this option to send a faspex welcome E-mail to the user when the account is created.
To modify the E-mail template, refer to 3.5 E-mail Notifications.
- Include password
Include this account's password in the welcome E-mail.
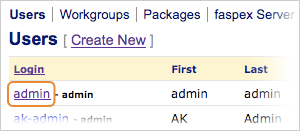
3.1.2 Manage user accounts
|
To manage existing user accounts, go to Server Admin from the faspex menu, and click Users. Click a login name to modify its settings.
|
|
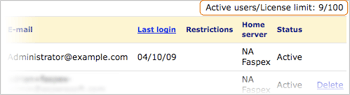
The maximum user accommodation in faspex is restricted by the license. To review the account usage, find the faspex account usage. at the upper-right of the user listing.
|
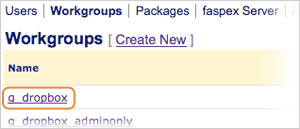
3.2 faspex Workgroups
faspex uses workgroups to manage users' permissions. To access all faspex workgroup management options, go to Server Admin in the faspex menu, and locate the Workgroups tab. The following tasks are performed under this page.
3.2.1 Create a New Workgroup

|
To create a new workgroup, go to faspex menu's Server Admin > Workgroups and click Create New.
The following table contains all options in the Create New Group form. When finished, click Create:
|
- Workgroup Details
-
- Name (Required)
Enter the workgroup's name.
- Description
Type in the workgroup's description.
- Workgroup Permissions
-
- Workgroup Type Select the workgroup type among the four options:
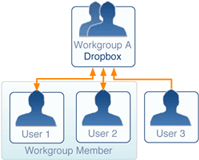
1. Dropbox
All faspex users (User1, User2 and User3) can upload file packages to the dropbox workgroup, regardless of the user's membership.
Members of this workgroup (User1 and User2) can download files from it.
|
|
|
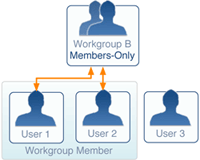
2. Members-Only
Only members of this group (User1 and User2) can upload file packages to the members-only workgroup.
Members of this workgroup (User1 and User2) can download files from it.
|
|
|
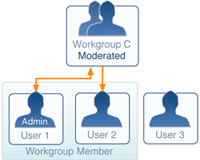
3. Moderated
Only the faspex administrators or this workgroup's administrators (User1) can upload file packages to the moderated workgroup.
Members of this workgroup (User1 and User2) can download files from it.
|
|
|
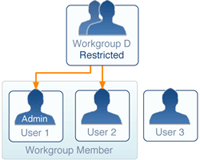
4. Restricted
No one can upload file packages to the restricted workgroup.
Members of this workgroup (User1 and User2) can download file packages from it.
|
|
- Sending to Other Members
Select the workgroup's access to other members permissions:
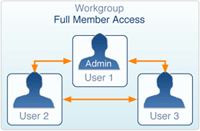
1. Full
This permission setting allows all workgroup members to send file packages to other individuals in the same workgroup.
|
|
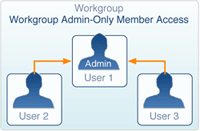
2. Workgroup Admin-Only
In this permission setting, workgroup members can only send file packages to the workgroup administrator, and the workgroup administrator cannot send to workgroup members.
|
|
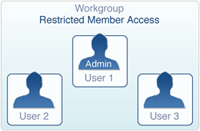
3. Restricted
In this setting, all workgroup members cannot send file packages to other individual workgroup members.
|
|
- Member Management
-
This section defines the workgroup administrator's management permissions. If both options are un-checked, this workgroup 's administrator will not have permissions to add or remove members.
- Add/remove existing users as members
The workgroup administrator can add existing faspex users to this workgroup.
- Create/remove new users as members
The workgroup administrator can create new faspex users to this workgroup.
3.2.2 Manage Workgroups
|
You can edit the existing groups by going to the Server Admin > Workgroups, and clicking the name of the workgroup to edit.
|
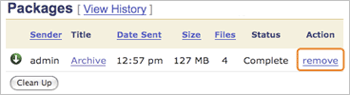
3.3 Packages
All packages sent through faspex will be stored on the faspex server, and the package files will be kept on the server for a certain days depending on the settings.
|
To manage the packages, go to faspex menu's Server Admin -> Packages.
The following diagram shows all items in this page:
|
- A Download Icon
- Click the icon to download the complete package.
- B Forward this Package
- Click to forward this package to others if your account has proper permission.
- C Details
- This box shows the package's information and download activity.
- D Browse and Download Contents
- Browse and Download Contents Click to navigate into the folders contained in this package, and select individual files, click Download Selected to download only selected files.
To view a package's information, click a package title. The general items in the page is shown below:
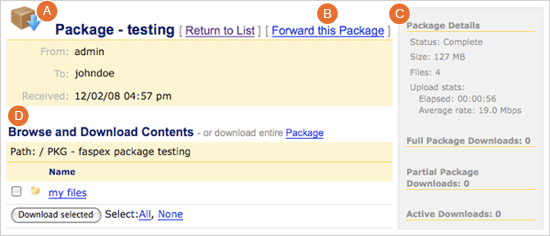
- A Download Icon
- Click the icon to download the complete package.
- B Forward this Package
- Click to forward this package if your account has proper permission.
- C Details
- This box shows the package's information and download activity.
- D Browse and
Download Contents
- Click to navigate into the folders contained in this package, and select individual files, click Download Selected to download only selected files.
3.4 Post-Processing
faspex allow the administrator to specify custom scripts to be executed automatically on the package when a package completes uploading, such as virus checking, moving files, and create backup.
The post-processing uses a set of filtering options to determine when to execute the customized scripts. faspex can execute shell scripts and Windows batch scripts, you can use the pre-defined environment variables to set up the scripts.
3.4.1 Prepare the Script
To set up the post-processing, a script should be generated and placed on the machine that runs faspex.
When the script is created, store it in the server that runs the faspex. Prepare the script's full path to configure the post-processing in faspex.
The following environment variables can be used in the script, use the variables in the script's variable form, for example the variable faspex_pkg_directory will be available as $faspex_pkg_directory in shell scripts, and %faspex_pkg_directory% in Windows batch:
faspex_pkg_directory
Storage directory of the packagefaspex_pkg_name
Title of the packagefaspex_pkg_note
Note of the packagefaspex_pkg_id
Id of the packagefaspex_recipient_list
Comma-separated list of recipients (e.g. "admin, johndoe")faspex_recipient_count
Number of recipients (e.g. "3")faspex_recipient_i
Name of the recipientfaspex_sender_id
Id of the senderfaspex_sender_name
Name of the senderfaspex_sender_email
E-mail of the senderfaspex_pkg_total_bytes
Size of the package in bytesfaspex_pkg_total_files
Number of files in the packagefaspex_pkg_uuid
uuid of the package
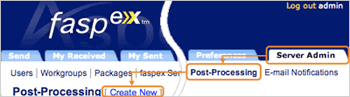
3.4.2 Configure the Post-Processing
|
To add a post-processing script, go to the Server Admin from the faspex menu, and click Post-Processing. Click Create New from the page.
Each option in the Add New Script form:
|
- Script to run
-
- Execution criteria
-
All specified criteria must match the uploaded package's attributes for the script to be run on that package. All options in this section are optional. When the Exact match is checked, the package attribute has to match the specified criterion exactly for the script to be run.
- Package name
Execute when the package name matches the string.
- Sender name
Execute when the sender name matches the string.
- Sender email
Execute when the sender email matches the string.
- Recipient name
Execute when the recipient name matches the string.
- Recipient email
Execute when the recipient email matches the string.
- Package note
Execute when the package note matches the string.
- Package date
Execute when the package date falls into the determined range.
- Package size
Execute when the package size falls into the determined range.
- Package file count
Execute when the package file count falls into the determined range.
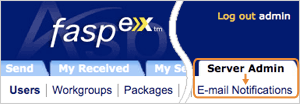
3.5 E-mail Notifications
faspex generates E-mail messages automatically to notify the newly created accounts and delivered packages.
|
To configure, go to Sever Admin from the faspex menu and click the E-mail Notifications.
|
Under Email Notifications tab contains a Configuration and five templates. First click the Configuration to set up the email server.

|
faspex supports four types of SMTP authentication options: open, login, POP before SMTP, and manual config.
It is recommended that you choose the manual config option, as it sends email more quickly than the other options. manual config uses a software utility called msmtp, the full documentation of msmtp is located at http://msmtp.sourceforge.net/doc/msmtp.html.
|
To debug the mail configuration, Enter your email address in the field next to the button Save and send test email and click the button.
			account default

			auth off

			tls off

			host your.smtp.server.com

			port 25

			from faspex@your.domain.com
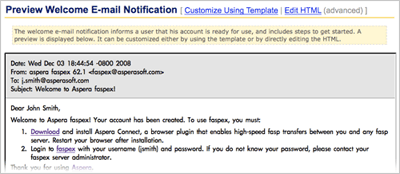
3.5.2 Modify the E-mail Templates
There are five email templates for different purposes: Welcome, Forgot Password, Package Received, Package Downloaded, and Workgroup Package. All templates use the same editing interface and only vary in content, we will use Welcome template as an example. Under Server Admin > Email Notifications click Welcome, you will see the following template preview:
|
The email notifications can be modified through template mode or HTML code. Click Customize Using Template or Edit HTML to edit in the selected mode.
The following variables can be used to compose the specific email template:
|
- Welcome
-
-
USER_NAME Full name of the e-mail recipient.
-
SERVER_ADDRESS Name or IP of the faspex server.
-
LOGIN Login name of the e-mail recipient.
- Forgot Password
-
-
USER_NAME Full name of the e-mail recipient.
-
LOGIN Login name of the e-mail recipient.
- Package Received
-
-
SENDER_NAME Full name of the sender of the package.
-
SENDER_EMAIL Email address of sender.
-
SENDER_LOGIN Login name of sender.
-
USER_NAME Full name of the e-mail recipient.
-
PACKAGE_NAME Name of the package sent to the e-mail recipient.
-
PACKAGE_URL Link to the package on the faspex server.
-
PACKAGE_DATE Time package was sent.
-
PACKAGE_SIZE Size of the data in the package.
-
PACKAGE_FILES Number of files in the package.
-
PACKAGE_NOTE Message associated with the package.
- Package Downloaded
-
-
DOWNLOADER_EMAIL Email of the user who downloaded the package.
-
DOWNLOADER_NAME Name of user who downloaded the package.
-
DOWNLOADER_LOGIN Login name of user who downloaded the package.
-
SENDER_NAME Full name of the sender of the package.
-
PACKAGE_NAME Name of the package sent to the e-mail recipient.
-
PACKAGE_URL Link to the package on the faspex server.
-
PACKAGE_DATE Time package was sent.
-
PACKAGE_SIZE Size of the data in the package.
-
PACKAGE_FILES Number of files in the package.
-
PACKAGE_NOTE Message associated with the package.
- Workgroup Package
-
-
USER_NAME Full name of the e-mail recipient.
-
WORKGROUP_NAME Name of the workgroup the package was sent to.
-
SENDER_NAME Full name of the sender of the package.
-
SENDER_EMAIL Email address of the sender of the package.
-
SENDER_LOGIN Login name of the sender of the package.
-
PACKAGE_NAME Name of the package sent to the e-mail recipient.
-
PACKAGE_URL Link to the package on the faspex server.
-
PACKAGE_DATE Time package was sent.
-
PACKAGE_SIZE Size of the data in the package.
-
PACKAGE_FILES Number of files in the package.
-
PACKAGE_NOTE Message associated with the package.
4. Transfer Files
4.1 Download Packages
You may receive and download the faspex file packages sent directly to you, or sent to your workgroup. This section shows you how to download packages you have received, and the package sent to your workgroup.
4.1.1 Download Received Packages
|
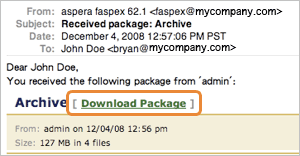
When a package is sent to you over faspex, an email notification containing the download link may be sent to your email address. If the email contains the download link, the link will open the package's down page on faspex:
|
|
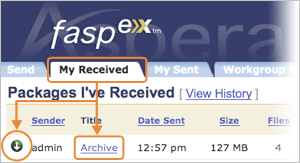
To locate the package you have received, log in faspex and go to My Received from the faspex menu to open the package list. You can download the complete package by clicking the  (Download button), or click the package name to advance to the package detail page. (Download button), or click the package name to advance to the package detail page.
In the package detail page, the general items in the page is indicated in the following graph:
|
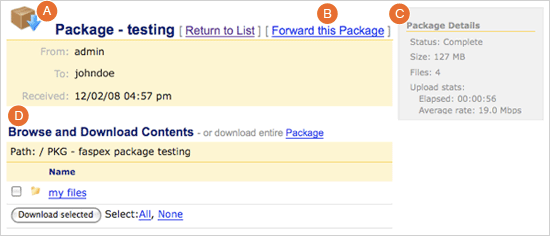
- A Download Icon
-
Click the icon to download the complete package.
- B Forward this Package
-
Click to forward this package to others if your account has proper permission.
- C Details
-
This box shows the package's information and download activity.
- D Browse and
Download Contents
-
Click to navigate into the folders contained in this package, and select individual files, click Download Selected to download only selected files.
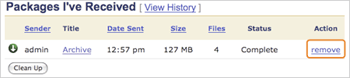
4.1.2 Remove Received Packages
|
The files in the packages you have received can be removed by the faspex's expiration settings, the administrators, or by you. In the My Received list, click the Remove to delete the files of the corresponding package.
|
|
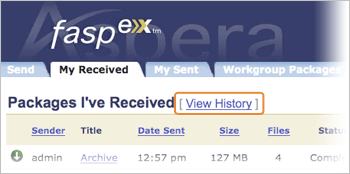
To view the log of all packages you have received regardless of the existence of files they contain, click the View History from the My Received package listing page.
|
4.1.3 Download Workgroup Packages
|
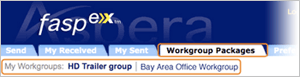
If you are a member of a faspex workgroup, you can access the workgroup and download its packages. To do so, go to the Workgroups from the faspex menu. Click the workgroup to access.
|
|
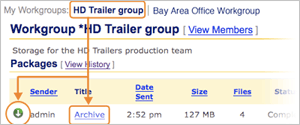
In a workgroup, you should see all the workgroup's packages listed in the table. Click the (Download button) to download the complete file package, or click the package name to go to the package detail page.
|
When clicking the package name from the list, faspex opens the package detail page. General items are indicated below:
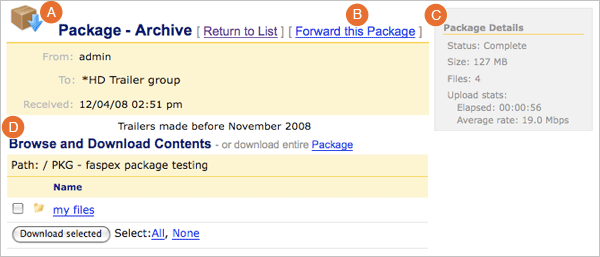
- A Download Icon
- Click the icon to download the complete package.
- B Forward this Package
- Click to forward this package to others if your account has proper permission.
- C Details
- This box shows the package's information and download activity.
- D Browse and
Download Contents
- Click to navigate into the folders contained in this package, and select individual files, click Download Selected to download only selected files.
|
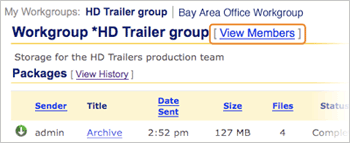
In the workgroup package listing page, click View Members to see all the workgroup members.
|
|
If you are an administrator of faspex or a particular workgroup, in the workgroup's package listing page you can click the Remove to delete the files of the corresponding package.
|
4.2 Send Packages

|
To send a file package through faspex, go to Send from the faspex menu.
The following graph shows all options in the Create and send package form. Click Send Package! when finished:
|
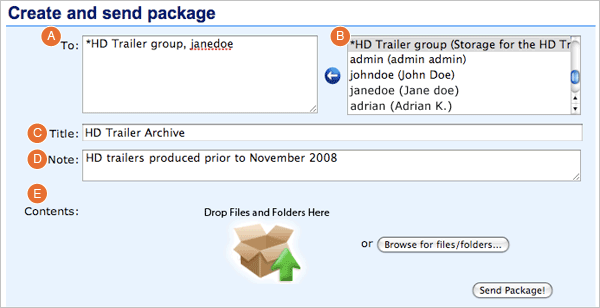
- A To:
- Enter individuals or workgroups as recipients. The workgroup's name starts with an asterisk (*).
- B Recipient List:
- Shows a list of recipient that you can send the packages. You can select the users or workgroups from this list and click
 (Left arrow) to add them as recipients.
- C Title:
- Enter the package's title.
- D Note:
- Enter the package's note.
- E Contents:
- Drag-and-drop the files to include onto the image, or click Browse for files/folders to browse and select files.
|
To send a file package through faspex, go to Send from the faspex menu.
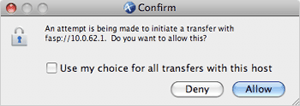
When a transfer is initiated, faspex will prompt the Aspera Connect to start the session. Click Allow when the confirmation dialog window appear.
|

|
You can access the packages you have sent by going to Sent from the faspex menu. Here you can review the packages you have sent. If a package isn't sent successfully, click  (Resume) to restart the transfer. (Resume) to restart the transfer.
|
Appendix 1. Restart faspex
If faspex is not working properly, it is recommended to restart faspex services. Follow the instructions for your platform:
- Step 1 Navigate into faspex's directory in Command Prompt
-
Open Command Prompt (Start > All Programs > Accessories > Command Prompt), enter the command to navigate into the faspex directory:
> cd "C:\Program Files\Aspera\Faspex"
- Step 2 Stop all services
-
In the faspex directory, execute the command:
> asctl faspex:all:stop
- Step 3 Start all services
-
Execute the command to start all services:
> asctl faspex:all:start
- Step 1 Navigate into faspex's directory in Command Prompt
-
Use the command to navigate into the faspex directory:
# cd /opt/aspera/faspex/asctl
- Step 2 Stop all services
-
In the faspex directory, execute the command:
# ./asctl faspex:all:stop
- Step 3 Start all services
-
Execute the command to start all services:
# ./asctl faspex:all:start
Appendix 2. The Log Files
You can find the Aspera faspex's log files in the directory:
- Windows
- C:\Program Files\Aspera\Faspex\log
- Linux
- /opt/aspera/faspex/log
Copyright 2009 © Aspera Inc. All Rights Reserved