
faspex User Guide
All Platforms
Version 1.5.2
- Chapter 1 Introduction
- Chapter 2 Getting Started
- 2.1 faspex Overview
- 2.2 Manage your faspex Account
- Chapter 3 Transfer Files
- 3.1 Download Packages
- 3.2 Send Packages
1. Introduction
Aspera faspex is a file exchange application that built upon Aspera Enterprise Server for centralized transfer solution. With a web-based graphical user interface, faspex allows more advanced management options for fasp high-speed transfer to match your organization's workflow. faspex provides the following features:
- fasp™ transport server
- Installed upon the Enterprise Server, a transport server that handles fasp™ connections.
- Web- and Email-based Interface
- Simple web and email interface for exchanging files and directories.
- Package Forwarding
- A permitted user can forward packages on the server to others without re-transferring.
- Permission Management
- Manage user permissions through workgroup assignment or direct-configuration.
- Post-Processing
- Execute custom scripts after a transfer when certain conditions are met.
- Email Notification
- Customizable Email Notification of faspex events such as when receiving a package.
The most up-to-date document can be found at http://asperasoft.com/support/documentation/faspex.
For further assistance, please contact us at http://asperasoft.com/support.
2. Getting Started
2.1 faspex Overview
2.1.1 faspex Transfer Overview
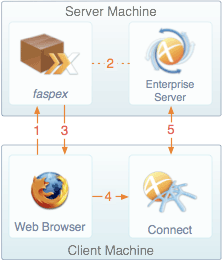
The faspex Transfer is illustrated step-by-step in Figure 1:
|
- 1. User opens faspex website through web browser. faspex website will trigger the Aspera Connect on the client's computer.
- 2. When the user successfully logged in, faspex communicates with Aspera Enterprise Server to acquire the file and directory information.
- 3. faspex returns either the file listing or the upload screen to the client.
- 4. When the user clicks on a file's download link, or initiates a file upload, the browser passes the transfer information to the Aspera Connect.
- 5. Once Aspera Connect receives the transfer information, it establishes a connection with the server's Enterprise Server and start the file transfer.
|
faspex menu includes six options to administrators:

- Send
- To send a file package.
- My Received
- Lists all the file packages you have received.
- My Sent
- Lists all the file packages you have sent
- Workgroup Packages
- Lists all the file packages sent to your workgroups.
- Preferences
- Configure your account preferences.
- Server Admin
- Configure and manage the faspex.
2.2 Manage Your faspex Account
Follow these steps to log in and manage your faspex user account:
- Step 1 Install Aspera Connect
-
faspex requires having Aspera Connect installed on your computer to start transfers. You can download it at http://asperasoft.com/connect.
You cannot transfer files using faspex if you are running on the machine that hosts it.
- Step 2 Log in faspex
-
To start faspex, bring up a web browser and enter the faspex's address. For example:
faspex address:
http://10.0.0.10/aspera/faspexUsername:
adminPassword:
aspera
- Step 3 Modify the account information
-
When logged in, go to Preferences from the faspex menu. You can change the following info:
-
E-mail Settings
- E-mail address
- The Email address to receive faspex notifications.
- E-mail me when I receive a package
- Check to have faspex notify you of new packages through email.
- E-mail me when someone first downloads a package I sent
- Check to receive notification when the package you sent is downloaded the first time.
-
Lists
- Max row per page
- Set how many rows of entry to display in one faspex page.
-
Change Password
- New Password / Confirm Password
- Enter the new password in both fields, then click Update Password.
It is strongly recommended to change the default password the first time you log in.
3. Transfer Files
3.1 Download Packages
You may receive and download the faspex file packages sent directly to you, or sent to your workgroup. This section shows you how to download packages you have received, and the package sent to your workgroup.
3.1.1 Download Received Packages
|
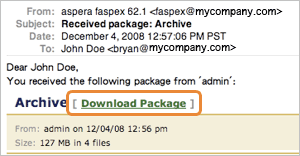
When a package is sent to you over faspex, an email notification containing the download link may be sent to your email address. If the email contains the download link, the link will open the package's down page on faspex:
|
|
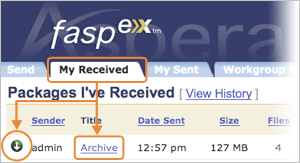
To locate the package you have received, log in faspex and go to My Received from the faspex menu to open the package list. You can download the complete package by clicking the  (Download button), or click the package name to advance to the package detail page. (Download button), or click the package name to advance to the package detail page.
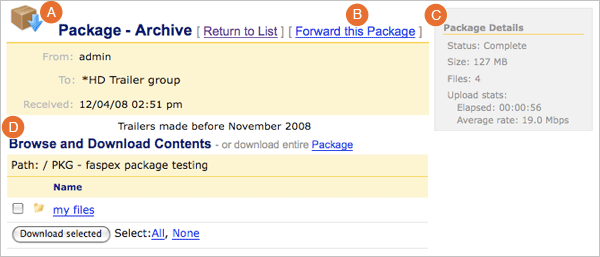
In the package detail page, the general items in the page is indicated in the following graph:
|
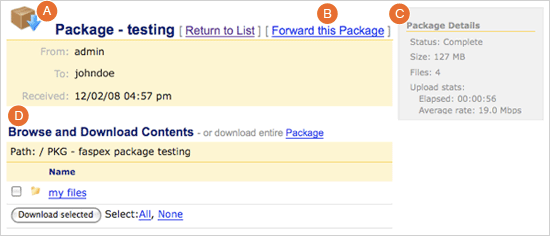
- A Download Icon
-
Click the icon to download the complete package.
- B Forward this Package
-
Click to forward this package to others if your account has proper permission.
- C Details
-
This box shows the package's information and download activity.
- D Browse and
Download Contents
-
Click to navigate into the folders contained in this package, and select individual files, click Download Selected to download only selected files.
3.1.2 Remove Received Packages
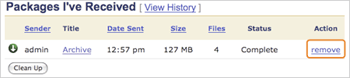
|
The files in the packages you have received can be removed by the faspex's expiration settings, the administrators, or by you. In the My Received list, click the Remove to delete the files of the corresponding package.
|
|
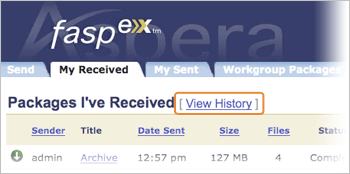
To view the log of all packages you have received regardless of the existence of files they contain, click the View History from the My Received package listing page.
|
3.1.3 Download Workgroup Packages

|
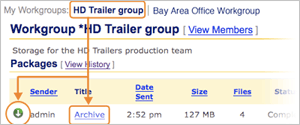
If you are a member of a faspex workgroup, you can access the workgroup and download its packages. To do so, go to the Workgroups from the faspex menu. Click the workgroup to access.
|
|
In a workgroup, you should see all the workgroup's packages listed in the table. Click the (Download button) to download the complete file package, or click the package name to go to the package detail page.
|
When clicking the package name from the list, faspex opens the package detail page. General items are indicated below:
- A Download Icon
- Click the icon to download the complete package.
- B Forward this Package
- Click to forward this package to others if your account has proper permission.
- C Details
- This box shows the package's information and download activity.
- D Browse and
Download Contents
- Click to navigate into the folders contained in this package, and select individual files, click Download Selected to download only selected files.
|
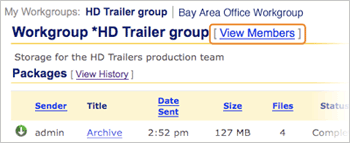
In the workgroup package listing page, click View Members to see all the workgroup members.
|
|
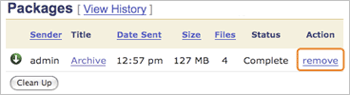
If you are an administrator of faspex or a particular workgroup, in the workgroup's package listing page you can click the Remove to delete the files of the corresponding package.
|
3.2 Send Packages

|
To send a file package through faspex, go to Send from the faspex menu.
The following graph shows all options in the Create and send package form. Click Send Package! when finished:
|
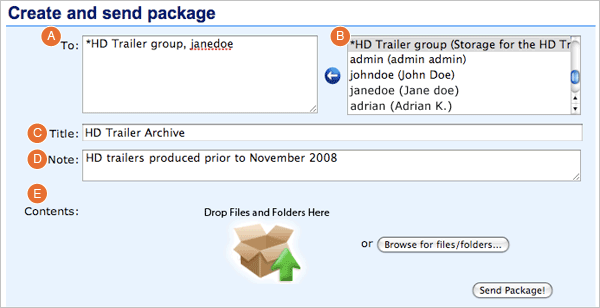
- A To:
- Enter individuals or workgroups as recipients. The workgroup's name starts with an asterisk (*).
- B Recipient List:
- Shows a list of recipient that you can send the packages. You can select the users or workgroups from this list and click
 (Left arrow) to add them as recipients.
- C Title:
- Enter the package's title.
- D Note:
- Enter the package's note.
- E Contents:
- Drag-and-drop the files to include onto the image, or click Browse for files/folders to browse and select files.
|
To send a file package through faspex, go to Send from the faspex menu.
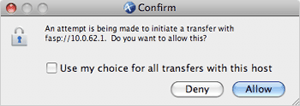
When a transfer is initiated, faspex will prompt the Aspera Connect to start the session. Click Allow when the confirmation dialog window appear.
|

|
You can access the packages you have sent by going to Sent from the faspex menu. Here you can review the packages you have sent. If a package isn't sent successfully, click  (Resume) to restart the transfer. (Resume) to restart the transfer.
|
Copyright 2009 © Aspera Inc. All Rights Reserved