
faspex Installation Guide
Windows XP/2003
Version 1.6.1
- Chapter 1 Introduction
- Chapter 2 Install faspex
- 2.1 Prepare the System
- 2.2 Installation
- 2.3 Generate the SSL Certificate
- 2.4 Configure the Web Server
- Appendix 1 Restart faspex
- 2 The Log Files
- 3 Reset the faspex Admin Password
- 4 faspex Commands
- 5 Uninstall faspex
- 6 Backup faspex Database
- Reference
1. Introduction
Aspera faspex is a file exchange application built upon Aspera Enterprise Server as a centralized transfer solution. With a web-based graphical user interface, faspex offers more advanced management options for fasp high-speed transfer to match your organization's workflow. faspex provides the following features:
- fasp™ transport server
- Installed upon the Enterprise Server, a transport server that handles fasp™ connections.
- Web/Email-based Interface
- Simple web and email interface for exchanging files and directories.
- Package Forwarding
- Users can forward packages on the server to others without re-uploading.
- Permission Management
- Manage user permissions through workgroup assignment or direct-configuration.
- Post-Processing
- Execute custom scripts after a transfer when certain conditions are met.
- Email Notification
- Customizable Email Notification of faspex events such as receiving a package.
- Active Directory
- Integration of your organization's Active Directory users and groups with faspex.
- Multi-Server
- Multiple faspex servers can be configured to work together.
The most up-to-date documentation can be found at the Aspera website.
For further assistance, please contact us at http://asperasoft.com/support.
2. Install faspex
2.1 Prepare the System
To successfully install Aspera faspex, it is highly recommended to use a computer with a newly-installed operating system. The following is a list of requirements for your system before installing:
- Application
-
- Existing Apache web server is not running during the installation.
- Existing MySQL Database is not running during the installation.
- No Aspera faspex previously installed.
- Firewall
-
- Allow inbound connections for Apache HTTP Server, such as TCP port 80.
- Allow inbound connections for Apache HTTPS Server, such as TCP port 443.
- Allow inbound and outbound connections on TCP port 22 for SSH connections.
- Allow inbound and outbound connections on UDP port 33001 for fasp transfers.
2.2 Installation
If you have a previous version of faspex server installed, backup the database before upgrading faspex. Refer to Appendix 6. Backup faspex Database.
Follow these steps to set up the faspex:
- Step 1 Set up the Aspera Enterprise Server version 2.5 or higher
-
Before installing faspex, you must already have Aspera Enterprise Server installed. Open Command Prompt (Start > All Programs > Accessories > Command Prompt) and use the command to verify the Enterprise Server installation:
> ascp -A
If the system cannot find the command, or the version is older that 2.5, download the latest Enterprise Server installer package. Use the login and password provided: http://asperasoft.com/downloads/ent-server
When downloaded, double-click the executable to install the Enterprise Server. In the setup wizard, choose "Typical" install option.
After the installation, go to Start Menu > All Programs > Aspera > Aspera Enterprise Server and launch the application. It will prompt for a license key upon first launch.
- Step 2 Install or update the faspex
-
Go to the Aspera download page, find the installer for your platform and download. Use the user name and password provided by Aspera to access: http://www.asperasoft.com/downloads/faspex
To install faspex or update the previous version of faspex on this computer, execute the downloaded installer. During the installation, the installer will prompt you for the following information. Follow the instructions:
- Enter the hostname or IP address for your faspex server
- Enter email address for faspex admin account
- Enter the directory where faspex packages will be stored Default: C:\faspex_packages
faspex is run by the system user faspex. Make sure this system user's password never expires. Right-click My Computer and select Manage, navigate into System Tools > Local Users ad Groups > Users. Double-click the user faspex, under General check Password never expires.
- Step 3 Install the faspex License File
-
You should find the license key file in the authorization E-mail sent by Aspera. The key is stored in a file name that looks like: aspera.faspex.[something].license. Put the ".license" file you received from Aspera into the following directory:
- 32bit XP/2003
- \Program Files\Aspera\Faspex\config
- 64bit XP/2003
- \Program Files (x86)\Aspera\Faspex\config
Important: you must only have one license file at a time in the directory, otherwise you will not be allowed to log in. To keep a second license file in the same directory, rename it, for example, add ".bak" to the end of the filename.
- Step 4 Start faspex Services and Aspera Central
-
In the Command Prompt (Start > All Programs > Accessories > Command Prompt), navigate into the faspex directory:
- 32bit XP/2003
-
> cd "C:\Program Files\Aspera\Faspex"
- 64bit XP/2003
-
> cd "C:\Program Files (x86)\Aspera\Faspex"
In the faspex directory, execute the following command to start the faspex:
> asctl faspex:start
To restart the Aspera Central to apply the new settings, Go to Control Panel > Administrative Tools > Services, choose the Aspera Central and click Restart.
- Step 5 Log in Aspera faspex
-
When successfully installed, you should be able to connect to the Aspera faspex through a web browser. For example:
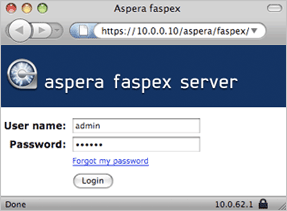
|
- URL:
https://10.0.0.10/aspera/faspex
- Username:
admin
- Password:
aspera
You can change the administrator's password in the faspex. Go to the Preferences from the faspex menu, enter your password under Change Password section.
|
2.3 Generate the SSL Certificate
This section covers both regenerating a self-signed SSL certificate, and ordering a certificate from a certificate authority.
2.3.1 Regenerate the Self-Signed SSL Certificate
When the faspex is set up, a pre-generated self-signed SSL (Secure Sockets Layer) certificate is installed. To regenerate a self-signed certificate based on the current apache 'hostname' setting, open the Command Prompt and navigate into the directory:
- 32bit Windows
-
> cd "C:\Program Files\Aspera\Faspex"
- 64bit Windows
-
> cd "C:\Program Files (x86)\Aspera\Faspex"
Execute the following command, replace the HOSTNAME with the current apache's IP address or host name. Answer yes when prompted to overwrite the existing certificate:
> asctl faspex:shared:apache:make_ssl_cert HOSTNAME
The command will overwrite the existing certificate:
- 32bit Windows
-
C:\Program Files\Common Files\Aspera\Common\apache\conf\server.crt
C:\Program Files\Common Files\Aspera\Common\apache\conf\server.key
- 64bit Windows
-
C:\Program Files\Common Files (x86)\Aspera\Common\apache\conf\server.crt
C:\Program Files (x86)\Common Files\Aspera\Common\apache\conf\server.key
2.3.2 Install the SSL Certificate Ordered from a Certificate Authority
To implement the SSL certificate ordered from a 3rd-party certificate authority, follow these steps:
- Step 1 Order a signed certificate from a SSL certificate provider
-
Order a signed SSL key from a certificate authority, and follow the key provider's instructions to generate and submit both of your private key and the Certificate Signing Request (CSR) to acquire the certificate. Here is a list of the certificate authority.
- Step 2 Replace the self-signed certificates with the new ones
-
Replace the pre-generated self-signed certificates with the ones that acquired from the certificate authority:
- 32bit Windows
-
C:\Program Files\Common Files\Aspera\Common\apache\conf\server.crt
C:\Program Files\Common Files\Aspera\Common\apache\conf\server.key
- 64bit Windows
-
C:\Program Files\Common Files (x86)\Aspera\Common\apache\conf\server.crt
C:\Program Files (x86)\Common Files\Aspera\Common\apache\conf\server.key
- Step 3 Install the Intermediate CA Certificate file (Optional)
-
Your certificate provider may require you to also install an Intermediate CA Certificate file. For example, if the Intermediate CA certificate is in the directory:
C:\serv-certificate\int-ca.crt
Use a text editor to open the Apache's SSL configuration file :
- 32bit Win
- C:\Program Files\Common Files\Aspera\Common\apache\conf\extra\httpd-ssl.conf
- 64bit Win
- C:\Program Files (x86)\Common Files\Aspera\Common\apache\conf\extra\httpd-ssl.conf
In the file, add or edit the parameter SSLCACertificateFile to point to the intermediate CA certificate:
SSLCACertificateFile "C:/serv-certificate/int-ca.crt"
- Step 4Restart Apache to apply the new settings
-
To restart Apache to apply the new settings, go to Control Panel > Administration Tools > Services, and restart the Apache HTTPD Server (Aspera).
At this point, faspex should be set up and functional. For additional Apache web server settings, follow the steps:
- Step 1 Navigate into the faspex directory
-
Open Command Prompt (Start > All Programs > Accessories > Command Prompt), enter the command to navigate into Console directory:
- 32bit XP/2003
-
> cd "C:\Program Files\Aspera\Faspex"
- 64bit XP/2003
-
> cd "C:\Program Files (x86)\Aspera\Faspex"
- Step 2 Print and change the hostname
-
During the installation, you should have the faspex's hostname configured. First, use the command to print the current hostname:
> asctl faspex:shared:apache:hostname
To change the hostname, use the command and replace the underlined value with the hostname you want to use:
> asctl faspex:shared:apache:hostname www.new-host.com
When changed, enter the new url to access the faspex. In this example, use the address:
https://www.new-host.com/aspera/faspex
- Step 3 Print and change the faspex namespace
-
By default, faspex uses the namespace /aspera/faspex. To print the current namespace, use the command:
> asctl faspex:uri_namespace
To set the namespace to, for example, /faspex, use the following command the change it and restart partial services to apply the settings. Notice that the namespace cannot be blank:
> asctl faspex:uri_namespace /faspex
> asctl faspex:restart
When changed, faspex's URL should be the server's address followed by the new namespace. In this example, use the address:
https://10.0.0.10/faspex
- Step 4 Change the HTTP and HTTPS ports
-
By default, faspex's web servers are running on TCP/80 (HTTP) and TCP/443 (HTTPS). Use the following commands to update the ports, replace the underlined values with your port numbers:
- HTTP
-
> asctl faspex:shared:apache:http_port 7080
- HTTPS
-
> asctl faspex:shared:apache:https_port 7443
If you change these two ports, reflect the settings on the system firewall.
When the port numbers are changed, reflect them in the url. In this example, use the address:
https://10.0.0.10:7443/aspera/faspex
Appendix 1. Restart faspex
If faspex is not working properly, it is recommended to restart faspex services. Follow the instructions for your platform:
- Step 1 Navigate into faspex's directory in Command Prompt
-
Open Command Prompt (Start > All Programs > Accessories > Command Prompt), enter the command to navigate into the faspex directory:
- 32bit XP/2003
-
> cd "C:\Program Files\Aspera\Faspex"
- 64bit XP/2003
-
> cd "C:\Program Files (x86)\Aspera\Faspex"
- Step 2 Restart all faspex services
-
In the faspex directory, execute the command:
> asctl all:restart
If you have Aspera Console installed on the same machine, this command also restarts all Console services.
Appendix 2. The Log Files
The Aspera faspex log files are located in the directory:
- 32bit XP/2003
- \Program Files\Aspera\Faspex\log
- 64bit XP/2003
- \Program Files (x86)\Aspera\Faspex\log
In the log directory, faspex's Apache logs into the following files:
- access_log
- error_log
- ssl_access_log
- ssl_error_log
- ssl_request_log
You can further configure the faspex's Apache log using the asctl commands. In the Command Prompt (Start > All Programs > Accessories > Command Prompt), navigate into the directory:
- 32bit XP/2003
-
> cd "C:\Program Files\Aspera\Faspex"
- 64bit XP/2003
-
> cd "C:\Program Files (x86)\Aspera\Faspex"
Use the following commands to modify the Apache logging settings:
- Specify an Apache log level. (e.g. error level)
- > asctl all:log_level error
- Enable Apache log. (Set to notice)
- > asctl all:enable_logs
- Disable Apache log. (Set to emerg level)
- > asctl all:disable_logs
- Delete logs older than certain days (e.g. 30 days)
- > asctl all:delete_logs_older_than 30
Appendix 3. Reset the faspex Admin Password
If you lost the faspex admin's password, follow the steps to reset the admin's password:
- Step 1 Navigate into the faspex directory
-
Open Command Prompt (Start > All Programs > Accessories > Command Prompt), navigate into the faspex directory:
- 32bit XP/2003
-
> cd "C:\Program Files\Aspera\Faspex"
- 64bit XP/2003
-
> cd "C:\Program Files (x86)\Aspera\Faspex"
- Step 2Execute the reset admin password command
-
In the faspex directory, execute the command:
> asctl faspex:reset_admin_password
Enter the new admin account password when prompted, enter again when prompted for confirmation. When the password is updated successfully, the admin should be able to log in faspex with the new password.
Appendix 4. faspex Commands
You can use the provided commands to control faspex. Open the Command Prompt (Start > All Programs > Accessories > Command Prompt) and navigate into the directory:
- 32bit XP/2003
-
> cd "C:\Program Files\Aspera\Faspex"
- 64bit XP/2003
-
> cd "C:\Program Files (x86)\Aspera\Faspex"
Execute the following in the faspex directory to list all options for asctl command:
> asctl all:help
You can use the asctl command and the option in the following format:
- faspex-specific
-
> asctl faspex:option
- All Components (faspex, MySQL, Apache)
-
> asctl all:option
For example, to display the faspex hostname, use the command:
> asctl faspex:hostname
Appendix 5. Uninstall faspex
To uninstall faspex,open Control Panel > Add/Remove Programs. Select Aspera Faspex and click Remove.
Appendix 6. Backup faspex Database
To backup the faspex database, open the Command Prompt (Start > All Programs > Accessories > Command Prompt) and navigate into the directory:
- 32bit XP/2003
-
> cd "C:\Program Files\Aspera\Faspex"
- 64bit XP/2003
-
> cd "C:\Program Files (x86)\Aspera\Faspex"
Execute the command in the folder:
> asctl faspex:backup_databases
This command uses mysqldump to create the faspex MySQL databases backup in the directory:
- 32bit XP/2003
-
C:\Program Files\Aspera\Faspex\db\backup
- 64bit XP/2003
-
C:\Program Files (x86)\Aspera\Faspex\db\backup
You should see the following backup files:
- central_backup_(date).sql
- faspex_backup_(date).sql
- user_service_backup_(date).sql
Reference
Copyright 2009 © Aspera Inc. All Rights Reserved