Manage your remote file storage for Aspera®Faspex™.
Aspera Faspex Server v3.X supports remote file storage, which means that senders can create packages with files that are stored on another server, as well as on their local machines. Before v3.X, senders were only able to browse their local machine for files to send through Aspera Faspex. Remote file storage can also be used for inboxes, i.e., locations where packages can be received.
Only registered Aspera Faspex users (i.e., those you have created accounts for within Aspera Faspex or imported from DS) can browse remote file storage. Outside senders are not permitted to access remote file storage. Additionally, every registered Aspera Faspex user can access all file storage (meaning that you cannot limit file storage access to certain registrants); however, a registered Aspera Faspex user cannot send from remote sources unless their account is configured with Create packages from remote sources enabled and their permission settings give them access to the source.
Configuring Aspera Faspex to Communicate with your remote Aspera Enterprise Server™ Node
- Ensure that Aspera Enterprise Server or Aspera Connect Server™ v3.0+ is installed on the node machine.
- Have the following information readily available:
- The node computer's hostname or IP address, along with a port and path (if applicable).
- The node API username and password, which you created when you set up Aspera Enterprise Server on your node machine.
If you do not have this information, please refer to the admin guide for Aspera Enterprise Server or Aspera Connect Server v3.0+.
- See the instructions for preparing a remote transfer-server node in Setting up a Remote Server.
- Follow the instructions for adding the remote server to Aspera Faspex, in Transfer Server.
Adding/Browsing the File Storage on your Remote Server
When you originally create the node (see Transfer Server) click Create and Add File Storage.
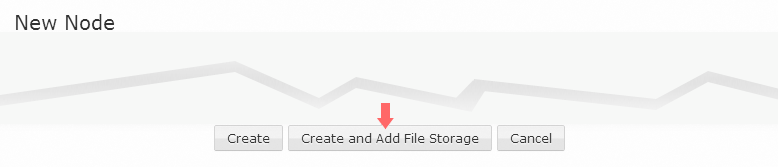
Either choice opens the New File Storage dialog which lets you browse for and select the file-storage directory.
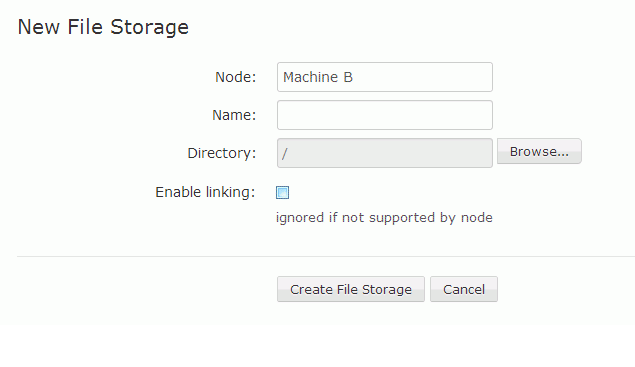
When you click the Browse... button, you are prompted to select a directory in the pop-up window. Note that you will only be able to browse within the docroot that was associated with your transfer service user and API username. In the above example, the directory "/" means the docroot, not the root of the server node's file system.
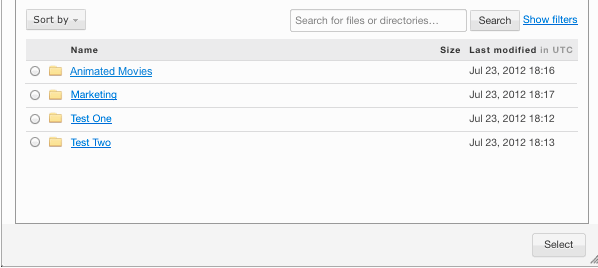
Here, you have several options:
- You can perform a simple search for a directory by entering it into the name field and clicking Search.
- You can perform an advanced search by clicking the Show Filters link, and entering your criteria.
- You can sort the directory list by type, size, size descending, last modified, and last modified descending.
- You can select a radio button next to the directory that you would like to be the share. After clicking the radio button, click Select.
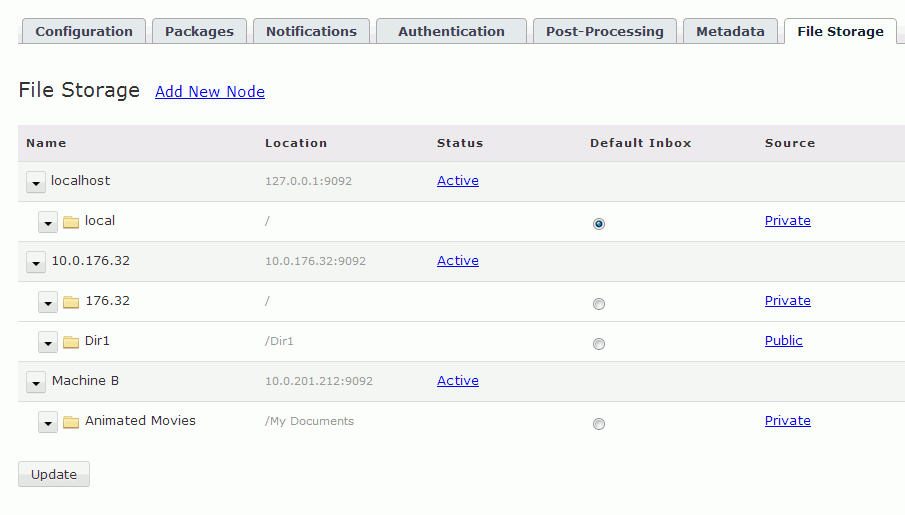
Once you have selected your file storage on the node, click Create File Storage. You should now see your node and file storage listed on the File Storage page For each node, the display shows its name and its status (active or error). The Active and Error links provide more detail on status. The display indicates which location is the current default inbox, and the permission level for access to sources in that location (private, public, or limited). By default, source directories are created with the private level.
In a fresh install, the default inbox is packages. You can change the default inbox to any file storage directory on an active node by clicking one of the option buttons in the Default Inbox column. If the node's connection status is Error, the option button will be grayed out and not selectable. When you are finished selecting a different location for the default inbox, click Update at the bottom of the display to save your selection.
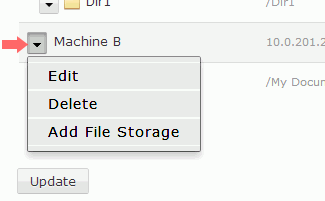
Modifying a Node and Adding File Storage
To modify or remove a file storage node, or add storage directories to it, click the down-arrow icon in front of its name. Clicking Edit opens the Edit Node page which, except for the title, is the same as the New Node page (see previous section), and offers the same modification choices. Clicking Delete removes the node from your file storage. Clicking Add File Storage opens the New File Storage page (see previous section).
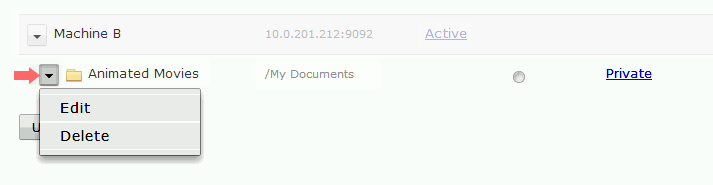
Modifying File Storage and Setting Access Permissions for Source Directories
To modify or remove a file storage directory, click the down-arrow by the directory name. Clicking Delete removes the directory from your file storage (however, it does not remove the directory from the node's disk). Clicking Edit opens the Edit File Storage page, from which you can modify the directory or set source access permission. You can also reach the Edit File Storage page by clicking the links for Private, Public, and Limited.
- Name - change the Aspera Faspex name for the storage directory.
- Directory - associate the Aspera Faspex name with a different directory in the node's file system.
- Enable linking - enable files that are sent from this location to
be copied to the inbox as symbolic links (symlinks). Both the default inbox and the source
location of the files must be on the same node. If they are not on the same node, checking
this box has no effect.
Note: Packages sent to a workgroup or dropbox with a custom inbox will not be symlinks. The default inbox will contain symlinks, but custom inboxes will contain actual files.Note: The linking feature does not work if the Aspera Enterprise Server node or the file-storage node is a system that does not support symbolic linking.Note: Enabling linking is ignored if EAR is enabled.
- Read Permission - set permissions for this source location as
follows:
- Private - (Default) No users can send content stored in this location. (However, even if private, this location can still serve as inbox storage.) Note that enabling linking (checking the Enable linking box) is not relevant for sources that are private.
- Public - Any user can send content stored in this location (as long as their account is configured to allow it).
- Limited - Only certain users can send content stored in this location (as long as their account is configured to allow it).

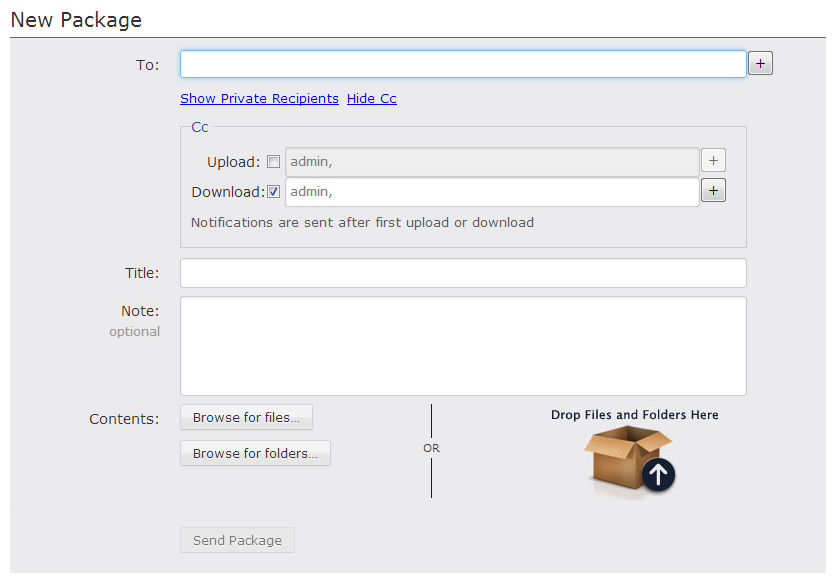
Selecting a File Source when Creating a New Package
Now that you have a file storage set up, registered Aspera Faspex users can select and browse it when creating a new package (in addition to browsing for a file on their local computers).