These instructions demonstrate how to create local user accounts. For information
on adding directory service users or groups, see
Working with Directory Services (DS).
-
Go to the Accounts tab and select New
User.
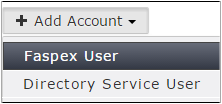
Note: If directory service is enabled, the
New User
button is replaced by the
Add Account drop-down menu.
From this menu, select
Faspex User to create a new
local user.
-
Enter a username in the Login field.
If an admin creates a user with the same username and email address as an
external user, Faspex merges the external user with this new account. If the new
user shares only an email address with the external user, the two accounts are
not merged. For more information about external users, see
Working with External Senders.
Important: Usernames cannot contain
semi-colons.
-
Enter a valid email address. Faspex uses this email address for email
notifications.
- Optional:
Manually set the account password. Select Set password.
Enter and confirm a password. The password must conform to current server
password requirements.
By default, Faspex enforces the creation of strong
passwords. Faspex defines strong passwords as passwords that are at least
six characters long, with at least one letter, one number, and one symbol.
You can disable strong passwords by going to and deselecting Use strong passwords.
Note: Unless disabled by an admin, Faspex sends a welcome email to every new
account. The email includes a reset password link and a login link for users
that already know their password. The password reset link in the welcome
email expires after one week. Admins can disable the welcome email by going
to Server > Configuration > Security and clearing
Send welcome email to all new users.
- Optional:
Edit Additional Permissions.
Click the
Edit Additional Permissions link at the
bottom of the form to access additional user settings. These settings include
the following:
- Account Details
- Permissions
- Package Deletion
- Advanced Transfer Settings
- Welcome E-mail
For more information on specific settings, see
Configure User Settings.
-
When finished with the configuration, click Create
Account.
If you manually set a password, provide the account credentials to the user.