Installing and Configuring the HA Environment

Install two stand-alone IBM Aspera Faspex servers and join them together into an HA environment.

This guide assumes that Shares is installed on two servers with IBM Aspera High-Speed Transfer Serversoftware installed and configured on each. The HSTS on each server behaves like any other node within the Faspex environment.

Note: All commands are run as root. (The examples in this section are for a CentOS 6.5 system.)

Before You Start

  1. Review the System Requirements.
  2. Check your network settings and names.
    Confirm that your network settings are correctly configured and that each host has a unique hostname properly configured within the name resolution mechanism you use (DNS, hosts file, and so on). Each host must be able to resolve its own name, as well as the name of the other node.
    Run the following command on both nodes. The resulting system output should make sense in your environment.
    # hostname
    faspexnode1.mydomain.com

Securing Your System

Perform the following steps for both nodes.
  1. Disable local firewalls.

    No traffic filter should be put in place between the two nodes. If your nodes are located behind a corporate firewall (and thus appropriately protected), you should disable the Linux firewall components. Use chkconfig to prevent the firewall from becoming active when the system is rebooted:

    On an OS running systemctl, instead of using chkconfig, disable services by running:

    # systemctl disable iptables
    # systemctl disable iptables off
    Otherwise, run:
    # service iptables stop
    iptables: Flushing firewall rules:                     [  OK  ]
    iptables: Setting chains to policy ACCEPT: filter      [  OK  ]
    iptables: Unloading modules:                           [  OK  ]
    # service ip6tables stop
    ip6tables: Flushing firewall rules:                    [  OK  ]
    ip6tables: Setting chains to policy ACCEPT: filter     [  OK  ]
    ip6tables: Unloading modules:                          [  OK  ]
    # chkconfig iptables off
    # chkconfig ip6tables off
    Note: If the firewall is not disabled, make sure to configure the firewall to open the necessary ports for Aspera. See TCP and UDP Ports Used in HA Environments for a list of ports used by the Faspex HA environment.
  2. Disable SELinux.
    SELinux must be disabled or set to permissive in the /etc/selinux/config file on each High Speed Transfer Server and each Faspex server system. You can confirm the SELinux current status by running the sestatus command.
    # sestatus
    SELinux status: disabled
  3. Configure SSH security on each High Speed Transfer Server.

    See the Securing your SSH Server section in the IBM Aspera Faspex Admin Guide for additional information and guidance.

    Make sure that public/private key authentication has been enabled on each server. Look for the following line in the /etc/ssh/sshd_config file and verify that it is uncommented.
    PubkeyAuthentication yes
    If you have modified the sshd_config file, you need to restart the sshd service:
    # service sshd restart

Install and Configure Faspex

  1. Create user accounts and groups on each Faspex server.
    The mysql and faspex user accounts and groups must be created manually on both systems before installing any Aspera packages to have consistent UID and GID across the HA environment.
    Note: It is critical to ensure that the UID and GID for the mysql and Faspex user accounts are consistent across all Faspex servers.
    You can use the following commands on each node to create the required users and groups:
    # groupadd -g 777 faspex && useradd -c "Aspera Faspex" -d /home/faspex -g faspex -m -s /bin/aspshell -r -u 777 faspex
    # groupadd -g 778 mysql && useradd -c "Aspera Mysql" -d /home/mysql -g mysql -m -s /bin/false -u 778 mysql

    The UID and GID do not have to be 777 and 778, and you can use any value available. Just make sure you use the same values on both systems.

  2. Install a standalone Faspex server on each system.
    1. Install High Speed Transfer Server. Follow the steps in the IBM Aspera High Speed Transfer Server Admin Guide to install your software and set up your license.
    2. Install Aspera Common.
    3. Install Faspex, answering any question as if you were installing a standalone server running its own transfer service locally.
    4. Log in to each Faspex server and install your Faspex license on each server.
    You can find a detailed procedure in Installing Faspex with a Local Node.
  3. On both servers, test that you can create, upload, and download new packages successfully.
    Note: It is important that you can upload and download packages on each node before proceeding further. You will not have access to the Faspex GUI once you start the HA setup process. Test now so you do not end up having to undo the entire HA setup to troubleshoot the Faspex configuration.

Share Resources Between Nodes

  1. Choose one node to be the active node.
  2. On the active node, grant remote access to MySQL for both nodes.
    Run the following commands and set the password. The password you choose must be the same for. The Aspera Cluster Manger (ACM) uses this password to access the database.
    Tip: ACM uses "aspera" as a default password. You will provide the password you chose in a later step to ACM by editing the acm configuration file.
    # asctl mysql:grant_remote_access "local_server_ip_address"
    New password: password
    Confirm new password: password
    # asctl mysql:grant_remote_access "other_server_ip_address"
    New password: password
    Confirm new password: password
  3. Configure the passive node to allow MySQL connections to the active node.
    # asctl mysql:grant_remote_access "active_node_ip_address"
    New password: password
    Confirm new password: password
    Note: The password you choose must be the same as the password you provided in the previous step.
  4. Stop and disable Faspex services.

    ACM takes charge of starting the Faspex services. You must disable those services from the system boot-up process.

    First, stop all Faspex services on both nodes:

    # asctl all:stop

    Then disable the services on both nodes.

    On an OS running systemctl, instead of using chkconfig, disable services by running:
    # systemctl disable aspera_mysqld; systemctl disable aspera_httpd; systemctl disable aspera_faspex_np_background; systemctl disable aspera_faspex_mongrel; systemctl disable aspera_faspex_ds_background; systemctl disable aspera_faspex_db_background; systemctl disable aspera_faspex_background; systemctl disable aspera_faspex_email_background
    Otherwise, run:
    # chkconfig aspera_mysqld off; chkconfig aspera_httpd off; chkconfig aspera_faspex_np_background off; chkconfig aspera_faspex_mongrel off; chkconfig aspera_faspex_ds_background off; chkconfig aspera_faspex_db_background off; chkconfig aspera_faspex_background off; chkconfig aspera_faspex_email_background off
  5. On both nodes, create a common nodeadmin user for the Node API:
    1. Run the following asnodeadmin command:
      # /opt/aspera/bin/asnodeadmin -a -u nodeadmin -x faspex -p
    2. Enter a password for this account when asked for one.

      The nodeadmin account must be the same on both nodes (same username and password).

    3. Verify that the account was created successfully:
      # /opt/aspera/bin/asnodeadmin -l
                      user       system/transfer user                    acls
      ====================    =======================    ====================
            NaaJFJg39PFfTZ                     faspex                        
                 nodeadmin                     faspex
    4. Delete the first account.

      The first account in the list (in this case NaaJFJg39PFfTZ) was created with a random name and a random password by the Faspex setup program. It can now be deleted, as it won't be used. To delete it, run the following command:

      # /opt/aspera/bin/asnodeadmin -d -u user_name

      Do this on both nodes.

  6. Configure the same encryption key for the Faspex users.

    Edit the aspera.conf file (/opt/aspera/etc/aspera.conf) folder on both nodes, and check that the settings for the user faspex are identical. In particular, check the value of the encryption_key tag. It must be the same on both nodes. If not, then choose one value and copy it to the other node:

    <aaa>
      <realms>
        <realm>
          <users>
            <user> 
              <name>faspex</name> 
              <authorization> 
                <token> 
                  <encryption_key>secret_encryption_key</encryption_key>
                </token>
              </authorization>
            </user>
          </users>
        </realm>
      </realms>
    </aaa>
  7. Pick one node and copy its secret.yml file (/opt/aspera/faspex/config/secret.yml) into the same directory on the other node, preserving the same owner and permissions.
  8. Copy the keystore.jks (/opt/aspera/faspex/lib/daemons/np/etc/keystore.jks) on one node to the other to make sure they are identical.

Mount Remote File Systems on Each Node

Faspex servers in HA environments must be configured with shared storage. There are three shared volumes that need to be available to each Faspex server. Mount the shared volumes if they are not already mounted.

The following are example mount points. Yours may be different.

Example Mount Point Usage User Permissions Notes
/mysql_data Used to store the MySQL data files rwx for the mysql user  
/faspex_packages Used to store the Faspex packages files rwx for the faspex user  
/acm_files Used to store the common ACM files rwx for the root user If using NFS, use the noac flag
Note: Make sure all the Faspex services are stopped on both nodes before continuing:
# asctl all:stop
  1. Move the MySQL data files into the shared volume.
    1. Backup the MySQL data, create a symlink to the mount point, and change the owner and group.
      # cd /opt/aspera/common/mysql
      # mv ./data ./data.orig
      # ln -s mysql_mount_point ./data
      # chown -h mysql.mysql ./data
    2. Check the permissions.
      # ls -lah /opt/aspera/common/mysql
      total 128K
      drwxr-xr-x 11 mysql mysql 4.0K Jun 12 15:25 .
      drwxr-xr-x 7 root root 4.0K Jan 28 13:58 ..
      drwxr-x--- 2 mysql mysql 4.0K Jan 18 16:13 bin
      lrwxrwxrwx 1 mysql mysql 4 Jun 12 15:25 data -> mysql_mount_point
      drwxr-x--- 5 mysql mysql 4.0K Jan 18 16:26 data.orig
      -rw-r----- 1 mysql mysql 14K Nov 28 2012 database_controller.rb
      -rw-r----- 1 mysql mysql 14K Nov 28 2012 database.rb
      -rw------- 1 mysql mysql 756 Jun 12 15:26 database.rb.yml
      drwxr-x--- 3 mysql mysql 4.0K Jan 18 16:13 include
      drwxr-xr-x 3 mysql mysql 4.0K Jan 18 16:13 lib
      drwxr-x--- 2 mysql mysql 4.0K Jan 18 16:13 libexec
      -rw-r----- 1 mysql mysql 1.3K Nov 28 2012 linux_database.rb
      -rw-r--r-- 1 mysql mysql 9.2K Jan 18 16:14 my.cnf
      -rw-r--r-- 1 mysql mysql 9.2K Jan 18 16:14 my.ini
      -rw-r----- 1 mysql mysql 9.1K Nov 28 2012 my_template.ini
      drwxr-x--- 2 mysql mysql 4.0K Jan 18 16:13 sbin
      drwxr-x--- 3 mysql mysql 4.0K Jan 18 16:13 share
      drwxr-x--- 3 mysql mysql 4.0K Jan 18 16:13 var
      -rw-r----- 1 mysql mysql 13 Nov 28 2012 version.txt
    3. On the first node, move the database file into the shared volume:
      # sudo mv -u /opt/aspera/common/mysql/data.orig/* /opt/aspera/common/mysql/data/
    4. On the other node, verify that you can see the data files in the directory /opt/aspera/common/mysql/data/.
  2. Move the Faspex packages files into the shared volume.
    1. Backup the Faspex data, create a symlink to the mount point, and change the owner and group.
      # cd /home/faspex
      # mv ./faspex_packages ./faspex_packages.orig
      # ln -s faspex_mount_point ./faspex_packages
      # chown -h faspex.faspex ./faspex_packages
    2. Check the permissions.
      # ls -lah /home/faspex
      total 128K
      drwxr-xr-x 11 faspex faspex 4.0K Jun 12 15:25 .
      drwxr-xr-x  7 root   root   4.0K Jan 28 13:58 ..
      lrwxrwxrwx  1 faspex faspex 4 Jun 12 15:25 faspex_packages -> faspex_mount_point
    3. On the first node, move the package folder into the shared volume:
      # sudo mv -u /home/faspex/faspex_packages.orig/ /home/faspex/faspex_packages/*
    4. On the other node, verify that you can see the data files in the directory home/faspex/faspex_packages.
  3. Download ACM here: https://download.asperasoft.com/download/sw/acm/faspex/acm-faspex-1-98-20180316-tar.gz
  4. Extract it to the dedicated shared volume by running the following command:
    # cd acm_files_mount_point
    # tar xzvf /path/to/acm_package.tar.gz
    Note: You only need to perform this task from one node as the acm_files_mount_point directory is shared by both Faspex servers.

Install and Configure ACM

You only need to perform the following tasks from one node as the acm_files_mount_point directory is shared by both Faspex servers.
  1. Create the following symbolic links on both nodes:
    # ln –s /acm_files_mount_point/acm /opt/aspera/acm
    # cd /opt/aspera/faspex/config
    # mv database.yml database.yml.orig
    # ln -s /opt/aspera/acm/config/database.yml database.yml
    # chown –h faspex.faspex database.yml
  2. You may need to edit the acm file (/opt/aspera/acm/bin/acm) to set correct values to these variables:
    MYSQLPW="mysql_password"
    SYSLOG_FACILITY=local2
    LOG_TO_FILE=0
    LOG_TO_SYSLOG=1
    CHECK_DEVICE_ID=1
    Note: The mysql_password is the password you configured when you granted the nodes remote access to the MySQL database.
    Note: The CHECK_DEVICE_ID variable defines if ACM should verify the Device ID of the storage volume where ACM is located. Because that Device ID can change upon reboot with NFS volumes, you may want to set this variable to 0 in order to disable the verification, which could prevent ACM and Faspex from running correctly.
  3. Install ACM in the crontab on both nodes so that the system launches ACM every minute.
    # crontab -e
                  * * * * * /opt/aspera/acm/bin/acm local_ip_address device_number > /dev/null 2>&1
    Two parameters are passed to the acm command. The first parameter is the local IP address of the host. You can use the following command to find out the list of IP addresses available on a system:
    # ip addr | grep "inet"
    The second parameter is the device number of the partition where the ACM files are stored. You can determine the correct value by using this command:
    # stat -c "%d" /acm_files_mount_point/acm
    For example:
    # crontab -e
    * * * * * /opt/aspera/acm/bin/acm 10.0.0.0 21 /dev/null 2>&1
    Once installed in the crontab, ACM starts running, elects an active node, and starts the services on the different nodes accordingly depending on their current status: active or passive.
  4. Create a job on both nodes to backup Faspex database with the acmctl command.
    Aspera recommends regularly backing up the database. In the example cronjob below, ACM performs a backup every day at 1:30 AM. Choose the interval depending on your requirements.
    # crontab -e
    * * * * * /opt/aspera/acm/bin/acm 10.0.71.21 20 > /dev/null 2>&1
    30 3 * * * /opt/aspera/acm/bin/acmctl -b > /dev/null 2>&1
  5. Create a job on both nodes to reset asctl logs.
    Each time the system launches ACM, ACM writes to the asctl logs. Since the asctl logs do not get rotated, the logs can start to cause performance issues if the files grow too large. In the example cronjob below, the system resets the asctl logs every 7 days at 3:45 AM. Choose the interval depending on your requirements.
    # crontab -e
    * * * * * /opt/aspera/acm/bin/acm 10.0.71.21 20 > /dev/null 2>&1
    30 3 * * * /opt/aspera/acm/bin/acmtl -b > /dev/null 2>&1
    45 3 * * 7 echo -n "" > /opt/aspera/common/asctl/log/asctl.log > /dev/null 2>&1
  6. Run the acmctl command on both nodes with the -s option nodes in order to verify some basic ACM prerequisites:
    # /opt/aspera/acm/bin/acmctl –s
    ACM sanity check
    ----------------
    Checking if the database.yml symbolic link exists				   OK
    Checking if the database.yml symbolic link points to the right location	  OK
    Checking if an entry for ACM seems to exist in the crontab			 OK
    Checking that all the Faspex services are disabled in chkconfig		   OK
    Checking that SE Linux mode is not set to enforcing				 OK
    Checking that asctl uses the correct load_file procedure			   OK
  7. If the verification looks good, start ACM on all the nodes at once, using the acmctl command with the –E option:
    # /opt/aspera/acm/bin/acmctl –E
    ACM is enabled globally
Within a few minutes, ACM selects an active node, starts all the Faspex services on it, and then starts the active/active services on the passive node.

Configure Faspex

If the load balancer is correctly configured, you should now be able to connect to the Faspex web application using the URL pointing to the VIP.
  1. Log in to Faspex through the URL.
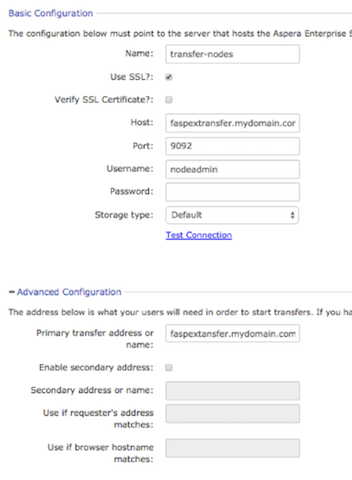
  2. Go to Server > File Storage and edit the main transfer node (the one used for the Default Inbox).
    Use the following table to set the different fields:
    Field Value
    Host

    The host is the name pointing to a list of the IP addresses of each node in the cluster (typically something like faspextransfer.mydomain.com).

    This value is used by Faspex’s Node Poller service (also called Stats Collector) to poll the transfer nodes to get the status of ongoing transfers.

    Both transfer nodes must be polled every few seconds.

    Note: If you don’t have a valid FQDN resolving into a list of several IP addresses, it is also possible to use a name defined by several entries in the /etc/hosts file on both nodes (see Using /etc/hosts Entries to Poll Transfer Nodes).
    Port Typically 9092
    Username nodeadmin
    Password The password you entered when you created the nodeadmin user (using the asnodeadmin command).
    Primary transfer address or name (expand Advanced Configuration)

    If you chose to use Type 1 architecture, use the VIP or a FQDN pointing to the VIP (typically something like faspex.mydomain.com).

    If you chose to use Type 2 architecture, use the FQDN pointing to the list that includes the IP address of each node in the cluster (typically something like faspextransfer.mydomain.com).

    Figure: Type 1 Architecture Example


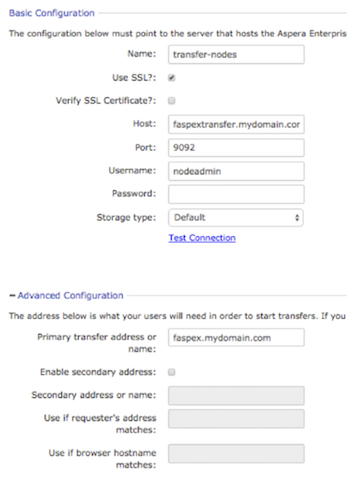
    Figure: Type 2 Architecture Example


  3. Verify the FQDN. The verification method depends on whether you used a valid FQDN or used the /etc/hosts file.
    If you used a valid FQDN, use the nslookup command:
    # nslookup FQDN_url
    For example:
    # nslookup faspextransfer.mydomain.com
    Server:	 10.0.0.1
    Address:	10.0.0.1#53
    
    Name: faspextransfer.mydomain.com
    Address: 10.0.115.102
    Name: faspextransfer.mydomain.com
    Address: 10.0.115.101
    In this case, the nslookup command shows that the FQDN faspextransfer.mydomain.com points to a list of two IP addresses: 10.0.115.102 and 10.0.115.101.
    If you used the /etc/hosts file, use the getent command:
    # getent hosts transfer-nodes
    10.0.115.101 transfer-nodes
    10.0.115.102 transfer-nodes