
Aspera On-Demand Server for AWS Admin Guide
All Platforms
Version 1.0
- Chapter 1 Introduction
- Chapter 2 Getting Started
- 2.1 Aspera On-Demand Server Overview
- 2.2 Set Up the On-Demand Server
- 2.3 Manage Your On-Demand Console User Account
- Chapter 3 On-Demand Console Administration
- 3.1 Manage Transfer Users and Groups
- 3.2 Add Unmanaged Nodes
- 3.3 Set Up Endpoints
- 3.4 Console Groups
- 3.5 Console Users
- Chapter 4 Transfer Files with the On-Demand Server
- 4.1 Transfer Using the Aspera Connect
- 4.2 Transfer Using the Aspera User Interface
- 4.3 Transfer Using the On-Demand Console
- Chapter 5 Manage Transfers
- 5.1 Dashboard
- 5.2 All Activity
- 5.3 Node Status
- 5.4 Session Detail
- 5.5 Reports
- Chapter 6 Configure the On-Demand Server
- 6.1 Configure the On-Demand Console
- 6.2 Configure the On-Demand Transfer Server
- Appendix 1 Control the Console Services
- 2 Reset the Administrator's Password
- 3 The Log Files
1. Introduction
The Aspera On-Demand Server contains the core features from Aspera's Connect Server, and Aspera’s management application, Aspera On-Demand Console for Amazon Web Services (AWS). The On-Demand Server is stored as an Amazon Machine Image (AMI).
The Connect Server and the Aspera On-Demand Console offer the following features:
- fasp™ Transport Server
- A transport server that accepts incoming Aspera connections. For more information, see http://asperasoft.com/en/technology/fasp_overview_3.
- ascp command-line
- A command-line transfer program to initiate Aspera transfers.
- Simple Sync
- A command-line synchronization program.
- Connect Server Web UI
- A web-based transfer server.
- Virtual Link
- Create aggregate bandwidth cap.
- HTTP Fallback Server
- Alternative transfer method for clients without Internet connectivity for fasp™.
- Transfer monitoring and control
- View transfers, pause / resume / cancel, change transfer rates
- Transfer Initiation
- Initiate and schedule transfer jobs remotely.
- Email Notification
- Notify users of transfer events with customizable messages.
- Reporting
- Create detail and summary reports of transfer activity.
You can access these applications thought the following paths:
- On-Demand Connect Server
- http://The instance's Public DNS/ Login configuration required
- On-Demand Console
- http://The instance's Public DNS/aspera/console Login: admin/(instance id)
For further assistance, please contact us at http://asperasoft.com/support.
2. Getting Started
2.1 Aspera On-Demand Server Overview
The Aspera On-Demand Server is packaged as an Amazon Machine Image (AMI). The Aspera AMI contains the Connect Server, and the Aspera On-Demand Console for AWS. When booting up the Aspera AMI, you can use the Connect Server for fasp™ file transfers, and the On-Demand Console for AMI's transfer server management.
2.1.1 Manage the Aspera AMI Through the Aspera On-Demand Console

Figure 1. The Aspera On-Demand Server
|
- 1
- The On-Demand Console can be accessed through a web browser. You can use the On-Demand Console to manage the fasp Transfer Server.
- 2
- In the On-Demand Console, you can perform the following tasks:
- Create the AMI's system/transfer user.
- Monitor and control transfers on the fasp Transfer Server.
- Set up the Email Notifications of transfer activity.
|
2.1.2 Transfer Files on the Aspera AMI

Figure 2. Transfer files with the On-Demand Server
|
- 1
- Use the Aspera User Interface to connect to the Aspera AMI and transfer files.
- 2
- With Aspera Connect installed, use a web browser to transfer files through the Connect Server Web UI.
- 3
- You can transfer files between the Aspera AMI and another Aspera server through the On-Demand Console, by adding the computer as an unmanaged node.
|
You can transfer files with the Aspera On-Demand Server using the following products:
- Aspera Connect Free download
- Aspera Client License required
- Aspera Point-to-Point License required
- Aspera Enterprise Server License required
- Aspera Connect Server License required
2.1.3 Nodes and Endpoints in the On-Demand Console
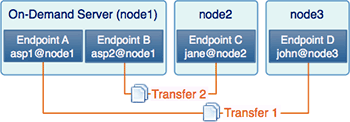
Figure 3. Nodes and Endpoints
|
An endpoint is an individual user account on a node which can run Aspera transfers. You can have one or multiple endpoints on a node depending on your business needs, as shown in Figure 2. Transfers are taken place between endpoints, for example, Transfer 1 between Endpoint A and Endpoint D.
|
2.1.4 The On-Demand Console User Permissions
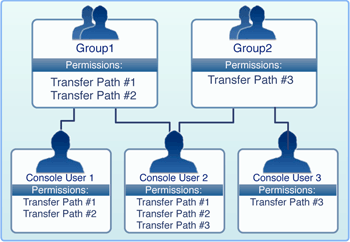
Figure 4. Group and User Permissions
|
All transfer permissions of non-admin Console users are governed by group assignments and predefined Transfer Paths. A Transfer Path is a specific access permissions between two endpoints. Each group may contain one or more Transfer Paths. In Figure 4, Group 1 contains two Transfer Paths, #1 and #2.
A Console user inherits transfer permissions from all of the groups he or she belongs to. For example, Console User 2 belongs to both Group 1 and Group 2, and has the permissions to use Transfer Path #1, #2 and #3.
|
The On-Demand Console Administrators are able to view and control all transfers. They automatically inherit permissions of any existing On-Demand Console groups. They can add, edit and delete any nodes, On-Demand Console users and Console groups.
2.1.5 On-Demand Console Menu
When logged in to On-Demand Console as an administrator, you should see the following items in the Console menu:

- Dashboard
- Overview of current and recent transfers, and simple node monitoring
- Activity
- Lists transfer activities involving at least one managed nodes
- Nodes
- Manage the On-Demand Server (managed node) and the unmanaged nodes
- Users
- Create and manage On-Demand Console users
- Groups
- Create and manage On-Demand Console groups
- Transfer
- Initiate a file transfer between nodes
- Reports
- Generate reports
- Preferences
- Configure your account preferences
- Config
- Configure the On-Demand Console
- Search
- Search for the most recent transfers that associate to key word(s) entered by users. Search Results shows up to 20 of the most recent transfers.
2.2 Set Up the On-Demand Server
Follow these steps to start using the Aspera On-Demand Server:
- Step 1 Prepare the AWS for Aspera AMI
-
Before using the Aspera On-Demand Server, make sure you have registered the Aspera On-Demand for AWS. You can find the registration page here:
http://asperasoft.com/ondemand/reg.
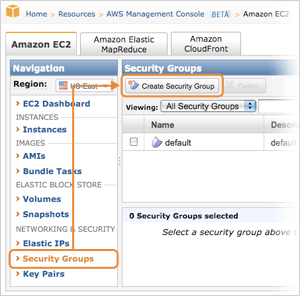 |
First, create a Security Group that prepares the firewall settings for the Aspera On-Demand Server. Go to the Security Groups in the Navigation sidebar, click Create Security Group.
Create a new group for the On-Demand Server, open at least the following ports:
- HTTP - TCP/80
- HTTPS - TCP/443
- Custom (SSH) - TCP/33001
- Custom (fasp) UDP/33001
|
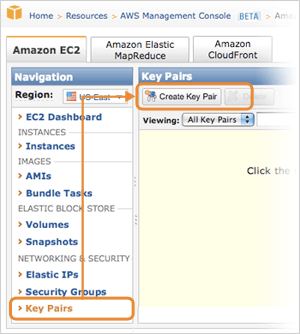 |
You can use your existing key pair for the Aspera AMI. If you wish to generate a new key pair, go to the Security Groups in the Navigation sidebar, click Create Key Pair. Enter the key pair name and click Create, the private key will be downloaded to your computer.
To install the downloaded private key (For example, asp1.pem) on your local machine, place the file in the following location on your computer. Replace the home directory with the path to your login account's home directory:
(home directory)/.ssh/
|
- Step 2 Launch the Aspera AMI
-
In the AWS Management Console, go to the AMIs in the Navigation sidebar, search for the AMI with the keyword aspera, or the exact name referred in the subscription-confirmation page. Launch the AMI.
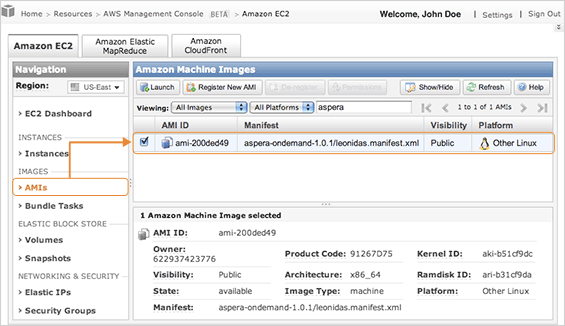 In the Launch Instance Wizard, enter the following info. Click Launch when finished:
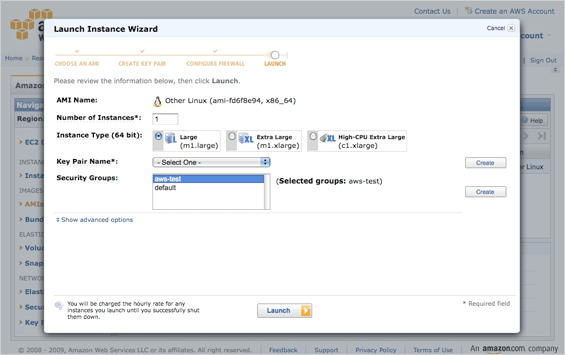
- Select the number of instances Each instance is a unique Aspera On-Demand Server
- Select the instance type
- Select the security key pair Refer to Step 1.
- Select the Security Groups associated with the Instance Refer to Step 1.
- Step 3 Log in the On-Demand Console
-
When the Aspera AMI is launched, locate it under the Instances in the Navigation sidebar. You can obtain the following On-Demand Server information:
- Login Password The string in the field Instance.
- Address The Public DNS. Or derive the IP address from its numeric string.
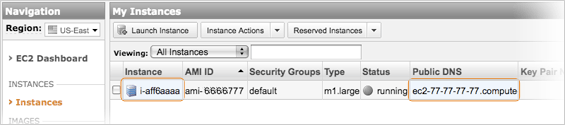 From the example above, On-Demand Console can be accessed through the information:
- Address:
-
https://ec2-77-77-77-77.compute.../aspera/console
https://77.77.77.77/aspera/console
- Username:
- admin
- Default Password:
- i-aff6aaaa
When accessing the page, the browser may notify you of a untrusted connection, follow the instructions to accept the security certificate.
You need to install the Adobe Flash Player on your computer before using the On-Demand Console. Download the Flash Player from the link:
http://get.adobe.com/flashplayer.
- Step 4 Update the admin account info
-
|
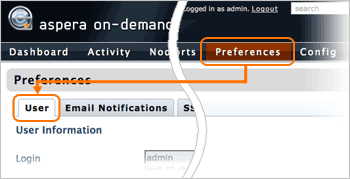
When logged in, go to Preferences Console menu > User, update your admin account information. Click Update when finished.
If you backup and restore the On-Demand Server (explained in Step 7), the password information will also be stored.
|
If you backup and restore the On-Demand Server without updating the password, the original password (The Instance id) will also be stored, which may not match the new instance id.
- Step 5 Create a transfer user account
-

|
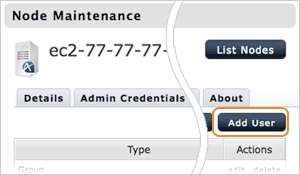
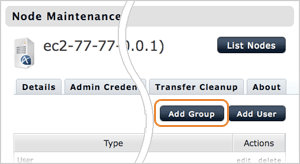
A transfer user account should be created in order to start fasp™ file transfers on this On-Demand Server. In the On-Demand Console, navigate into the Nodes, click edit in the 127.0.0.1 entry.
|
|
In the Node Maintenance page, go to the Accounts tab and click Add User. In the Creating New User page, enter the login information and click Create. For example, create the user with the following information:
- Login: asp1
- Password: secRet
|
- Step 6 Log in the Connect Server and test transfers
-
Before logging into the Connect Server, make sure you have installed the
Aspera Connect on your computer. Download the installer here:
http://asperasoft.com/connect.
- Address:
-
http://ec2-77-77-77-77.compute...
http://77.77.77.77
- Username:
- asp1
- Password
- secRet
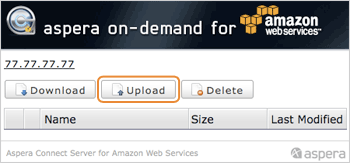 |
When logged in the Connect Server Web UI, click Upload and try transferring a file to the server. |
- Step 7 Log in the Aspera AMI through SSH
-
To use SSH to log in the Aspera AMI instance, connect to the IP address derived from the Step 2 with your admin credentials. In this example, the Aspera AMI uses the information:
- Address:
-
ec2-77-77-77-77.compute...
77.77.77.77
- Port number:
- 33001
- Login:
- root
- Private key file:
- ~/.ssh/asp1.pem
For example, execute the following command to log in:
$ ssh root@77.77.77.77 -p 33001 -i ~/.ssh/asp1.pem
- Step 8 Backup and restore the On-Demand Server configuration
-
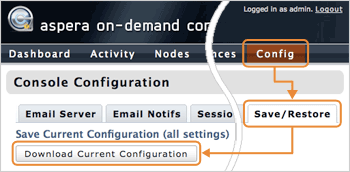 |
The AMI instance doesn't store any data when terminated, you may want to backup the configuration before shutting down the Aspera AMI. To do so, log in the On-Demand Console and go to Config > Save/Restore. Click Download Current Configuration and save the file. |
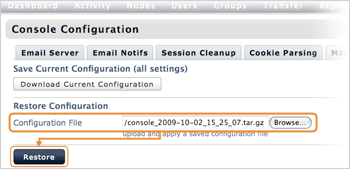 |
To restore the configuration to a new instance, go to the same page of the On-Demand Console (Config > Save/Restore), click Browse in the Configuration File to select the backup file, click Restore to load the settings. |
2.3 Manage Your On-Demand Console User Account
Follow these steps to log in and manage your Console user account:
- Step 1 Update the user information
-

|
When logged in the On-Demand Console, click Preferences from the Console menu to edit all the user account settings.
|
Under the User tab, you can modify your user information, including the password, user first name and last name, e-mail address, and time zone. When finished, click Update.
- Step 2 Set up the email notification
-
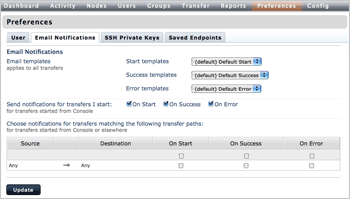
|
You can configure the email notifications of particular transfer events in the Email Notification tab. For example, send notification to file sender and receiver when transfer is completed successfully. Select the template to use under the Email templates section, and check the event which you like to be notified. Click Update when finished.
|
- Step 3 Manage the Saved Endpoints
-
When you enter an endpoint of a node to initiate a transfer, for example, asp1@10.0.0.10, Console automatically saves this endpoint (combination of the login credentials and node address) under your user account. To manage endpoints, go to Saved Endpoints tab in the Preferences Console menu. You can modify, test, and remove a saved endpoint by using edit, test and delete respectively.
- Step 6 Add SSH private keys
-

|
If you wish to transfer files through the On-Demand Console, using the key-based authentication, go to the SSH Private Keys tab and click New SSH Private Key to upload the private key. Complete the form and click Save:
Note: The Real name value should match the private key file name.
|
- Unique name
- A unique name to represent this key file.
- Real name
- The private key file name.
- Private Key file
- Select the private key file to upload.
- Passphrase /
Confirm passphrase
- Enter the passphrase of the key, if any. Enter the passphrase again in the Confirm passphrase field.
|
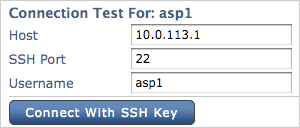
When a SSH private key is added, you can test the connection by clicking the Test button, entering the IP address of the computer that has the pairing public key installed and corresponding user name. Finally, click the Connect button.
|
3. On-Demand Console Administration
3.1 Manage Transfer Users and Groups
You need to add system/transfer users on the Aspera AMI to allow the fasp™ transfer connection with the user account. Each entity, including the user account and the system groups, can be further assigned with the specialized transfer settings, such as the docroot, bandwidth, and the authentication method. This section shows you how to add the system/transfer users and groups through the Aspera On-Demand Console.
The system/transfer user is not directly related to the Console User. The system/transfer user is the system user account on the Aspera AMI, which can be used for fasp™ transfer authentication. The Console User is for logging in the On-Demand Console.
When adding the system/transfer user and groups in the On-Demand Console, it creates the system users and groups in the Aspera AMI instance. Follow these steps to create and manage the system/transfer users and groups:
- Step 1 Navigate into the On-Demand Server's node maintenance page
-
|
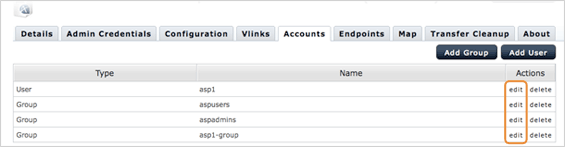
In the On-Demand Console, navigate into the Nodes and click edit in the 127.0.0.1 entry.
|
- Step 2 Create a system/transfer user
-
|
To add a system/transfer user, in the Node Maintenance page, go to the Accounts tab and click Add User.
In the Creating New User page, enter the login information and click Create.
|
- Step 3 Create a system/transfer group
-
 |
To add a system/transfer group, in the Node Maintenance page, go to the Accounts tab and click Add Group.
In the Creating New Group page, enter the group name and click Create.
|
- Step 4 Edit the system/transfer user and group
-
You can configure the fasp™ transfer settings specifically for a system/transfer user or group. To do so, in the Node Maintenance page, go to the Accounts tab. Click the edit in the entity's entry that you wish to modify. Refer to 6.2 Configure the On-Demand Transfer Server for configuration details.
3.2 Add Unmanaged Nodes
In the On-Demand Console, a node is defined as an Aspera-transfer-enabled computer that is being added to Console. A managed node is the On-Demand server itself, whereas an unmanaged node is another fasp™ transfer server that being added for transfers and monitoring through the Console, without the transfer server configuration accessibility.
To add an unmanaged node, follow these steps:
- Step 1 Go to the Unmanaged Node List page
-
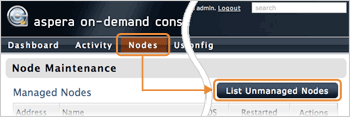
|
In the Aspera Console, go to Nodes and click List Unmanaged Nodes.
|
- Step 2 Add a new unmanaged node
-
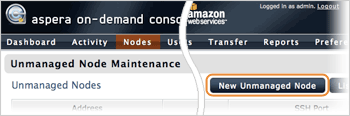
|
In the Unmanaged Node Maintenance page, click New Unmanaged Node.
|
In the Creating New Unmanaged Node page, enter the node's IP address, description, and the SSH port number. Click Create when finished.
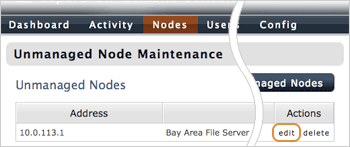
- Step 3 Configure the unmanaged node
-
When added the unmanaged node, you should see the node's maintenance page. Go to the Map tab to position this node onto the map and click Save Changes. The On-Demand Console uses this map to illustrate the transfer activity in the Dashboard.
The Endpoints tab is used for adding endpoints on this node. Refer to 3.3 Set Up Endpoints for instructions.
3.3 Set Up Endpoints
The endpoints can be used to initiate transfers in the On-Demand Console, and set up transfer paths for monitoring. It is a combination of a login account and a node's address, for example, user1@node1.
A wildcarded endpoint, for example, *@node1, interpreted as "all logins at node1", is created when adding the node. With the wildcarded endpoint, one can monitor all transfers on the node, and provide the credentials to start transfers on it. The user-provided credentials will be stored in the user account's Saved Endpoints under the Preferences.
Follow these steps to add an endpoint:
- Step 1 Navigate into the node's maintenance screen
-
Go to the following location to add an endpoint on a managed or an unmanaged node:
|
|
To add an endpoint on the managed node, go to the Nodes Console menu, locate the node to add endpoints, and click edit.
|
|
|
To add an endpoint on an unmanaged node, go to the Nodes Console menu, and click List Unmanaged Nodes.
|
|
In the Unmanaged Node Maintenance screen, locate the node to add endpoints, and click edit.
|
- Step 2 Add an endpoint
-
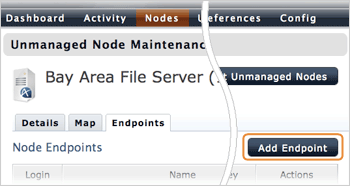
|
In the node maintenance screen, go to the Endpoints tab, and click Add Endpoint.
In the New Endpoint screen, enter the following info. When finished, click Create:
|
- Login
(Required)
Enter the login name.- Password
- Enter the password if you want to store the password info in this endpoint. Enter again in the Confirm Password field.
- Email Notifications
- Enter an address to receive notifications of the transfer activity on this endpoint.
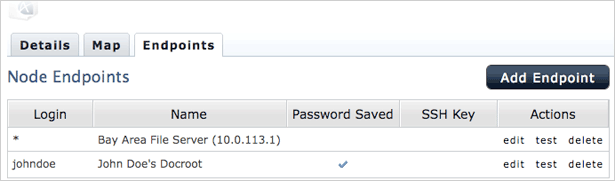
The created endpoints will appear in the node's maintenance page, under the Endpoints tab. A checked Password Saved field means that the endpoint contains the password information, and the permitted user doesn't need to enter the password to use this endpoint.
Under the Action column, you can click edit to modify the endpoint, test to test logging in the endpoint, and Remove to delete it.
3.4 Console Groups
The Console user's permissions are defined in the Console groups. When assigning a Console user to a group, the Console user inherits the permissions defined in the group.
The group's permissions are determined by the Transfer Path, an access settings between specified endpoints. The Transfer Path consists of two endpoints, the transfer direction (one-way or two-way), and a set of permissions, such as start transfers, monitor others' transfers, and enable Email notifications.
3.4.1 Default Groups
Console contains three default groups, each group's permissions:
- ALL NODES -
Transfer Administrators
- The users in this group can monitor, control and set up Email Notifications of all transfers on all Console nodes, start Simple and Smart Transfers between any nodes, and share the Smart Transfer templates with other users. Notice that when starting a transfer, the user can enter an arbitrary address of a node, but is not provided a list of the added Console nodes.
- ALL NODES -
Transfer Initiators
- The users in this group can start Simple and Smart Transfers between any nodes. Notice that when starting a transfer, the user can enter an arbitrary address of a node, but is not provided a list of the added Console nodes.
- ALL NODES -
Transfer Monitors
- The users in this group can monitor and set up Email Notifications of all transfers on all Console nodes.
3.4.2 Add Console Groups
To set up a Console group, follow these steps:
- Step 1 Create a new Console group
-
|
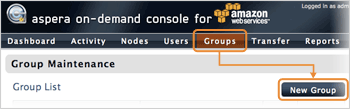
Go to Groups from the Console menu and click New Group. In the Creating New Group screen, enter the group's name and description. Click Create when finished.
|
- Step 2 Add a Transfer Path
-
|
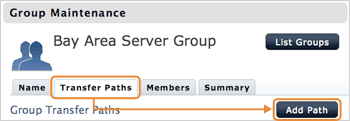
When the Console group is created, you should be redirected to its Group Maintenance. To create a Transfer Path, go to the Transfer Paths tab and click Add Path.
|
Fill out the New Transfer Path form. When finished, click Create:
- Endpoint 1
- Choose an endpoint. When creating an unidirectional transfer path, select the source endpoint.
- Direction
- Specify the allowed transfer direction.
- Endpoint 2
- Choose the other endpoint.
When selecting Any as an endpoint, and the Transfer Path has the start Simple or Smart Transfer permissions, it permits users to enter arbitrary addresses for file transfer.
- Start Simple Transfers
- Allowed to start a Simple Transfer.
- Start Smart Transfers
- Allowed to trigger Smart Transfers.
- Create Smart Transfers
- Allowed to create a Smart Transfer template.
- Share Smart Transfers
- Share the Smart Transfer templates to other users.
- Control Transfers started by others
- Control other's transfers. (stop, pause, set rate etc.)
- View Transfers started by others
- View others' transfers on the same Transfer Path.
- Opt-in to email notifications
- Enable Email Notifications of this Transfer Path.
- Description
- Enter the endpoint's description.
When created, the Transfer Path can be found under the Node Maintenance > Transfer Path. To edit or delete the Transfer Path, click edit or remove, respectively.
- Step 3 Add members to the Console group
-
|
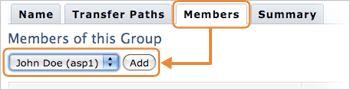
Go to the Members tab, select the Console user from the menu, and click Add to add this user to the group.
|
You can also assign group members through the
User Maintenance page. See
3.5 Console Users.
- Step 4 Review the Console group
-
You can review the Console group's Transfer Path and the members in the Summary tab.
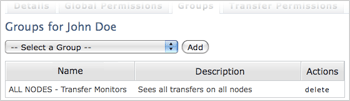
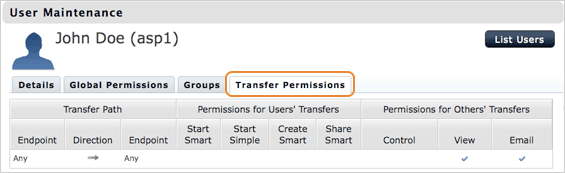
3.5 Console Users
A Console user is an Aspera Console login account with customizable access permissions. Except for administrator accounts, Console user permissions are managed through the group assignment. A Console user inherits the permissions from the group(s) one belongs to.
A Console user is not directly related to the login account (system user/transfer user) to a node.
To create a Console user, follow these steps:
- Step 1 Add a new Console user
-
|
Go to Users from the Console menu and click New User.
In the Creating a New User screen, enter the user's info in the specified fields. Click Create when finished.
|
All activity on the Console will show the time and date based on the user's time zone.
- Step 2 Set the global permissions
-
|
You can find the Console user's general permissions in the Global Permissions tab. If any changes is made, click Update.
|
- Active (allow user to login)
- Check to enable the Console user account.
- Console Administrator
- Check to make it an administrator account.
- Step 3 Assign the Console user to groups
-
|
You can assign groups to the Console user, allowing the Console user to have the permissions (Transfer Paths) of the groups. Go to the Groups tab, select the group to assign, and click Add.
|
|
The added groups will appear in the table below. Click delete if you wish to remove it.
|
- Step 4 Review the Console user's permissions
-
You can review the user's permissions in the Transfer Permissions tab.
4. Transfer Files with the On-Demand Server
When the On-Demand Server is set up, and at least one system/transfer account is created, you can transfer files with the On-Demand Server through the Connect Server Web UI, fasp™ Transfer Server, or the On-Demand Console. This chapter shows you how to transfer files with these components using the following applications:
- Aspera Connect
- 4.1 Transfer Using the Aspera Connect
- Aspera User Interface
- 4.2 Transfer Using the Aspera User Interface
- On-Demand Console
- 4.3 Transfer Using the On-Demand Console
4.1 Transfer Using the Aspera Connect
Aspera Connect is a file transfer browser plugin that allows web applications to take advantage of fasp-enhanced transfers. You can download it for free at http://asperasoft.com/connect.
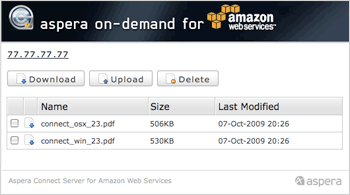 |
To transfer files with the On-Demand Server, point your browser to the On-Demand Server's address, provide the system/transfer user credentials when prompted. In the Connect Server Web UI, use the buttons Upload and Download to transfer files.
For more information about the Aspera Connect usage and configuration, refer to the Aspera Connect User Guide.
|
4.2 Transfer Using the Aspera User Interface
The Aspera User Interface is a desktop application for initiating fasp™ file transfers. The Aspera User Interface is included in the following products (All products require license):
- Aspera Connect Server Windows / Mac OS X
- Aspera Enterprise Server Windows / Mac OS X
- Aspera Point-to-Point Windows / Mac OS X
- Aspera Client Windows / Mac OS X
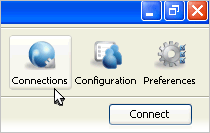 |
To add the On-Demand Server, in the Aspera User Interface, click Connections in the main window.
In the Connection Manager window, click  to add a new connection. Enter the following info: to add a new connection. Enter the following info:
The On-Demand Server uses the port TCP/33001 for SSH connections, instead of the default TCP/22.
|
- Host:
Required
The On-Demand Server's IP address, for example: 77.77.77.77- Users:
- The system/transfer user, for example: asp1. To add a system/transfer user, refer to 3.1 Manage Transfer Users and Groups.
- Authentication
- Select Password and enter the system/transfer user account's password.
- Display Name:
- Enter a name for this connection.
- Target Directory:
- The default directory when connecting to this computer.
- Sharing:
- Check this box to share this connection with other users on your computer. Notice that when this connection is authenticated through the public key, other users should have the same private key.
- Advanced Settings:
-
- SSH Port (TCP): The TCP network port. Set this to 33001.
- fasp PORT (UDP): The UDP network port: Default: 33001
- Connection Timeout: Timeout the connection attempt after the selected time.
 |
When the On-Demand Server is added, on the Aspera User Interface main window, select the On-Demand Server from the Connection list, click Connect to establish the connection.
|
4.3 Transfer Using the On-Demand Console
If you have added the unmanaged nodes into the On-Demand Console, it can be used to initiate transfers between nodes when the Console user has the permission to start transfers. It provides two types of transfer methods:
- Simple Transfer
- A one-time transfer session that requires entering all transfer info.
- Smart Transfer
- A transfer template that stores all the transfer settings and can easily be reused.

|
Click the Transfer from the Console menu to begin.
|
4.3.1 Simple Transfer
|
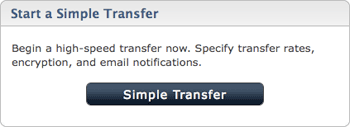
To start a Simple Transfer in the Transfer screen, click Simple Transfer.
Fill out the Start a Simple Transfer form. When finished, click Transfer to initiate the transfer:
|
- Description
-
Enter the name and comment of the transfer. This can be helpful if you want to search for this transfer later.
- Source
-
Select the source endpoint and files to transfer.
If you select a node instead of an endpoint (An IP address without the login presented), it prompts you to enter the fasp™ transfer login credentials. The credentials that you enter during a transfer will be stored in Preferences > Saved Endpoint that only you can access.
Click Browse to select files to transfer.
- Selected Source Items
-
The selected files and folders to transfer will be added into the Selected Source Items panel.
- Destination
-
Select the destination endpoint and the directory to receive the file.
Same as the Source, when selecting a node instead of an endpoint, it prompts you to enter the fasp™ transfer login credentials.
Click Browse to select files to transfer.
- Destination Directory
-
The selected folder to receive the files will be added into this panel.
The More Options panel will be covered in 4.3.3 Console Transfer Options.
4.3.2 Smart Transfer
|
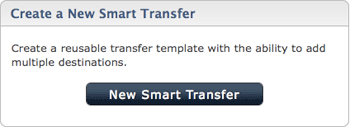
To set up a Smart Transfer, in the Transfer screen, click the New Smart Transfer.
Follow these steps to create a new Smart Transfer template. Click Save when finished:
|
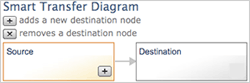
- Step 1 Set up the source
-
|
Select the Source from the Smart Transfer Diagram. Enter its information:
|
- Transfer Name
- Enter the transfer name.
- Share this smart transfer
- Share this transfer with other Console users.
- Allow changes to transfer settings at start time
- Allow the transfer initiator to modify the transfer settings when starting the transfer.
- Connect
- Select the source endpoint. Enter the login credentials when selecting a node.
- Use a URL instead of a directory as source
- Check this option to feed the files from a FTP to the source endpoint.
- Choose Source Directory
- Choose the source directory to transfer.
- Items to transfer
- Select a file-transfer rule.
- Step 2 Set up the destination
-
|
Select Target from the Smart Transfer Diagram.. Enter its information:
|
- Connect
-
Select the destination endpoint. Enter the login credentials when selecting a node.
- Use a URL instead of a directory as destination
- Check this option to forward the files to a FTP from the destination endpoint.
- Choose Destination Directory
- Choose the destination directory to receive.
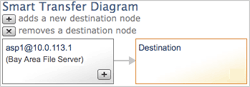
- Step 3 Add more destination (Optional)
-
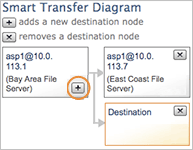
|
To add more destination in the Smart Transfer Diagram, click + in the preceding endpoint. Select the new destination and repeat the Step 2. To remove a destination, click x in the box.
|
The More Options panel will be covered in 4.3.3 Console Transfer Options.
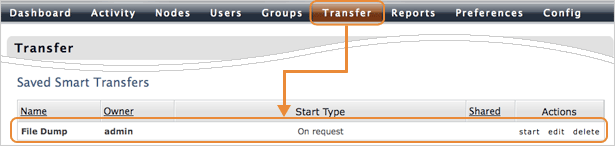
When a Smart Transfer is created, you can find it in the Transfer Console menu > Saved Smart Transfer panel. Under the Action column, click start to initiate this transfer, use edit or delete to manage it.
4.3.3 Console Transfer Options
In both the Simple and Smart Transfer, you can find more transfer settings in the More Options panel:
- fasp™ Port (UDP)
- Specify the UDP port for fasp file transfers.
- Target rate
- Specify the transfer target rate.
- Minimum rate
- Set the transfer minimum rate
- Bandwidth policy
- Choose a transfer policy among fixed/high/fair/low.
- Retry policy
- Check the option to enable the retry policy, and specify the number of attempts and the duration.
- Content protection
- Check the option to enable the content protection that encrypts the files on destination, using the entered password.
- Transport encryption
- Select aes-128 to transfer with this encryption method.
File Handling
- Resume policy
- Specify a resume policy and the overwrite rule when the file exists on the destination.
- File attributes
- Check the option to preserve the file permissions on the destination.
- Source files
- Check the option to delete the transferred files from the source computer.
- Exclude filter
- Enter file-name pattern to exclude from the transfer. Two symbols can be used in the pattern: * represents zero to many characters in a string, for example "*.tmp" matches ".tmp" and "abcde.tmp". ? represents one character, for example "t?p" matches "tmp" but not "temp".
- Email address
- Enter the Email address in the text field, and click Add to send notifications to the address on specified events. When the Email is added into the table, specify the notification template for each transfer status.
- fasp datagram size (MTU)
- Check the option and enter the datagram size in bytes.
- Read block size
- Check the option and enter the read block size in bytes.
- Write block size
- Check the option and enter the write block size in bytes.
- Transfer
- Specify when to submit the transfer.
5. Manage Transfers
Through Console, transfers on managed nodes can be monitored and controlled directly. This chapter covers the three approaches to manage transfers (Dashboard, Activity, and Node status), and creating activity reports.
5.1 Dashboard
The Dashboard provides a quick overview of all transfer activities and the node status which you have permissions to monitor. It gives continuous updates and helps identify transfer and node problems.

|
Go to the Dashboard from the Console menu. The Dashboard contains the following six panels:
|
- Current Transfers
-
Lists up to ten ongoing transfers on all managed nodes. To view all active transfers, click the Current Transfers button in the header. Console will open the Activity page with the proper filter set up.
- Scheduled Transfers
-
Lists up to ten scheduled transfers on all managed nodes. To view all scheduled transfers, click the Scheduled Transfers in the header, Console will open the Activity page with the proper filter set up.
- Recent Transfers
-
Lists up to ten recent transfers on all managed nodes. To view all recent transfers, click the Recent Transfers in the header, Console will open the Activity page with the proper filter set up.
- Problem Transfers
-
Lists up to ten transfers with error on all managed nodes. To view all transfers with error, click the Problem Transfers in the header, Console will open the Activity page with the proper filter set up.
- Map
-
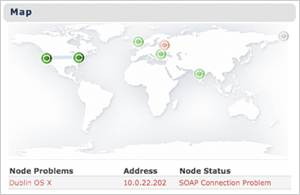 |
The map indicates all the managed nodes' status, as well as the transfers between them. If a node fails, the icon becomes red in the map, and the node is listed with the problem in the table below.
|
- Bandwidth
-
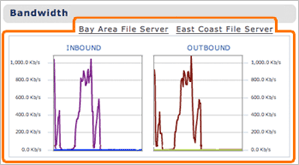 |
By default, the Bandwidth panel shows bandwidth usage for all nodes. If you select one or more nodes on the map, the Bandwidth panel shows the cumulative bandwidth of the selected nodes.
|
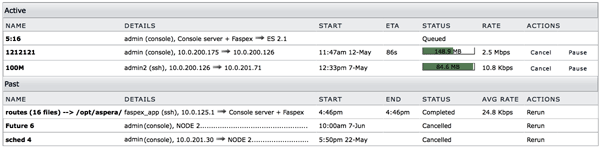
5.2 All Activity

|
The Activity page lists all transfers on all managed nodes. You can narrow down the list with the filter, and advance into a transfer's session detail page. Click the Activity button from the Console menu to begin.
|
5.2.1 Activity Overview
You can review the list of transfers in the Activity Overview screen. Each column in the table represents the following:
- NAME
- The transfer's name.
- DETAILS
- The transfer initiator, source, and destination.
- START
- This transfer's start time.
- ETA
- The estimated time of arrival.
- STATUS
- Current status of this transfer.
- RATE / AVG RATE
- The transfer rate of the active transfer, or the average rate of a past transfer.
- ACTIONS
- Show all available actions. For example, Pause and Cancel for a running transfer.
The Active transfers in the top table lists all the active transfers, including the running and queued transfers. The Past transfers on the bottom shows the previous transfers, including completed, canceled, and error ones.
The filter options on the top can be used to narrow down the list. The options are explained in the diagram:

- History
- Select the timeframe to display the started transfers.
- Scheduled
- Select the timeframe to display the scheduled transfers.
- Status
- Choose a specific transfer status to display.
- Search
- Search for keywords in transfer sessions.
5.2.2 Transfer Detail and Session Detail
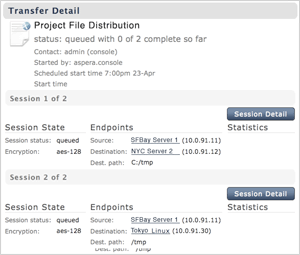
|
Clicking a transfer item from the Activity Overview page opens the Transfer Detail or the Session Detail screen.
In a multiple-session transfer, when clicking the item from the Activity Overview page, you should see the Transfer Detail page that lists all sessions in this transfer as shown in the screenshot on the left. Clicking the Session Detail button of a particular session in this transfer opens its Session Detail page.
In a single-session transfer, clicking the item advances directly to the Session Detail screen. Refer to 5.4 Session Detail for more information.
|
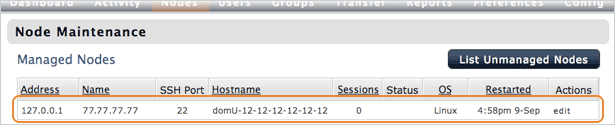
5.3 Node Status

|
Through the Nodes page, you can monitor the node status and manage the transfers on a node. Click the Nodes from the Console menu to begin.
|
In the Node Maintenance page, you can see the On-Demand Server as a managed node. Click it to open the Node Detail page.
5.3.1 Monitor Transfers on the On-Demand Server
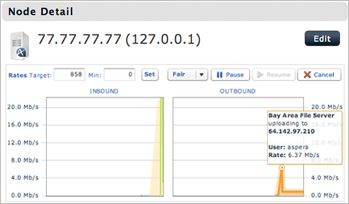
|
In the Node Detail page, the upper panel is a transfer chart showing all inbound and outbound transfers on the On-Demand Server. To control a transfer session, select the session from the graph, and use the control options above the graph.
|
|
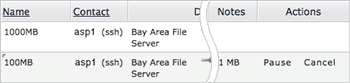
The table below lists all sessions on the On-Demand Server. Use the Pause and Cancel buttons to control an ongoing session. Click on a session to open to the Session Detail page. Refer to 4.4 Session Detail for more info.
|
5.3.2 Transfer Cleanup
|
|
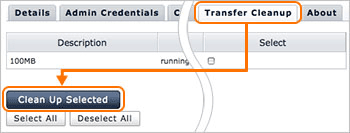
If the On-Demand Server is having the SOAP connection problem, the finished transfers could be listed erroneously as ongoing transfers. To clean up these transfers, click edit in the 127.0.0.1 entry.
|
|
In the Node Maintenance page, go to the Transfer Cleanup tab, select the transfer to remove, and click Clean Up Selected.
|
5.4 Session Detail
The Session Detail page shows all the information regarding the transfer session. It can be accessed through the Activity or the Nodes page from the Console menu.
For an ongoing transfer, the Session Detail page provides the transfer monitor that displays current transfer status. You can control the transfer through the options above the graph.
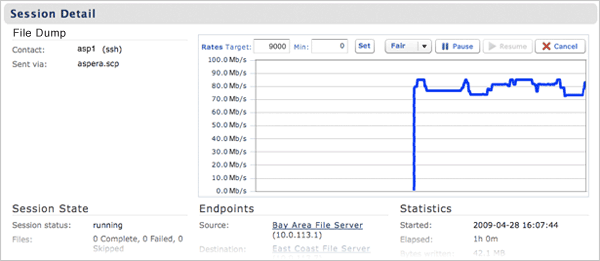
The Session Files section below lists all files being transferred in this section. Click on a file to review the file's information.

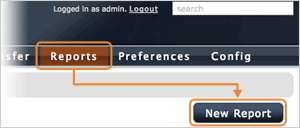
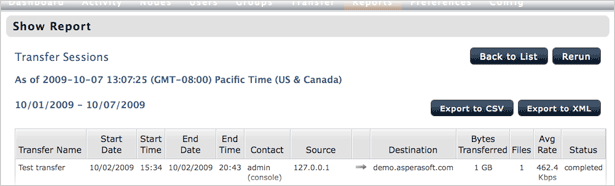
5.5 Reports
|
You can set up activity reports based on customizable filters, and export files in XML or CSV format. Go to Reportsfrom the Console menu and click New Report to begin.
In the New Report screen, fill out the form and click Generate Report:
|
- Report name
- Enter the report's name.
- Report type
- Organize report by the selected type. E.g. Summary by Day lists reports by each day.
- Start date
- Determine the start date of this report.
- End date
- Determine the end date of this report.
- Time zone
- Specify the time zone for this report.
Specify the sorting rule of this report. The report will be sorted by this order:
- Sort by
- Select the sorting column.
- Order
- Set the sorting order.
To narrow down the report, specify the filter and the value to show only the matching result:
- Filter by
- Select the filtering option.
- Not
- Check this option to add the "not" into the filter.
- Comparison
- Select the filtering operant and enter the value.
When created, you should see the report in the Report List. Clicking the Xml or Csv to export and download the report in the chosen format. Click Rerun to refresh the report.

To view the report, click the row to advance into the Show Report page. In this page, you should see the result of this report. Click an item to review its Session Detail. Click Rerun to refresh the report.
The On-Demand Console Administrators can configure Aspera Nodes from Aspera Console. The managed nodes that runs the following Aspera transfer products may be configured with Console:
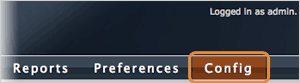 |
To configure the On-Demand Console, go to the Config from the On-Demand Console menu. The Config menu contains the following tabs that are covered in this section:
|
- 6.1.1 Email Server
- Email Server for Notification.
- 6.1.2 Email Notifs
- The Email notification templates.
- 6.1.3 Session Cleanup
- The zero-byte transfer handling rule.
- 6.1.4 Cookie Parsing
- Parsing the cookie values set for transfers.
- 6.1.5 Map
- Set the map for transfers route visualization.
- 6.1.6 SSH Private Keys
- Upload private keys for initializing transfers with unmanaged nodes.
- 6.1.7 Console Defaults
- The On-Demand Console's default setting options.
- 6.1.8 Save/Restore
- Save and restore the On-Demand Server's configuration.
6.1.1 Email Server
Go to the Email Server tab to set up the SMTP server that will be used to send notifications. When finished, click Save settings. The options under the Email Server tab:
- Server
- The SMTP server's address.
- Port
- The SMTP server's port number.
- Domain
- Enter the domain.
- Use TLS if available
- Check the box if Transport Layer Security is available.
- Authentication type
- Choose between the Open authentication and the Login required of the SMTP server's authentication type, and provide the required information (e.g. "From" address and "From" name for Open authentication). .
- Test email address
- Enter a email address and click Save settings and send test email to test the SMTP server setting.
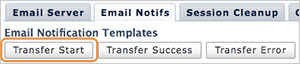
6.1.2 Email Notifs
Go to the Email Notifs tab to modify the email notification templates and settings:
|
Three set of notification templates are provided based on three transfer states: Transfer Start, Transfer Success and Transfer Error. Click Transfer Start to begin.
|

|
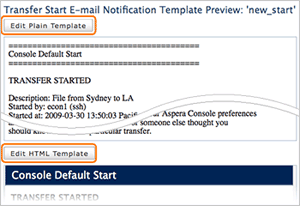
To add new templates, click Create New Template to add a new one into the list. Click edit in the template to edit it.
|
|
In the template preview screen, click Edit Plain Template to edit the pure-text notification in the provided form, and Edit HTML Template to modify the template in the HTML code.
Console sends email in multi-part format, to ensure information is shown in both parts of the email correctly, you need to edit both the plain and HTML templates. When finished editing the template, click Save.
|
There are several special text strings that will be replaced in the actual e-mail by the appropriate value:
- DESCRIPTION
- Description of the transfer
- CONTACT
- Login name of user who initiated the transfer
- STARTED_AT
- Time the transfer began
- STOPPED_AT
- Time the transfer stopped
- SOURCE_NODE
- Source node of the transfer
- FIRST_5_SOURCE_PATHS
- First five source paths being transferred
- ALL_SOURCE_PATHS
- All source paths being transferred (up to 4000 chars)
- DESTINATION_NODE
- Destination node of the transfer
- DESTINATION_PATH
- Target path on the destination node for the transfer
- COMMENT
- Comment for transfer
- BYTES_TRANSFERRED
- Total number of bytes transferred
- ELAPSED_TIME
- Time elapsed for transfer
- AVERAGE_RATE
- Average transfer rate
- FILES_TRANSFERRED
- Number of files transferred
- FILES_SKIPPED
- Number of files skipped during transfer
- FILES_FAILED
- Number of files that failed to be transferred
- FIRST_10_FILEPATHS
- Paths of the first 10 files transferred
- ALL_FILEPATHS
- Paths of all transferred files
- Earlier Sync versions
- Check the option to include the notifications for an older Sync activity.
- Default time zone
- Set the default time zone for the Email notification. The time and date shown in the notifications will be based on this time zone.
- Skip non-error emails older than:
- If the transfer-start or the transfer-success notifications are not sent after the specified hour, ignore them.
- Skip error emails older than
- If the transfer-error notifications are not sent after the specified hour, ignore them.
- Email process log level
- Specify a log level for email process. From the most to the least detailed log, choose between Debug, Info, Warn and Error.
- Polling frequency
- Specify the polling frequency in seconds.
6.1.3 Session Cleanup
The Session Cleanup tab provides options to handle the sessions with zero bytes transferred (no-transfer sessions):
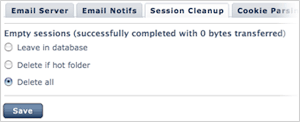
|
- Leave in database
- Log no-transfer sessions into the database.
- Delete if hot folder
- Delete the no-transfer sessions which are Hot Folder sessions.
- Delete all
- Delete all no-transfer sessions.
|
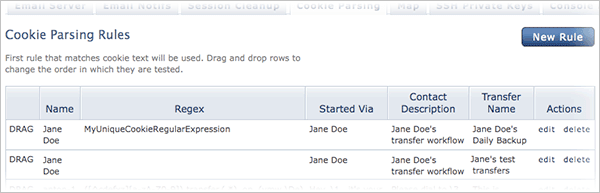
6.1.4 Cookie Parsing
In the ascp command-line transfer, one can specify the cookie through the environment variable. In Console, you can match the cookie string and substitute the transfer's information with the specified values. Go to Cookie Parsing to begin.
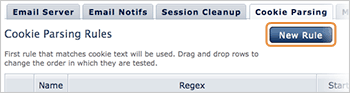
|
In the main screen, click New Rule to set your rule. When finished, click Create to save the rule. The Creating New Rule includes the following options:
|
- Rule name
- Enter a name for this parsing rule.
- Regexp
- The Cookie's regular expression. If this string matches the cookie accompanies the transfer, the following information is used in this transfer session.
- Started via
- Enter the name of the transfer initiator.
- Contact description
- Enter the description of this transfer initiator.
- Transfer name
- Enter the name of this transfer.
When multiple rules are created, use drag-and-drop to move the rules in the list. If two rules have identical regular expression, the one stands higher in the list will be applied.
6.1.5 Map
In the Map tab, you can select or upload an image as the map used in the Dashboard:
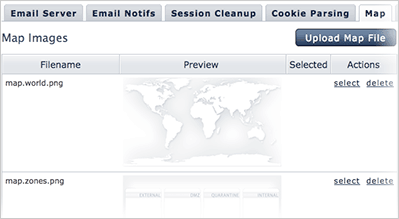
|
There are two default map images. To use the one you desire, click select next to the name of the map.
You can also click Upload Map File to upload your own map image. For the best result, use an image with the 16 x 9 ratio.
(eg. 800px x 450px) |
6.1.6 SSH Private Keys
To make a private key accessible for other users, go to Config Console menu and click SSH Private Keys. Click New SSH Private Key. Fill out the form, click Save when finished:
- Unique name
- A unique name to represent this key file.
- Real name
- The private key file name.
The Real name value should match the private key file name.
- Private Key file
- Select the private key file to upload.
- Passphrase /
Confirm Passphrase
- Enter the passphrase of the key, if any. Enter the passphrase again in the Confirm passphrase field.
 |
When added, click Test, enter a computer's address that has the pairing public key installed, the corresponding user name, and click Connect with SSH Key to test against the computer.
|
6.1.7 Console Defaults
Go to Console Defaults for the Console default settings:
- Console's IP address
- Enter the Console's IP address.
- Skip non-error transfers older than:
- If a submitted transfer doesn't start after the specified minutes, mark it as errors.
- SSH Timeout
- Enter the value in minutes that the SSH connection attempts to sustain.
6.1.8 Save/Restore
The AMI instance doesn't store any data when terminated, you may want to backup the configuration before shutting down the Aspera AMI.
|
To backup the settings, in the Config > Save/Restore, click Download Current Configuration and save the file onto your local machine.
|
|
To restore the configuration to a new instance, click Browse in the Configuration File to select the backup file, click Restore to load the settings. |
You can set up the On-Demand transfer settings for the node-level, group-level, and the user-level.
6.2.1 The Transfer Server Configuration Page Overview
|
To start the transfer server configuration, navigate into the Nodes, click edit in the 127.0.0.1 entry.
The transfer server configuration can be found in the following tabs:
- Configuration
- The node-level configuration.
- Accounts
- The user- and group-level configuration.
|

The following is a summarized chart for navigating and changing values when you click on an individual section, click Save changes when finished:
|
- A Connect this node to Console/Restart Aspera Central
- When adding a new node, click Connect this node to Console to auto-config this node to connect to Console. The Restart Aspera Central button appears when settings require restarting Aspera Central, and all transfers on the machine will be terminated.
- B (Panel tools)
- Open All to expand all panels; Open Overridden to expand those have overwritten values; Close All to collapse all panels.
- C (Collapsed Panel)
- Click the arrow to expand the panel and view all options. If there are overrides applied in that section, an asterisk (*) appears in the header.
- D Source
- The source where the default value is inherited from.
- E Overwrite
- Check the option to specify a value.
- F Effective Value
- When Override is checked, enter a value for this option.
- G (Option Tools)
- Click Overwrite to enable certain panel (e.g. Docroot); click Default to restore the default values.
|
The following sections cover all the transfer server configuration options:
- Server-only Database
- 6.2.2 Database
- Server-only Transfer Server
- 6.2.3 Transfer Server
- Server-only HTTP Fallback Server
- 6.2.4 HTTP Fallback Server
- Docroot
- 6.2.5 Docroot
- Authorization
- 6.2.6 Authorization
- Bandwidth
- 6.2.7 Bandwidth
- Advanced File Handling
- 6.2.8 Advanced File Handling
- Advanced Network Options
- 6.2.9 Advanced Network Options
- Virtual Links
- 6.2.10 Create the Virtual Links
6.2.2 Database
- Host IP valid IPv4 address, default 127.0.0.1
- Enter the Aspera Console server's IP address.
- Port positive integer, default 4406
- The default value for an Aspera Console installation is 4406. Valid port numbers range between 1 and 65535.
- Usertext string, default blank
- User login for the database server.
- Database Name text string, default blank
- Name of the database used to store Aspera transfer data.
- Threadspositive integer between 1 and 40, default 10
- The number of parallel connections used for database logging. A higher value may be useful when a large number of files are being transferred within a given timeframe.
- Stop Transfers on Database Errortrue / false, default false
- Quits all ongoing transfers and no new transfers are permitted when a database error prevents data from being written to the database. Set this to true if all transfers must be logged by your organization.
- Session Progresstrue / false, default true
- Setting this value to true will log transfer status such as number of files transferred, and bytes transferred, at a given interval.
- Session Progress Intervalpositive integer, default
1
- The frequency at which an Aspera node logs transfer session information, up to 65535 seconds.
- File Eventstrue / false, default true
- Setting this value to
true enables the logging of complete file paths and file names. Performance may be improved when transferring datasets containing thousands of files. Also see File Per Session for setting a threshold for the number of files to log per session.
- File Progresstrue / false, default true
- Setting this value to
true will log file status such as bytes transferred, at a given interval.
- File Progress Intervalinteger between
1 and 65535, default 1
- The frequency at which an Aspera node logs file transfer information, up to 65535 seconds. The default setting of
1 logs information every second.
- Files Per Sessionpositive integer or zero, default
0
- The value set will be the cut-off point for file names logged in a given session. For instance, if the value is set to
50, the first 50 file names will be recorded for any session. The session will still record the number of files transferred along with the number of files completed, failed or skipped. The default setting of 0 logs all file names for a given session.
- Ignore Empty Filestrue / false, default false
- Setting this to true will block the logging of zero-byte files.
- Ignore No-transfer Filestrue / false, default false
- Setting this to true will block the logging of files that have not been transferred because they exist at the destination at the time the transfer started.
- Rate Eventstrue / false, default true
- Setting this to true will log changes made to the Target Rate, Minimum Rate, and Transfer Policy by any user or Aspera node administrator during a transfer.
6.2.3 Transfer Server
- Addressvalid IPv4 address, default 127.0.0.1
- This is the network interface address on which the transfer server listens. The default value 127.0.0.1 enables the transfer server to accept transfer requests from the local computer. Setting the value to 0.0.0.0 allows the Aspera transfer server to accept transfer requests on all network interfaces for this node. Alternatively, a specific network interface address may be specified.
- Portpositive integer, default 40001
- The port at which the transfer server will accept transfer requests. Valid port numbers range between 1 and 65535.
6.2.4 HTTP Fallback Server
- Cert File file path, default blank
- The absolute path to an SSL certificate file. If left blank, the default certificate file that came with your Aspera Enterprise Server will be used.
- Key Filefile path, default blank
- The absolute path to an SSL key file. If left blank, the default certificate file that came with your Aspera Enterprise Server will be used.
- Bind Addressvalid IPv4 address, default 0.0.0.0
- This is the network interface address on which the HTTP Fallback Server listens. The default value 0.0.0.0 allows the Aspera HTTP Fallback Server to accept transfer requests on all network interfaces for this node. Alternatively, a specific network interface address may be specified.
- Restartable Transferstrue / false, default true
- Setting this to true allows interrupted transfer to resume at the point of interruption.
- Session Activity Timeout (seconds)positive integer, default 0
- The default value of 0 means the HTTP Fallback Server will never timeout due to lack of communication from the client. Any value greater than 0 sets the amount of time, in seconds, that the HTTP Fallback Server will wait before canceling the transfer.
- Enable HTTP true / false, default false
- Enables the Aspera HTTPS Fallback Server that allows failed UDP transfers to continue over HTTP.
- HTTP Portpositive integer, default 8080
- The port on which the HTTP server listens. Valid port numbers range between 1 and 65535.
- Enable HTTPStrue / false, default false
- Enables the secure Aspera HTTPS Fallback Server that allows failed UDP transfers to continue over HTTPS.
- HTTPS Port positive integer, default 8443
- The port on which the HTTPS server listens. Valid port numbers range between 1 and 65535.
6.2.5 Docroot
- Absolute Pathfile path, no default
- The Absolute Path describes the area of the file system that is accessible by Aspera users. The default empty value gives users access to the entire file system.
- Read Allowedtrue / false, no default
- Setting this to true allows users to transfer from the designated area of the file system as specified by the Absolute Path value.
- Write Allowedtrue / false, no default
- Setting this to true allows users to transfer to the designated area of the file system as specified by the Absolute Path value.
- Browse Allowedtrue / false, no default
- Setting this to true allows users to browse the directory.
6.2.6 Authorization
- Incoming Transfersallow / deny / require token, default allow
- The default setting of allow allows users to transfer to this computer. Setting this to deny will prevent transfers to this computer. When set to require token, only transfers initiated with valid tokens will be allowed to transfer to this computer. Token-based transfers are typically employed by web applications such as Faspex™ and require a Token Encryption Key.
- Incoming External Provider URLHTTP URL, default blank
- The value entered should be the URL of the external authorization provider for incoming transfers. The default empty setting disables external authorization. Aspera servers can be configured to check with an external authorization provider. This SOAP authorization mechanism can be useful to organizations requiring custom authorization rules.
- Incoming External Provider SOAP Actiontext string, default blank
- The SOAP action required by the external authorization provider for incoming transfers. Required if External Authorization is enabled.
- Outgoing Transfersallow / deny / require token, default allow
- The default setting of allow allows users to transfer from this computer. Setting this to deny will prevent transfers from this computer. When set to require token, only transfers initiated with valid tokens will be allowed to transfer from this computer. Token-based transfers are typically employed by web applications such as Faspex™ and require a Token Encryption Key.
- Outgoing External Provider URLHTTP URL, default blank
- The value entered should be the URL of the external authorization provider for outgoing transfers. The default empty setting disables external authorization. Aspera servers can be configured to check with an external authorization provider. This SOAP authorization mechanism can be useful to organizations requiring custom authorization rules.
- Outgoing External Provider Soap Actiontext string, default blank
- The SOAP action required by the external authorization provider for outgoing transfers. Required if External Authorization is enabled.
- Token Encryption Cipheraes-128 / aes-192 / aes-256, default aes-128
- The cipher used to generate encrypted authorization tokens.
- Token Encryption Keytext string, default blank
- This is the secret token that will be used to authorize those transfers configured to require token. Token generation is part of the Aspera SDK. See http://asperasoft.com/developer/web for more information.
- Token Life (seconds)positive integer, default 1200
- Sets token expiration for users of web-based transfer applications.
- Encryption Allowedany / none / aes-128, default any
- Describes the type of transfer encryption accepted by this computer. When set to any the computer allows both encrypted and non-encrypted transfers. When set to none the computer restricts transfers to non-encrypted transfers only. When set to aes-128 the computer restricts transfers to encrypted transfers only.
6.2.7 Bandwidth
- Incoming Vlink IDpre-defined value, default 0
- The value sets the Vlink ID for incoming transfers. Vlinks are a mechanism to define aggregate transfer policies. The default setting of 0 disables Vlinks. One Vlink—the virtual equivalent of a network trunk—represents a bandwidth allowance that may be allocated to a node, group, or user. Vlink ID are defined in each Vlink created in Aspera Console. The Vlink ID is a unique numeric identifier.
- Incoming Target Rate Cap (Kbps)positive integer, default Unlimited
- The value sets the Target Rate Cap for incoming transfers. The Target Rate Cap is the maximum target rate that a transfer can request, in kilobits per second. No transfer may be adjusted above this setting, at any time. The default setting of
Unlimited signifies no Target Rate Cap. Clients requesting transfers with initial rates above the Target Rate Cap will be denied.
- Incoming Target Rate Default (Kbps)positive integer, default 10000
- This value represents the initial rate for incoming transfers, in kilobits per second. Users may be able to modify this rate in real time as allowed by the software in use. This setting is not relevant to transfers with a Policy of Fixed.
- Incoming Target Rate Locktrue / false, default false
- After an incoming transfer is started, its target rate may be modified in real time. The default setting of false gives users the ability to adjust the transfer rate. A setting of true prevents real-time modification of the transfer rate.
- Incoming Minimum Rate Cap (Kbps)positive integer, default Unlimited
- The value sets the Minimum Rate Cap for incoming transfers. The Minimum Rate Cap is a level specified in kilobits per second, below which an incoming transfer will not slow, despite network congestion or physical network availability. The default value of Unlimited effectively turns off the Minimum Rate Cap.
- Incoming Minimum Rate Default (Kbps)positive integer, default 0
- This value represents the initial minimum rate for incoming transfers, in kilobits per second. Users may be able to modify this rate in real time as allowed by the software in use. This setting is not relevant to transfers with a Policy of Fixed.
- Incoming Minimum Rate Locktrue / false, default false
- After an incoming transfer is started, its minimum rate may be modified in real time. The default setting of false gives users the ability to adjust the transfer's minimum rate. A setting of true prevents real-time modification of the transfer rate. This setting is not relevant to transfers with a Policy of Fixed.
- Incoming Bandwidth Policy Defaultfixed / high / fair / low, default fair
- The value chosen sets the default Bandwidth Policy for incoming transfers. The default policy value may be overridden by client applications initiating transfers.
- Incoming Bandwidth Policy Allowedany / high / fair / low, default any
- The value chosen sets the allowed Bandwidth Policy for incoming transfers. Aspera transfers use fixed, high, fair and low policies to accommodate network-sharing requirements. When set to any, the server will not deny any transfer based on policy setting. When set to high, transfers with a Policy of high and less aggressive transfer policies (e.g. fair or low) will be permitted. Fixed transfers will be denied. When set to low, only transfers with a Bandwidth Policy of low will be allowed.
- Incoming Bandwidth Policy Locktrue / false, default false
- After an incoming transfer is started, its Policy may be modified in real time. The default setting of false gives users the ability to adjust the transfer's Policy. A setting of true prevents real-time modification of the Policy.
- Outgoing Vlink IDpre-defined value, default 0
- The value sets the Vlink ID for outgoing transfers. Vlinks are a mechanism to define aggregate transfer policies. The default setting of 0 disables Vlinks. One Vlink—the virtual equivalent of a network trunk—represents a bandwidth allowance that may be allocated to a node, group, or user. Vlink ID are defined in each Vlink created in Aspera Console. The Vlink ID is a unique numeric identifier.
- Outgoing Target Rate Cap (Kbps)positive integer, default Unlimited
- The value sets the Target Rate Cap for outgoing transfers. The Target Rate Cap is the maximum target rate that a transfer can request, in kilobits per second. No transfer may be adjusted above this setting, at any time. The default setting of Unlimited signifies no Target Rate Cap. Clients requesting transfers with initial rates above the Target Rate Cap will be denied.
- Outgoing Target Rate Default (Kbps)positive integer, default 10000
- This value represents the initial rate for outgoing transfers, in kilobits per second. Users may be able to modify this rate in real time as allowed by the software in use. This setting is not relevant to transfers with a Policy of Fixed.
- Outgoing Target Rate Locktrue / false, default false
- After an outgoing transfer is started, its target rate may be modified in real time. The default setting of false gives users the ability to adjust the transfer rate. A setting of true prevents real-time modification of the transfer rate.
- Outgoing Minimum Rate Cap (Kbps)positive integer, default Unlimited
- The value sets the Minimum Rate Cap for outgoing transfers. The Minimum Rate Cap is a level specified in kilobits per second, below which an incoming transfer will not slow, despite network congestion or physical network availability. The default value of Unlimited effectively turns off the Minimum Rate Cap.
- Outgoing Minimum Rate Defaultpositive integer, default 0
- This value represents the initial minimum rate for outgoing transfers, in kilobits per second. Users may be able to modify this rate in real time as allowed by the software in use. This setting is not relevant to transfers with a Policy of Fixed.
- Outgoing Minimum Rate Locktrue / false, default false
- After an outgoing transfer is started, its minimum rate may be modified in real time. The default setting of false gives users the ability to adjust the transfer's minimum rate. A setting of true prevents real-time modification of the transfer rate. This setting is not relevant to transfers with a Policy of Fixed.
- Outgoing Bandwidth Policy Defaultfixed / high / fair / low, default fair
- The value chosen sets the default Bandwidth Policy for outgoing transfers. The default policy value may be overridden by client applications initiating transfers.
- Outgoing Bandwidth Policy Allowedany / high / fair / low, default any
- The value chosen sets the allowed Bandwidth Policy for outgoing transfers. Aspera transfers use fixed, high, fair and low policies to accommodate network-sharing requirements. When set to any, the server will not deny any transfer based on policy setting. When set to high, transfers with a Policy of high and less aggressive transfer policies (e.g. fair or low) will be permitted. Fixed transfers will be denied. When set to low, only transfers with a Bandwidth Policy of low will be allowed.
- Outgoing Bandwidth Policy Locktrue / false, default false
- After an outgoing transfer is started, its Policy may be modified in real time. The default setting of false gives users the ability to adjust the transfer's Policy. A setting of true prevents real-time modification of the Policy.
6.2.8 Advanced File Handling
- File Create Modepositive integer (octal), default undefined
- Specify file creation mode (permissions). If specified, create files with these permissions (for example 0755), irrespective of File Create Grant Mask and permissions of the file on the source computer. Only takes effect when the server is a non-Windows receiver.
- File Create Grant Maskpositive integer (octal), default 0644
- Used to determine mode for newly created files if File Create Mode is not specified. If specified, file modes will be set to their original modes plus the Grant Mask values. Only takes effect when the server is a non-Windows receiver and when File Create Mode is not specified.
- Directory Create Modepositive integer (octal), default undefined
- Specify directory creation mode (permissions). If specified, create directories with these permissions irrespective of Directory Create Grant Mask and permissions of the directory on the source computer. Only takes effect when the server is a non-Windows receiver.
- Directory Create Grant Maskpositive integer (octal), default 0755
- Used to determine mode for newly created directories if Directory Create Mode is not specified. If specified, directory modes will be set to their original modes plus the Grant Mask values. Only takes effect when the server is a non-Windows receiver and when Directory Create Mode is not specified.
- Read Block Size (bytes)positive integer, default 0
- This is a performance tuning parameter for an Aspera sender. It represents the number of bytes an Asper sender reads at a time from the source disk drive. Only takes effect when server is sender. The default of
0 will cause the Aspera sender to use its default internal buffer size, which may be different for different operating systems.
- Write Block Size (bytes)positive integer, default 0
- This is a performance tuning parameter for an Aspera receiver. Number of bytes an ascp receiver writes data at a time onto disk drive. Only takes effect when server is receiver. The default of
0 will cause the Aspera sender to use its default internal buffer size, which may be different for different operating systems.
- Use File Cachetrue / false, default true
- This is a performance tuning parameter for an Aspera receiver. Enable or disable per-file memory caching at the data receiver. File level memory caching improves data write speed on Windows platforms in particular, but will use more memory. We suggest using a file cache on systems that are transferring data at speeds close to the performance of their storage device, and disable it for system with very high concurrency (because memory utilization will grow with the number of concurrent transfers).
- Max File Cache Buffer (bytes)positive integer, default 0
- This is a performance tuning parameter for an Aspera receiver. This value corresponds to the maximal size allocated for per-file memory cache (see Use File Cache). Unit is bytes. The default of 0 will cause the Aspera receiver to use its internal buffer size, which may be different for different operating systems.
- Resume Suffixtext string, default aspx
- Extension name of a class of special files holding meta data information of regular data files. Useful in the context of resuming partially completed transfers. During resume mode (-k1/2/3), each data file has a corresponding metadata file with the same name and the pre-specified resume suffix.
- Preserve Attributesnone / times, default undefined
- Configure file creation policy. When set to none, do not preserve the timestamp of source files. When set to times, preserve the timestamp of the source files at destination.
- Overwriteallow / deny, default allow
- Overwrite is an Aspera server setting that determines whether Aspera clients are allowed to overwrite files on the server. By default it is set to allow, meaning that clients uploading files to the servers will be allowed to overwrite existing files as long as file permissions allow that action. If set to deny, clients uploading files to the server will not be able to overwrite existing files, regardless of file permissions.
- File Manifesttext / disable, default none
- When set to text a text file "receipt" of all files within each transfer session is generated. If set to disable no File Manifest is created. The file manifest is a file containing a list of everything that was transferred in a given transfer session. The filename of the File Manifest itself is automatically generated based on the transfer session's unique ID. The location where each manifest is written is specified by the File Manifest Path value. If no File Manifest Path is specified, the file will be generated under the destination path at the receiver, and under the first source path at the sender.
- File Manifest Pathtext string, default blank
- Specify the location to store manifest files. Can be an absolute path or a path relative to the transfer user's home.
- Pre-Calculate Job Sizeany / yes / no, default any
- Configure the policy of calculating total job size before data transfer. If set to any, follow client configurations (-o PreCalculateJobSize={yes|no}). If set to no, disable calculating job size before transferring. If set to yes, enable calculating job size before transferring.
- Storage Rate Controltrue / false, default false
- Enable/Disable disk rate control. When enabled, adjust transfer rate according to the speed of receiving I/O storage, if it becomes a bottleneck.
6.2.9 Advanced Network Options
- Bind IP Addressvalid IPv4 address, default blank
- Specify an IP address for server-side ascp to bind its UDP connection. If a valid IP address is given, ascp sends and receives UDP packets ONLY on the interface corresponding to that IP address.
- Bind UDP Portpositive integer, default 33001
- Specify a port number for server-side ascp to bind its UDP connection. This also prevents client ascp processes from binding to same UDP port. Valid port numbers range between 1 and 65535.
- Disable Packet Batchingtrue / false, default false
- When set to true, send data packets back to back (no sending a batch of packets). This results in smoother data traffic at a cost of higher CPU usage.
- Maximum Socket Buffer (bytes)positive integer, default 0
- Upper bound the UDP socket buffer of an ascp session below the input value. The default of
0 will cause the Aspera sender to use its default internal buffer size, which may be different for different operating systems.
- Minimum socket buffer (bytes)positive integer, default 0
- Set the minimum UDP socket buffer size for an ascp session.
6.2.10 Creating the Virtual Links
Vlinks (Virtual links) is a feature that allows "virtual" bandwidth caps. Transfer sessions assigned to the same "virtual" link conform to the aggregate bandwidth cap and attain an equal share of it.
|
To configure a node's virtual link, go to Vlinks tab under the Node Maintenance page. Click Add Vlink to create a new virtual link.
Each option is listed below. Click Create when finished:
|
- Vlink ID
-
ID of the virtual link. Sessions assigned with the same trunk ID share the same bandwidth cap. Takes positive integer between 1 and 255.
- Vlink Name
- Name of the virtual link. No impact on actual bandwidth capping.
- On
- Setting this value to true activates the Vlink.
- Capacity
- This value reflects the virtual bandwidth cap in Kbps. Future release will provide a "cron"-style scheduler with cap values changing over time.
When created, the Vlink can be assigned to the Bandwidth configuration section, under node, group, or user configuration.
Appendix 1. Control the Console Services
Console installs the following services:
- Aspera Console
-
- Aspera Console (Mongrels)
- Aspera Console main application
- Aspera Console (Background)
- Process new data from the Database Logger
- Aspera Console (SOAP)
- Retrieve live statistics from nodes, generate charts
- Aspera Console (Email)
- Handles Email notification
- Apache Server
-
- Apache Httpd Server (Aspera)
- Apache Server for Aspera Console
- MySQL
-
- MySQL Server (Aspera)
- MySQL Database for Aspera Console
To control Console through command-line, connect to the On-Demand Server through SSH, use the command to navigate into the Console directory:
cd /opt/aspera/console
Use the following commands to control Console's services. The underlined values are optional:
- Start
- ./asctl console:start_app
- Stop
- ./asctl console:stop_app
- Start
- ./asctl all:start
- Stop
- ./asctl -b all:stop
- Print status
- ./asctl all:status
- Show info
- ./asctl all:info
- Set mongrel number
- ./asctl console:mongrel:count number
- Start
- ./asctl console:mongrel:start
- Stop
- ./asctl console:mongrel:stop
- Print status
- ./asctl console:mongrel:status
- Show info
- ./asctl console:background:info
- Start
- ./asctl console:background:start
- Stop
- ./asctl console:background:stop
- Print Status
- ./asctl console:background:status
- Show info
- ./asctl console:background:info
- Start
- ./asctl console:soap:start
- Stop
- ./asctl console:soap:stop
- Print status
- ./asctl console:soap:status
- Show info
- ./asctl console:soap:info
- Start
- ./asctl console:email:start
- Stop
- ./asctl console:email:stop
- Print status
- ./asctl console:email:status
- Show info
- ./asctl console:email:info
- Print/Set the hostname
- ./asctl console:shared:apache:hostname host-name
- Print/Set the namespace
- ./asctl console:uri_namespace namespace
- Print/Set HTTP port
- ./asctl console:shared:apache:http_port port
- Print/Set HTTPS port
- ./asctl console:shared:apache:https_port port
- Start
- ./asctl console:shared:apache:start
- Stop
- ./asctl console:shared:apache:stop
- Print status
- ./asctl console:shared:apache:status
- Show info
- ./asctl console:shared:apache:info
- Print/Set MySQL port
- ./asctl console:shared:db:port port-number
- Set root password
- ./asctl console:shared:db:set_root_password
- Start
- ./asctl console:shared:db:start
- Stop
- ./asctl console:shared:db:stop
- Print status
- ./asctl console:shared:db:status
- Show info
- ./asctl console:shared:db:info
Appendix 2. Reset the Administrator's Password
If you lose the original Aspera Console administrator account's password (default: admin/aspera), follow the instructions to reset the password:
- Step 1 Log in the Ruby shell
-
In the Terminal, execute the command to open the Ruby subshell:
$ /opt/aspera/console/config/aspera_ruby.sh
- Step 2 Execute the reset command
-
Use the command to navigate into the Console's directory:
$ cd /opt/aspera/console/
Execute the following command. Replace the underlined value adminPass with your new admin password, and name@email with the administrator's email address.:
$ rake aspera:admin_user PASSWORD=adminPass EMAIL=name@email RAILS_ENV=production
- Step 3 Exit the Ruby Subshell
-
When finished, use this command to return to the normal shell:
$ exit
Appendix 3. The Log Files
The Aspera Console log files are located in the directory:
/opt/aspera/console/log
Copyright 2009 © Aspera Inc. All Rights Reserved