As described in this guide's Introduction, the Aspera On-Demand Server contains core features from Connect Server and the On-Demand Console for Amazon Web Services (AWS). The Aspera On-Demand Server is packaged as an Amazon Machine Image (AMI). When booting up the Aspera AMI, you can use the Connect Server for fasp file transfers and the On-Demand Console for transfer server management. You may access these applications via the following paths:
| Application | URL | Login |
|---|---|---|
| On-Demand Connect Server | http://The instance's Public DNS/ | Login configuration required |
| On-Demand Console | http://The instance's Public DNS/aspera/console | Login: admin/(instance id) |
The following diagrams depict the information flow through the Aspera AMI:
Figure 1. Manage your Aspera AMI using the Aspera On-Demand Console
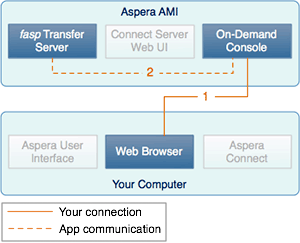
- The On-Demand Console can be accessed through a web browser. You can use the On-Demand Console to manage the fasp transfer server.
- In the On-Demand Console, you can perform the following tasks:
- Create the AMI's system/transfer user.
- Monitor and control transfers on the fasp Transfer Server.
- Set up the Email Notifications of transfer activity.
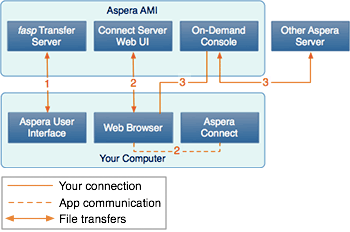
- Use the Aspera User Interface to connect to the Aspera AMI and transfer files.
- With the Connect browser plugin installed, use your web browser to transfer files through the Connect Server Web UI.
- You can transfer files between the Aspera AMI and another Aspera server through the On-Demand Console by adding the computer as an unmanaged node.
Note that you can transfer files with the Aspera On-Demand Server using the following products:
- Aspera Connect (free download)
- Aspera Client (Client license required)
- Aspera Point-to-Point (Point-to-Point license required)
- Aspera Enterprise Server (Enterprise Server license required)
- Aspera Connect Server (Connect Server license required)