If Google Cloud Storages belongs to different projects but are under the same
account, you can transfer content between them.
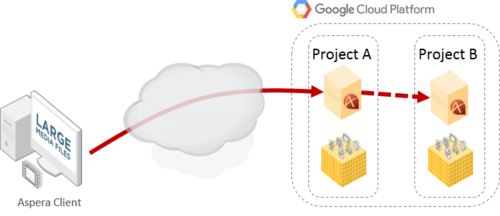
For example, if an Aspera
client has access to Project A but not Project B, that client can transfer content
between storage in Project A and storage in Project B by creating a private key in
Project B and configuring it on the transfer server in Project A.
Prerequisites:
- You can create or access a service account (IAM and Admin) in the target
project
- You can create a private key in the target project
- Both projects have Aspera transfer servers installed on virtual machines
-
Open the service accounts manager for the target project.
In the Google Cloud Platform Console, click Service
accounts then Select a project and select
the target project. Click Open.
-
Create a dedicated service account and private key in .p12
format.
Click
Create Service Account. In the pop-up window that
appears, take the following steps:
- Enter a service account name
- Select a role you wish to grant to the service account
- Select Furnish a new private key and
P12 key type
- Click Create
Warning: Save the private key to a secure location and record
the private key's password. This is the only opportunity you have to view
the password.
For more information on Google Cloud service
accounts, see:
https://cloud.google.com/iam/docs/creating-managing-service-accounts#creating_a_service_account
-
On the transfer server in the client-accessible project, add the private key to
Trapd.
Copy the private key file into the following directory on the Aspera transfer
server in the client-accessible
project:
/opt/aspera/etc/trapd
For
example:
/opt/aspera/etc/trapd/999996a12345678b2e4aef12345e1117777d800e-privatekey.p12
-
Modify the docroot of the transfer user to point to the project and specify the
private key file.
On the Aspera transfer server in the client-accessible project, set the
docroot by running the following
command:
# asconfigurator -x "set_user_data;user_name,username;absolute,docroot"
Where
docroot has the format shown
below:
gs://email_address@storage.googleapis.com/my_bucket/?aspera.gssession.projectId=project_ID&aspera.gssession.pk12=path_to_private_key_pk12_file
The
email_address is that of the service account and must
be URL encoded. For
example,
gs://service-account%40demo-resource-1234.gserviceaccount.com@storage.googleapis.com/bucket1/2017files/?aspera.gssession.projectId=1021234564321&aspera.gssession.pk12=/opt/aspera/etc/trapd/999996a12345678b2e4aef12345e1117777d800e-privatekey-privatekey.p12
-
Restart asperanoded to activate your changes.
# systemctl asperanoded restart
-
Transfer content between projects.