The HST Server uses system accounts to authenticate connections
from Aspera clients. The system users must be added and configured as Aspera transfer
users before clients can browse the server file system or run FASP transfers to and from
the server. When creating transfer users, you can also specify user-specific settings,
such as transfer bandwidth, docroot, and file handling. User configuration is an
important part of securing your server. For a complete description, see Configuring Shares Security.
Important Configuration Notes:
- Some Aspera features require a docroot in URI format or require a
file restriction instead of a docroot. For more information, see Docroot vs. File Restriction.
- If users connect to the server by providing IBM Aspera Shares credentials or by
providing Node API credentials that are associated with the transfer user,
changes to a user's configuration, such as their docroot, are not applied to
the user until asperanoded is restarted. For instructions, see
Restarting Aspera Services.
To configure a system user account as an Aspera transfer user:
-
To allow the user to access the HST Server web UI (deprecated),
configure the user for Apache authentication.
In addition to SSH authentication,
HST Server uses Apache's authentication to authorize web UI
access. To set up a system user (
asp1 in this example) for Apache
authentication, run the
htpasswd command below.
Note: On the
first run of htpasswd, you must use the
-c option to create the file for credential storage,
webpasswd. Do not use the -c
option otherwise.
# htpasswd [-c ]/opt/aspera/etc/webpasswd asp1
Note: If you have Apache 2.4.4, you may get authentication
errors when trying to provide a password to view the site. As a workaround,
run htpasswd with the -b option and
enter the password on the command line as follows:
# htpasswd -b /opt/aspera/etc/webpasswd asp1 password
-
Restrict user permissions with aspshell.
By default, all system users can establish a FASP connection and are only restricted by
file permissions. Restrict the user's file operations by assigning them to use
aspshell, which permits only the following operations:
- Running Aspera uploads and downloads to or from this computer.
- Establishing connections in the application.
- Browsing, listing, creating, renaming, or deleting contents.
These instructions explain one way to change a user account or active
directory user account so that it uses the aspshell;
there may be other ways to do so on your system.
Run the following command to change the user login shell to
aspshell:
# sudo usermod -s /bin/aspshell username
Confirm that the user's shell updated by running the following command and
looking for /bin/aspshell at the end of the output:
# grep username /etc/passwd
username:x:501:501:...:/home/username:/bin/aspshell
Note: If you use OpenSSH, sssd, and Active Directory
for authentication: To make aspshell the
default shell for all domain users, first set up a local account for server
administration because this change affects all domain users. Then open
/etc/sssd/sssd.conf and change
default_shell from /bin/bash to
/bin/aspshell.
-
Launch HST Server as root.
Run the following command as
root:
# asperascp
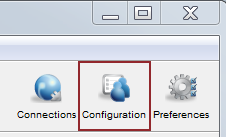
-
Click Configuration to open the configuration settings
window.
-
For server security, configure Global settings to
restrict users' transfer and system permissions.
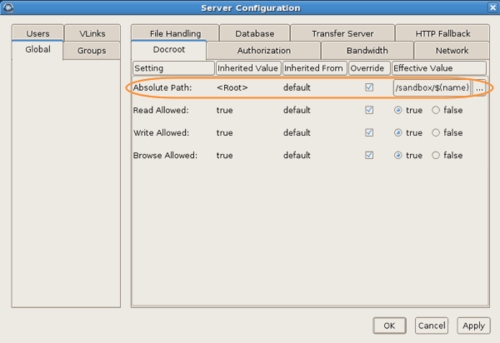
-
Set a global docroot (Absolute Path) to an empty
folder or a part of the file system specific to each user.
If there is a pattern in the docroot of each user, for example,
/sandbox/username,
you can use a substitutional string. This way you assign independent docroot to
each user without setting a docroot for each user individually
| Substitutional String |
Definition |
Example |
$(name) |
system user's name |
/sandbox/$(name) |
| $(home) |
system user's home directory |
$(home)/Documents |
-
On the Docroot tab, set Read
Allowed, Write Allowed, and
Browse Allowed to
false.
-
On the Authorization tab, deny incoming and
outgoing transfers by default, then enable transfers for individual
users as required (described in a later step).
-
On the Authorization tab, set the token
encryption key to a string of at least 20 random characters.
-
If your workflow allows, on the Authorization
tab set Content Protection Required to
true.
-
On the Authorization tab, set
Encryption Allowed to
AES-128.
By setting an encryption cipher, uploads to the server must use the
specified encryption cipher or stronger. Setting to
any allows encrypted and unencrypted
transfers.
-
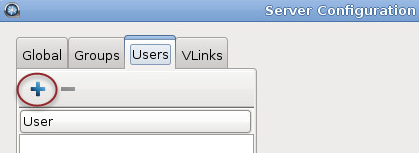
Add a system user.
-
In Server Configuration, go to
Users.
-
Click
 to add a new user.
-
Enter the username, then click
OK.
Usernames cannot contain the "@" symbol,
except when using the user@domain format. For
additional information, see Product
Limitations.
-
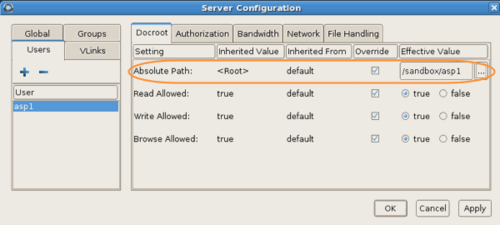
Set the user's docroot and transfer permissions.
-
Set a user-specific docroot, if the global docroot is not
adequate.
In the user's
Docroot tab
(
Configuration > Users
>username >
Docroot), select the
Override box
for
Absolute Path and enter or select an existing
path as the user's docroot -- for example,
/sandbox/aspera_user_1. When
finished, click
OK or
Apply.
-
Set read, write, and browse permissions.
On the Docroot tab, set Read
allowed to true to enable the
user to download from their docroot on the server, set Write
allowed to true to enable the
user to upload to the server and move files within their docroot, and
set Browse allowed to true
to enable the user to browse files within their docroot. For maximum
security, allow users the minimum permissions required for their
workflow.
-
Set transfer permissions.
On the Authorization tab, set
Incoming Transfers to
allow to allow the user to upload to the
server within their docroot and set Outgoing
Transfers to allow to allow the
user to download from the server from their docroot.
-
If you provided an Aspera license during installation (rather than an
entitlement), ensure that the transfer user has read permissions on the Aspera
license file (aspera-license) so that they can run
transfers.
The license file is found in:
/opt/aspera/etc/
-
Configure group and user settings.
Settings are located in the
Docroot,
Authorization,
Bandwidth,
Network,
File Handling and
Precedence tabs.
User
settings take precedence over group settings, which take precedence over
global settings; for more information, see Configuration Precedence.