Introduction
Keeping your data secure it critically important. Aspera strongly encourages you to take additional steps in setting up and configuring your SSH server so that it is protected against common attacks. Most automated robots will try to log into your SSH server on Port 22 as rootAdministrator, with various brute force and dictionary combinations in order to gain access to your data. Furthermore, automated robots can put enormous loads on your server as they perform thousands of retries to break into your system. This topic addresses steps to take in securing your SSH server against potential threats, including changing the default port for SSH connections from TCP/22 to TCP/33001.
Why Change to TCP/33001?
It is well known that SSH servers listen for incoming connections on TCP Port 22. As such, Port 22 is subject to countless, unauthorized login attempts by hackers who are attempting to access unsecured servers. A highly effective deterrent is to simply turn off Port 22 and run the service on a seemingly random port above 1024 (and up to 65535). To standardize the port for use in Aspera transfers, we recommend using TCP/33001.
Please note that your Aspera transfer product ships with OpenSSH listening on both TCP/22 and TCP/33001. As such, Aspera recommends only exposing TCP/33001 through your organization's firewall and disabling TCP/22.
IMPORTANT NOTE: You need RootAdministrator access privileges to perform the steps below.
-
Locate and open your system's SSH configurationservices file
Open your SSH configurationservices file with a text editor. You will find this file in the following system location:
OS Version Path 32-bit Windows C:\Program Files\Aspera\Enterprise Server\etc\sshd_config 64-bit Windows C:\Program Files (x86)\Aspera\Enterprise Server\etc\sshd_config OS Version Path 32-bit Windows C:\Program Files\Aspera\Point-to-Point\etc\sshd_config 64-bit Windows C:\Program Files (x86)\Aspera\Point-to-Point\etc\sshd_config /etc/services
/etc/ssh/sshd_config
/etc/mcp/templates/sshd_config
-
Add new SSH port
IMPORTANT NOTE: Before changing the default port for SSH connections, please verify with your network administrators that TCP/33001 is open.
The OpenSSH suite included in the Connect ServerEnterprise ServerPoint-to-Point installer uses TCP/22 as the default port for SSH connections. Aspera recommends opening TCP/33001 and disabling TCP/22 to prevent security breaches of your SSH server.
The OpenSSH suite included in the Connect ServerEnterprise ServerPoint-to-Point installer uses TCP/22 and TCP/33001 as the default ports for SSH connections. Aspera recommends disabling TCP/22 to prevent security breaches of your SSH server.
To enable TCP/33001 while your organization is migrating from TCP/22, open Port 33001 within your sshd_config file (where SSHD is listening on both ports). As demonstrated by this exercise, SSHD is capable of listening on multiple ports.
...
Port 22
Port 33001
...
To enable TCP/33001 while your organization is migrating from TCP/22, open Port 33001 within your /etc/services file. Note that you cannot put two entries of the same name in the /etc/services file to make SSHD run on two ports. Thus, you need to first add a second SSH process to the /etc/services file (e.g. ssh2), which is demonstrated in the sample below.
...
ssh   22/tcp      # SSH Remote Login Protocol
ssh2  33001/tcp   # SSH Remote Login Protocol (secure port)
...
You need to restart your SSH service to apply the changes. Restarting your SSH server will not impact currently connected users. To restart your SSH Server, open System Preferences (Apple menu > System Preferences) and follow the instructions for the version of your Mac OS X:
OS Version Instructions 10.5+ In System Preferences, go to Sharing. Uncheck and then re-check Remote Login from the left panel. In the Allow access for: option, select All users, or specify individual user accounts for the fasp connections. 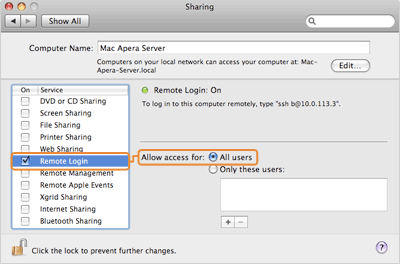
10.4 In System Preferences, go to Sharing and select Services. Uncheck and then re-check Remote Login to restart the SSH service. 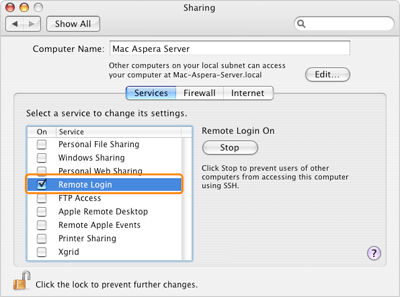
Next, duplicate the /System/Library/LaunchDaemons/ssh.plist file, and edit it to use the second SSH port (which is demonstrated in the sample below).
...
<key>Label</key>
<string>com.openssh.sshd2</string>
...
<key>Sockets</key>
   <dict>
      <key>Listeners</key>
         <dict>
            <key>SockServiceName</key>
               <string>ssh2</string>
...
Once your client users have been notified of the port change (from TCP/22 to TCP/33001), you can disable Port 22 in your sshd_config file. To disable TCP/22 and use only TCP/33001, comment-out Port 22 in your sshd_config file.
...
#Port 22
Port 33001
...
Once your client users have been notified of the port change (from TCP/22 to TCP/33001), you can modify /etc/services so that only open ssh port is 33001/tcp.
IMPORTANT NOTE: Aspera recognizes that disabling the default SSH connection port (TCP/22) may affect your client users. When you change the port, ensure that you advise your users on configuring the new port number. Basic instructions for specifying the SSH port for fasp file transfers can be found below. To change the SSH port for Aspera Client, click Connections on the main window, and select the entry for your computer. Under the Connection tab, click Show Advanced Settings and enter the SSH port number in the SSH Port (TCP) field.
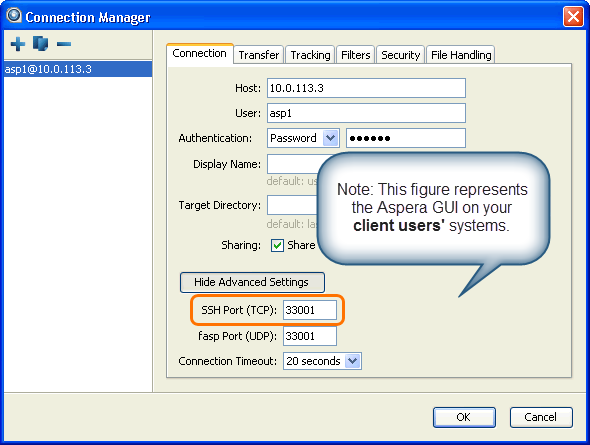
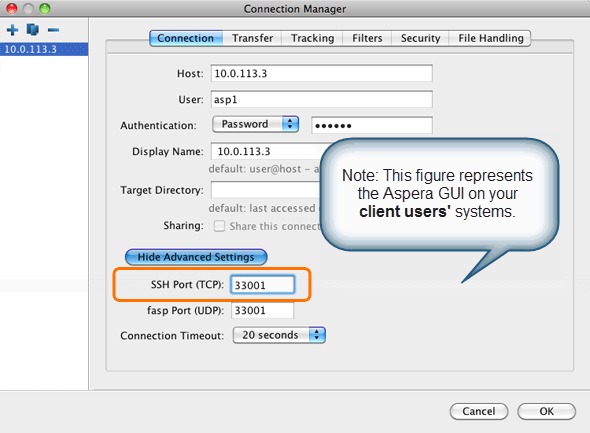

To make an impromptu connection to TCP/33001 during an ascp session, specify the SSH port (33001) with the -P (capital P) flag. Please note that this command does not alter ascp or your SSH server's configuration.
>$ ascp -P 33001 ...
-
Disable non-admin SSH tunneling
IMPORTANT NOTE: The instructions below assume that OpenSSH 4.4 or newer is installed on your system. For OpenSSH 4.4 and newer versions, the "Match" directive allows some configuration options to be selectively overridden if specific criteria (based on user, group, hostname and/or address) are met. If you are running an OpenSSH version older than 4.4, the "Match" directive will not be available and Aspera recommends updating to the latest version.
In OpenSSH versions 4.4 and newer, disable SSH tunneling to avoid potential attacks; thereby only allowing tunneling from Administrator groupRoot users. To disable non-admin SSH tunneling, add the following lines at the end of the sshd_config file:
...
AllowTcpForwarding no
Match Group Administrators
AllowTcpForwarding yes
...
AllowTcpForwarding no
Match Group root
AllowTcpForwarding yes
Depending on your sshd_config file, you may have additional instances of "AllowTCPForwarding" that are set to the default "Yes." Please review your sshd_config file for other instances and disable as appropriate.
Note that disabling TCP forwarding does not improve security unless users are also denied shell access, as they can always install their own forwarders. Please review your user and file permissions, as well as refer to the instructions below on modifying shell access.
-
Update authentication methods
Public key authentication can prevent brute force SSH attacks if all password-based authentication methods are disabled. Thus, Aspera recommends disabling password authentication in the sshd_config file and enabling private/public key authentication. To do so, add or uncomment PubkeyAuthentication yes in the sshd_config file and comment out PasswordAuthentication yes.
...
PubkeyAuthentication yes
#PasswordAuthentication yes
PasswordAuthentication no
...
-
Disable Root Login
OpenSSH defaults to allowing root logins; however disabling root access helps you to maintain a more secure server. Aspera recommends commenting out PermitRootLogin yes in the sshd_config file and adding PermitRootLogin No.
...
#PermitRootLogin yes
PermitRootLogin no
...
Administrators can then utilize the su command if root privileges are needed.
-
Restart the SSH server to apply new settings
When you have finished updating your SSH server configuration, you must restart the server to apply your new settings. Restarting your SSH server will not impact currently connected users. To restart your SSH Server, go to Control Panel > Administrative Tools > Services. Locate the OpenSSH Service and click Restart.
When you have finished updating your SSH server configuration, you must restart the server to apply your new settings.
When you have finished updating your SSH server configuration, you must restart or reload the server to apply your new settings. Restarting or reloading your SSH server will not impact currently connected users. To restart or reload your SSH Server, you may use the following commands:
OS Version Instructions RedHat (restart) $ sudo service sshd restart
RedHat (reload) $ sudo service sshd reload
Debian (restart) $ sudo /etc/init.d/ssh restart
Debian (reload) $ sudo /etc/init.d/ssh reload
Solaris $ pfexec svcadm refresh ssh
FreeBSD $ sudo /etc/rc.d/sshd reload
$ sudo /etc/rc.d/sshd reload
-
Review your user and file permissions
Permissions determine who can access certain files within your system, thereby making it a critical component of securing your server. By default, all user accounts are allowed to browse and read all files in the server.
To limit the user's access to a portion of the system, set the user account's shell to use the Aspera secured shell (aspshell) and set a document root for the user. The aspshell permits only the following operations:
- Run Aspera uploads and downloads to or from this computer.
- Establish connections in the application and browse, create, delete, rename or list contents.
You may configure aspshell behavior by editing the aspera.conf file (/opt/aspera/etc/aspera.conf). The following template displays access options:
<file_system>
   <access>
	  <paths>
		 <path>
			<absolute>/sandbox/$(name)</absolute>      <!-- Absolute Path -->
			<read_allowed>true</read_allowed>          <!-- Read Allowed -->
			<write_allowed>true</write_allowed>        <!-- Write Allowed -->
			<dir_allowed>true</dir_allowed>            <!-- Browse Allowed -->
		 </path>
	  </paths>
   </access>
...
</file_system>
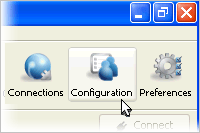
To limit the user's access to a portion of the system, set a document root for the user. The Docroot configuration options can be found in your Aspera products's Configuration menu, within the Global, Groups and Users sections.

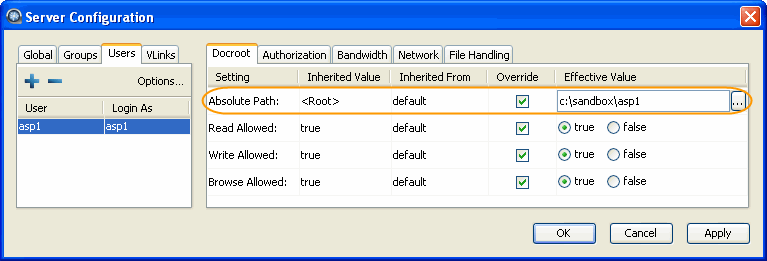

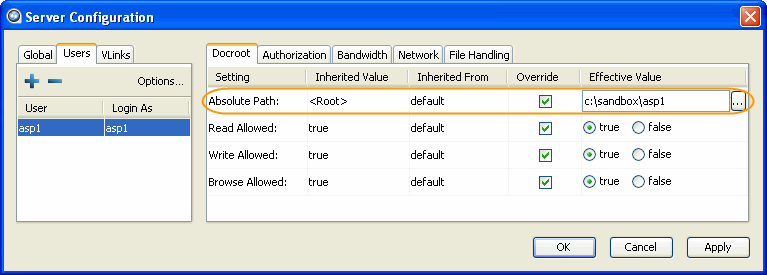

The following is a list of your Aspera product's Docroot configuration options:
# Field Description Values Default 1 Absolute Path The Absolute Path describes the area of the file system that is accessible by Aspera users. The default empty value gives users access to the entire file system. file path blank 2 Read Allowed Setting this to true allows users to transfer from the designated area of the file system as specified by the Absolute Path value. - true
- false
blank 3 Write Allowed Setting this to true allows users to transfer to the designated area of the file system as specified by the Absolute Path value. - true
- false
blank 4 Browse Allowed Setting this to true allows users to browse the directory. - true
- false
blank -
Run the asp-check tool to check for potential user-security issues
The asp-check tool performs the following secure checks:
- Searches for full-access users and reports how many exist on the system. Note that the existence of full-access users does not necessarily indicate that your system is vulnerable; however, it is being brought to the attention of the System Administrator to ensure that the existence of full-access users is intentional.
- Searches for restricted users and potential misconfigurations, including incorrect login shell (i.e., one that is not restricted via aspshell); SSH tunnel access (which can be used to work around the restricted shell); and docroot setting that allows the user to access the home directory.
IMPORTANT NOTE: Docroot setting that allows access to the home directory does not necessarily indicate that your system is vulnerable; however, a user with this docroot can download or upload keys in .ssh, as well as upload .login scripts. These capabilities may be used to circumvent the intended, restricted-nature of the user. Aspera highly recommends setting the docroot under the user's home folder (e.g. /home/jane/data) or in an alternate location (e.g. /data).
To run the asp-check tool, run the following command in a Terminal window:
$ sudo /opt/aspera/bin/asp-check.sh
Your search results will appear in the Terminal window, as shown in the example below. If potential issues have been identified, please review your users' settings before proceeding.
Users with full access: 22 (not considered insecure)
Restricted users: 0
Insecure users: 0
 - no restricted shell (aspshell): 0
 - docroot above home directory: 0
 - ssh tunneling enabled: 0
-
Review your logs periodically for attacks
Aspera recommends reviewing your SSH log periodically for signs of a potential attack. Launch Control Panel > Administrative Tools > Event Viewer. To see only SSH Server events, select View > Filter... to bring up the filter settings. In Application Properties's Filter tab, select sshd in the Event source menu to display only SSH Server events. You may also apply other conditions when needed.
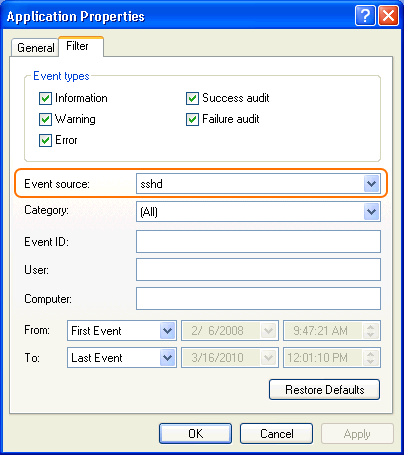
With filter applied, you can review the logs in the Event Viewer main window, or select Action > Save Log File As... to export a log file using .txt or .csv format.
Aspera recommends reviewing your SSH log periodically for signs of a potential attack. Launch (Macintosh HD) > Applications > Utilities > Console and locate the file /private/var/log/secure.log (FILES > private/var/log > secure.log).
Aspera recommends reviewing your SSH log periodically for signs of a potential attack. Locate and open your syslog, for example, /var/log/auth.log or /var/log/secure. Depending on your system configuration, syslog's path and file name may vary.
Look for invalid users in the log, especially a series of login attempts with common user names from the same address, usually in alphabetical order. For example:
...
Mar 10 18:48:02 sku sshd[1496]: Failed password for invalid user alex from 1.2.3.4 port 1585 ssh2
...
Mar 14 23:25:52 sku sshd[1496]: Failed password for invalid user alice from 1.2.3.4 port 1585 ssh2
...
If you have identified attacks:
- Double-check the SSH security settings in this topic.
- Report attacker to your ISP's abuse email (e.g. abuse@your-isp).