IMPORTANT NOTE: In order to configure multiple servers, you must acquire a separate license from Aspera. Please contact Technical Support for details and for setup support.
The multi-server feature allows you to set up a cluster of Faspex servers (which belong to the same user domain). When configured, the master and slave server(s) share Faspex user information and relay file packages. Administrators may also create Home Server Rules to auto-assign users to a specific Faspex server. Note that when packages are being transferred between users who are on different home servers, the packages are auto-forwarded through server-to-server relay.
IMPORTANT NOTE: In a Faspex multi-server environment, your master and slave servers may use different Faspex licenses (i.e. licenses with different concurrent user limits); however, the master and slave server(s) must be running the same version of Faspex.
In a Faspex multi-server environment, you need to designate one server as the master server and all others as slaves. A multi-server configuration has the following characteristics:
- Non-admin users are assigned to a home server, and can only login to that server. Admin users are also assigned to a home server, however, they can login to other clustered servers as well.
- User information is periodically synced between the Faspex servers. IMPORTANT: If a server containing account information is made a slave, then that server's account information (including passwords) will be overwritten by the master server.
- You can only administer Faspex accounts and workgroups on the master server. Note that these settings are read-only on the slave server(s).
- The following Faspex security settings (accessible via ) cannot be modified on the Faspex slave server(s): Use strong password setting; Allow sending packages to outside email addresses setting; all settings under the Packages sent to outside email addresses sub-section; and the Use Encryption-at-Rest setting. These security settings must be configured on the master server. Please refer to Server Configuration Overview for configuration instructions.
- Non-admin users send and receive packages from their home server. Admin users can send packages from any of the clustered servers, but receive packages only on their home server.
- A slave that is not connected to the Active Directory server will always authenticate via the master.
The following steps will guide you through setting up a Faspex multi-server cluster:
-
Configure Faspex slave server(s)
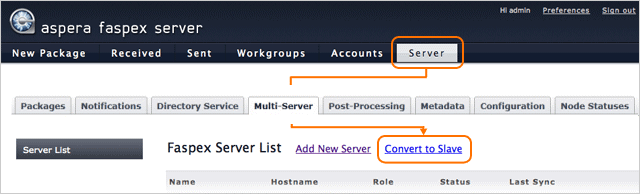
Login to each computer that you wish to configure as a Faspex slave server and select . Then, click Convert to Slave.
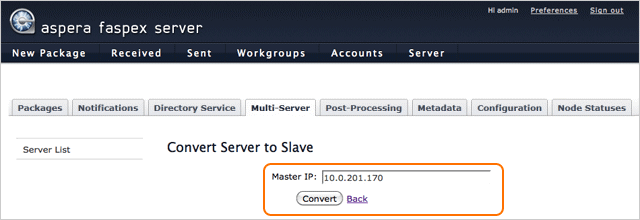
On the Convert Server to Slave screen, enter your Faspex master server's IP address and click Convert.
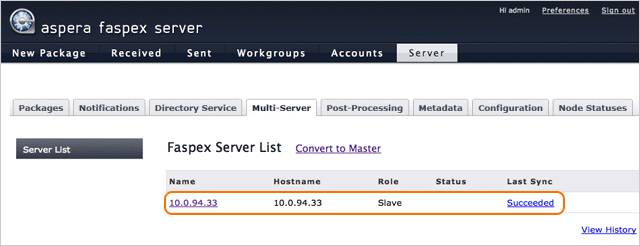
Upon successful conversion, you will see the server listed within the Faspex Server List and identified as a "Slave" under the Role column.
-
Add slave servers to the Faspex master server
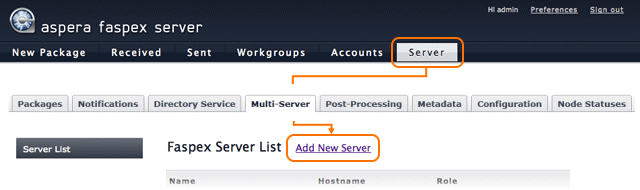
On your Faspex master server, go to and click Add New Server.
On the Faspex Server List: New Remote Server screen, enter the slave server's name, IP address (or host name), URL namespace, HTTPS port and optional alternate address. When finished, click Create.
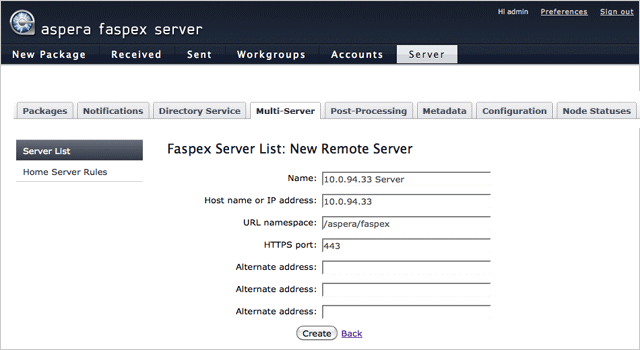
Name The Faspex slave server's name. Host name or IP address The Faspex slave server's address. URL namespace The Faspex slave server's URL namespace. (Default: /aspera/faspex) HTTPS port The Faspex slave server's HTTPS port. (Default: 443) Alternate address The Faspex slave server's alternate address (if any). Once added, a Faspex slave server is initially in an “OUT OF SYNC” state and is prepared for its first sync. Slave servers will remain in this state until they are successfully synced manually (note that after being synced manually, the servers will sync automatically). First, click Test to verify the connection between servers.
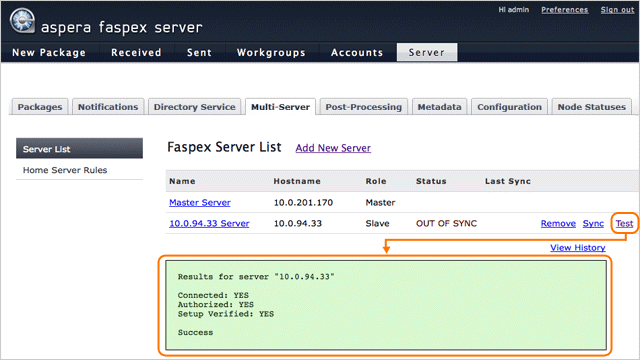
Then, click Sync to start the manual synchronization process. After clicking Sync, you can monitor the process in the "Status" column. Syncing servers that are in an “OUT OF SYNC” state typically takes longer than subsequent, automatic syncs. Once you have successfully synced your master and slave servers, the slave server will display an “OK” status. The master will periodically sync with slaves in this state, keeping them up-to-date with the latest user information. If consecutive, automatic syncs to a slave server fail more than the maximum allowed, then the slave server will be designated as being “OUT OF SYNC” and a notification will be sent to the Admin user(s).
NOTE: To troubleshoot server synchronization, click the View History link (displayed above), where you will see a chronological list of sync operations and their summaries.
-
Create Home Server Rules
You may assign users to specific home servers by creating Home Server Rules. Home Server Rules may be based on a user's email address, username or Active Directory information. Note that administrators can also override rules and manually set a Faspex user's home server. To create a rule, go to and select Home Server Rules. First, select a Default Server from the drop-down list. NOTE: If a Faspex user account does not conform to any established home server rules, then it will be auto-assigned to the selected "Default Server." To create a new home server rule, click Create New to reveal the Create New Rule form. Complete the form fields (described below). Note that you may skip fields (i.e., leave blank) if they are not needed.
IMPORTANT NOTE: Do not add regular expression operators, including tilde (~), forward slash (/), and backward slash (\), into matching patterns.
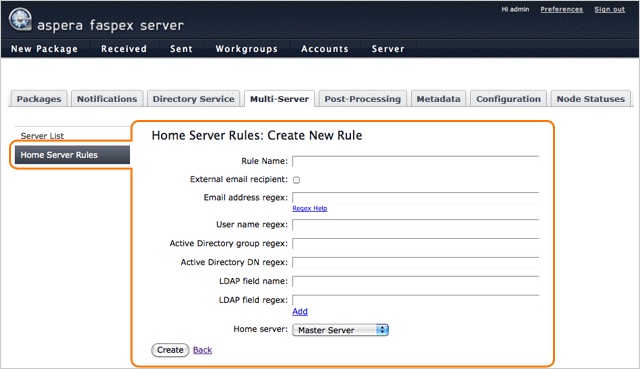
Item Description Rule Name Enter the rule's name. External email recipient Check this option to define a home server rule for recipients that do not have a Faspex user account (i.e., external email recipients). When enabled (checked), only the Email address regex (email address regular expression rule) can be applied to determine external users' home servers. If no rules are defined for external email recipients, then they will download the package from the sender’s home server. Email address regex Determine home server based on user's email address (Note: Use a regular expression). Click the Regex Help link for assistance on creating regular expressions. User name regex Determine home server based on user's login name (Note: Use a regular expression). Click the Regex Help link for assistance on creating regular expressions. Active Directory group regex Determine home server based on user's Active Directory group (Note: Use a regular expression). Click the Regex Help link for assistance on creating regular expressions. Active Directory DN regex Determine home server based on user's Active Directory distinguished name (Note: Use a regular expression). Click the Regex Help link for assistance on creating regular expressions. LDAP field name Determine home server based on a specific LDAP field. You may add up to three LDAP fields by clicking Add. LDAP field regex Determine home server based on the specified LDAP field (Note: Use a regular expression). Click the Regex Help link for assistance on creating regular expressions. Home server Use the selected machine as the home server for users that match all of the above, non-empty regular expressions. When determining a user’s home server, Faspex applies rules in the order in which they appear (from top to bottom). The first rule for which all non-empty, regular expressions match the user’s information determines that user's home server. If a user does not match any of the rules, it is assigned to the default home server. If a user’s home server has been set manually, then home server rules will not affect that user.
-
Set server-to-server relay transfer rate
In a Faspex multi-server environment, packages transferred between users will be automatically relayed to the proper home server server. To specify the transfer rate between your Faspex clustered servers, go to . Enter the outgoing bandwidth under Server-to-Server Relay Transfer Settings.
-
Locate relayed file packages
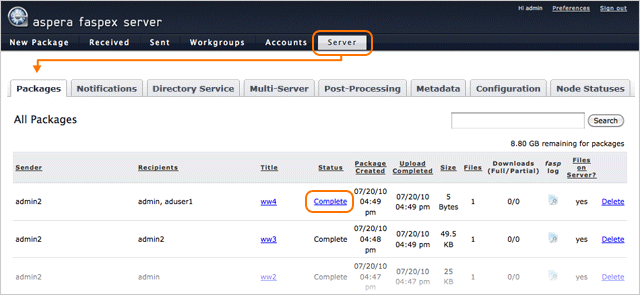
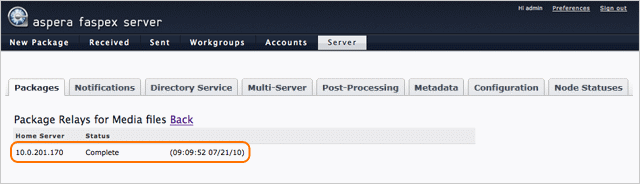
At this point, your Faspex multi-server environment is configured. When packages are being transferred between users who are on different home servers, the packages are auto-forwarded through server-to-server relay (after being uploaded to the sender's home server). A sender may the package's status by logging into his/her home server and going to . Once a package is uploaded to the sender's home server, the Status link will change to "Relaying" if the recipient has been assigned to a different home server, and then to "Complete" after relaying has finished successfully. Click the package's status link to view its associated relay(s). Here, the relay status is displayed, along with the package's destination server, time of last status update, and possibly, an error message (in the case of failed relays).
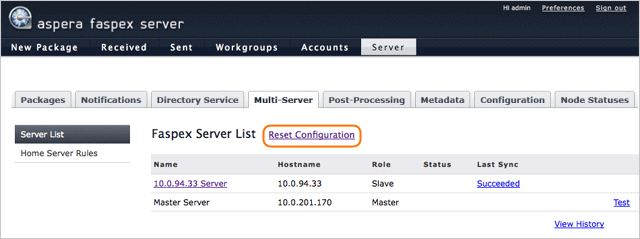
If you wish to eliminate a slave server from a multi-server environment, you must remove it from the Faspex master server and perform a reset operation. In order to remove the Faspex slave from the master, login to the Faspex master server and navigate to . Click Remove next to the slave you wish to remove and confirm the operation when prompted. To reset the slave’s configuration, login to the slave server and navigate to . Click Reset Configuration and confirm the operation when prompted.
IMPORTANT NOTE: If a user is re-assigned from one home-server to another in a multi-server environment, then that user's packages and external email contacts DO NOT MIGRATE with the user. Thus, when re-assigned users log into their new home servers, they will be unable to access their old packages, and--in addition--their address books will not contain external email addresses from their previous home servers.