Preface
Before configuring Faspex to communicate with a remote transfer server, it is important to understand how it is able to do so. Enterprise (or Connect) Server v3.0+ features the Node API, a daemon that offers REST-inspired file operations and a transfer management API. When you install Enterprise (or Connect) Server 3.0+ on a local/remote system or EC2 instance, it becomes an Aspera "node." Faspex can be installed on the transfer node; or it can access the transfer node remotely via the Node API. The instructions below explain how to configure Faspex to access a remote transfer node and directory shares. Before you continue, make sure that you have followed the steps in the topic "Setting up your Remote Server" to prepare your remote machine.
Transfer Server Configuration Screen
Within the Faspex Web UI, go to to configure access to the node that manages your Aspera transfers. By default, your transfer server (the node that has Enteprise or Connect Server installed on it) is configured as being on the same machine as your Faspex Web server (by default, 127.0.0.1). When you initially view the Transfer Server page, you will find that the IP address or domain name is the same as that of your Web server.
| Field | Description |
|---|---|
| Address | The transfer server's IP address or host name. |
| Status | Current status of the transfer server (e.g. active). |
| Last Successful Poll Time | The last time that the transfer server node was polled by the stats collector daemon for new transfer information. |
| OS | The transfer server's operating system. |
| Active Sessions | The number of active transfer sessions occuring on the transfer server. |
| Node UUID | The node's universally-unique identifier. |
| Errors | Transfer-server reported errors. |
If you are planning to use a different machine as your transfer server, click the edit link, which takes you to a secondary transfer server configuration screen.
Transfer Server Address for the Web Server
By default, your transfer server address is 127.0.0.1 because Faspex assumes that it is installed on the same machine as your transfer server (i.e. Enterprise or Connect Server v3.0+). If you are running your transfer server on a different machine, you need to tell the Faspex Web server where that machine is located so that Faspex can gather transfer statistics and display them via the Web UI. Please refer to the example below.
| Field | Description | Sample Value |
|---|---|---|
| Node API address or name | The transfer node's hostname or IP address. | In our example, Faspex can access the transfer node at 100.100.100.100. Depending on your own unique setup, this value will be different. |
| Port | The node computer's port number. | HTTPS 9092. Depending on your own unique setup, this value may be different. |
| Username | The node API username that was created when Enterprise (or Connect) Server 3.0+ was set up on the node machine. | "node-admin" |
| Password | The node API password that was created when Enterprise (or Connect) Server 3.0+ was set up on the node machine. | "s3cur3_p433" |
| Directory | Once authenticated, you can select a directory for browsing and
transferring to/from on your node machine. You will be able to browse your
transfer node's directories using the Browse...
button. Note that you will only be able to browse within the docroot that
was associated with your transfer service user and API username. If
you are not able to browse the node's directories, please check your Node
API username and password, as well as your node configuration. When you
click the Browse... button, you will be prompted to
select a directory in the pop-up window. Here, you have several options:
|
"/" (docroot on the node machine of my API user and associated transfer-service user) |
| Use SSL | To encrypt the connection to the node using SSL, enable this box. Please refer to the topic Setting up SSL for Nodes for details. | Enabled, by default. |
| Verify SSL Certificate | To verify the SSL certificate, enable this box. Please refer to the topic Setting up SSL for Nodes for details. | Disabled, by default. |
IMPORTANT NOTE: To use HTTP or HTTPS Fallback for a transfer server on a separate (remote) machine, you must configure your transfer server and firewall ports in ONE of the following ways:
- HTTP/HTTPS enabled and set to defaults (8080 + 8443) AND firewall port open on 8080/8443.
- HTTP/HTTPS enabled and set to standard ports (80 + 443) AND firewall port open on 80/443.
Additionally, the transfer server's fallback settings must match Faspex's fallback settings; otherwise, Faspex will return a "Package creation failed" error. This includes ensuring that the transfer server has HTTP/HTTPS fallback enabled; and that (within the Web GUI) Faspex has and (for HTTPS fallback) turned on. For security, Aspera highly recommends using HTTPS fallback. If HTTPS fallback is enabled on the transfer server, then encrypted transfers must be enabled in the Faspex Web GUI.
Transfer Server Address for Users
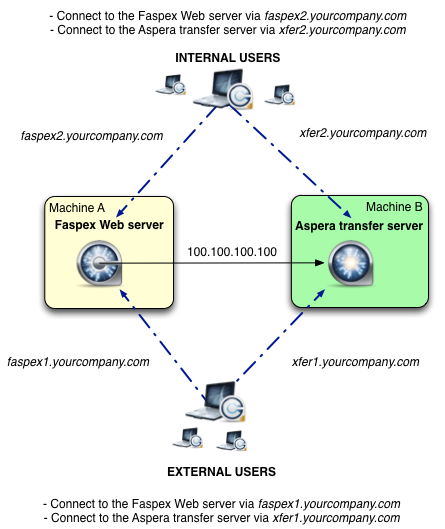
In the example above, the Aspera transfer server is accessible via a different host name for both internal and external users. Thus, we can complete the "Transfer Server Address for Users" section as follows:
- Your Web server communicates with the transfer node via 100.100.100.100.
- Your internal users communicate with the transfer node via xfer2.yourcompany.com.
- Your external users communicate with the transfer node via xfer1.yourcompany.com. In addition to specifying a secondary address/name, you can also set conditions for when the secondary address will be used (e.g. if the requester's IP address matches X.X.X.X or the browser URL matches outside.vendor.com).
| Field | Description | Sample Value |
|---|---|---|
| Primary transfer address or name | IP address or host name for users to access the transfer node. | xfer2.yourcompany.com |
| Enable secondary address | Check this box if you have a group of external users who must access the transfer node via a secondary IP address or domain name. | Disabled, by default. |
| Secondary address or name | Input the secondary address or name in this field. | xfer1.yourcompany.com |
| Use if requestor's address matches | Set a condition that the requestor's IP address must match this range for the secondary transfer address to be used. | A partial string, with wild cards like "10.10.*" |
| Use if browser URL matches | Set a condition that the requested browser URL must match this value for the secondary transfer address to be used. | outside.vendor.com |