The Aspera Add-in for Microsoft Outlook can be set up on your operating system using the installer, which is available on Aspera's website. Follow the instructions below to download and run the installer program.
-
Launch Microsoft Outlook and input authentication details.
Launch Microsoft Outlook.
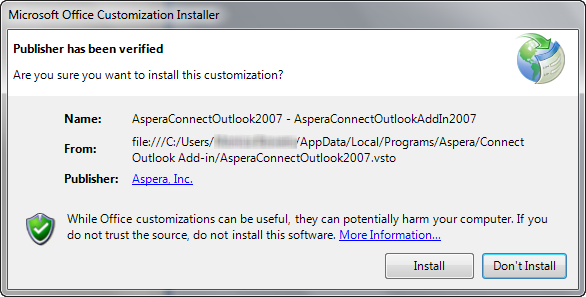
Note:IMPORTANT NOTE: The first-time you open Outlook after installing the Aspera Add-in, you may need to confirm that you would like to install a customization. If you receive this prompt, select the Install button.
After Outlook has opened, you will see the new Aspera menu (in either the toolbar or the ribbon, depending on which version of Office you are running).
Figure 1. Outlook 2007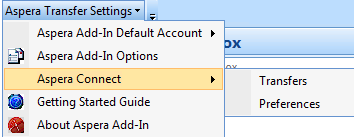 Figure 2. Outlook 2010
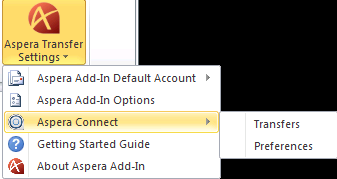
The Aspera Transfer Settings menu features the following drop-down items:
Item Function Aspera Add-In Default Account (sub-menu) Opens a drop-down list showing all Faspex accounts that are configured to send packages via the Aspera Add-in. In Outlook 2007, the default Faspex account is marked as "(default)"; whereas, in Outlook 2010, it's identified by a checkmark icon. A user can change the default account (if there are more than one Faspex accounts configured in the Aspera Add-in) by selecting a different account in the list. Aspera Connect (sub-menu) - Transfers: Opens the "Aspera Connect Transfers" window, where you can view and manage all transfer sessions that have been initiated by the Aspera Add-in. Note that if Aspera Connect is not currently installed on your system, then you will be prompted to install it upon clicking this button.
- Preferences: Opens the "Aspera Connect Preferences" window, where you can change the application's default settings before transferring files. For additional information on Aspera Connect's preferences, please view the Connect User Guide. Note that if Aspera Connect is not currently installed on your system, then you will be prompted to install it upon clicking this button.
Aspera Add-In Options Opens a dialog box for you to configure your Faspex Server account authentication and change your Add-in settings. Getting Started Guide Opens your default browser to display the user's guide. About Aspera Add-in Opens the "About" window. Note: For additional instructions on configuring and using Aspera Connect, please refer to the user guide.If you do not see the Aspera Transfer Settings menu, please review the restore-instructions for your Outlook version below.
Version Restore Aspera Menu Outlook / Office 2007 Go to and ensure that Aspera is checked Outlook / Office 2010 Right-click the ribbon and select Customize the Ribbon. Click the New Group button in the lower, right-hand corner (you can name the group "Aspera"). Select the new group that appears on the right side of the screen, and then select All Commands from the left drop-down list. Scroll down until you find Aspera Transfer Settings in the list. Select Aspera Transfer Settings and click the Add >> button. You should now see the Aspera Transfer Settings tab in your command ribbon.