Aspera Scp Client User's Guide
Windows 2000 / XP / 2003 / Vista
Version 2.0.2
| Chapter 1 Introduction |
| Chapter 2 Setting Up |
| Chapter 3 Getting Started |
| Chapter 4 Advanced Features |
| Chapter 5 ascp Command-line Reference |
| Appendix 1 Transfer Policies and Transfer Rate |
Aspera Scp Client is a complete file transfer application supercharged with Aspera's fasp file transport technology. It enables high-speed transfers of files and directories between two computers over a network, regardless of the distance.
Aspera Scp Client for Windows includes three components:
| Feature | Description |
|---|---|
| Aspera Scp | A desktop application for initiating fasp™ file transfers. |
| ascp Command | A command-line transfer program |
| Aspera Sync | A hot-folder synchronization feature in Aspera Scp. |
| Public Key Authenticaton | A more secured and flexible authentication method. |
This document guides you through the configuration and operation of Aspera Scp Client on Windows 2000, Windows XP, Windows 2003, and Windows Vista. If you have encountered any problems using this software, please contact your system administrator, or contact us directly at http://asperasoft.com/support.
If your server machine already has a previous version of Aspera software installed, it is recommended to backup before you install the newer version. Copy all files under the directory \Program Files\Aspera\FASP\etc. You can install the newer version right on top of the older one.
Before installing, make sure the server is connected to the network. When the system is prepared, follow the instructions to set up the Aspera Scp Client. You may need to modify the following examples to fit your exact setup.
Go to the Aspera's download page, find the installer for your platform and download. Use the user name and password provided by Aspera to access: http://asperasoft.com/downloads. Execute the installer. Follow the instructions to setup the application.
Aspera Scp Client requires a valid license key to function. A ‘Change License Key' window appears when Aspera Scp is launched for the first time. Go to Start menu -> All Programs -> Aspera -> Aspera Scp and execute Aspera Scp. Enter your license key in the ‘New license key' field.
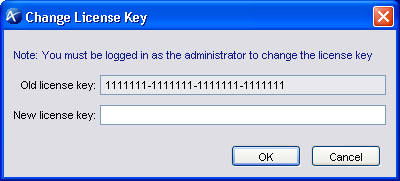
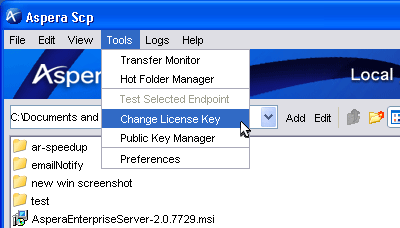
You can always change the license key afterward. To change it, go to Toolbar -> Tools -> Change License Key, and enter the new license key into the indicated field.
To verify the license key, in Aspera Scp go to Toolbar -> Help -> About. You can find it under "License Info"

Aspera products use different ports for communication and file transfer. Your firewall system should be correctly configured in order to set up for the Aspera fasp™ transfers. This section shows you the general configuration guideline of firewall configuration, and the configuration of embedded firewall system of Windows XP and Windows 2003. Make sure you have both your network environment's firewall system, and the firewall on your Windows set up.
If the Aspera server transfers with Aspera endpoints outside of your network environment, you may need to configure your firewall to allow fasp transfers. By default fasp™ uses TCP port 22 and UDP port 33001; the firewall must allow incoming access on both ports.
Here is a basic guideline to configure your firewall system. Please refer to the appropriate documentation for specific instructions on configuring your firewall properly.
| Firewall Type | Configuration |
|---|---|
| Server-side Firewall |
|
| Client-side Firewall |
|
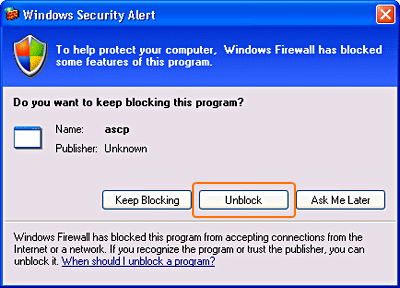
If Windows Firewall is enabled, the system will prompt you when you are connecting to a remote endpoint. Click Unblock for both ascp and asperascp.
This chapter guides you through the basics of Aspera fasp&tade; transfers and Aspera Scp, including transfer testings to insure the system is successfully set up, and the basics of Aspera Scp application.
It is recommended to run test transfers to make sure your system is correctly configured before start using it. The following steps show you how to set up and establish file transfers with Aspera Demo Server:
Step 1 Launch Aspera Scp Client
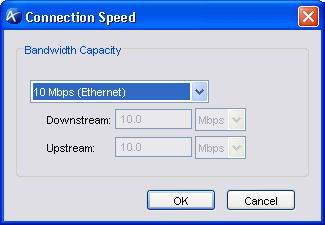
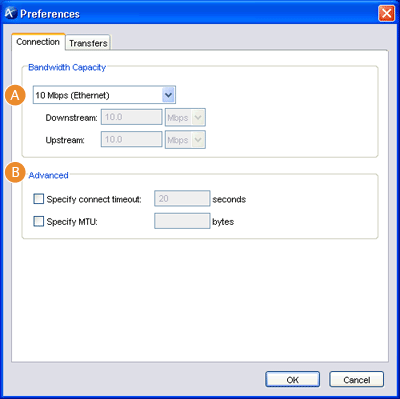
Go to Start menu -> All Programs -> Aspera -> Aspera Scp Client and launch Aspera Scp. If this is the first time you run this program, besides the Change License Key window, a Preferences window appears. In the Set Default Rate window, select the default rate that matches your connection bandwidth.
|
Step 2 Set up a remote endpoint
In Aspera Scp, first set up our Aspera demo server as the endpoint for testing. Click New under the "Saved Remote" panel. 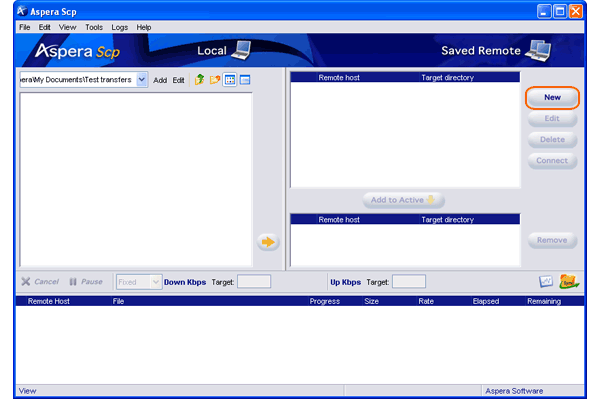
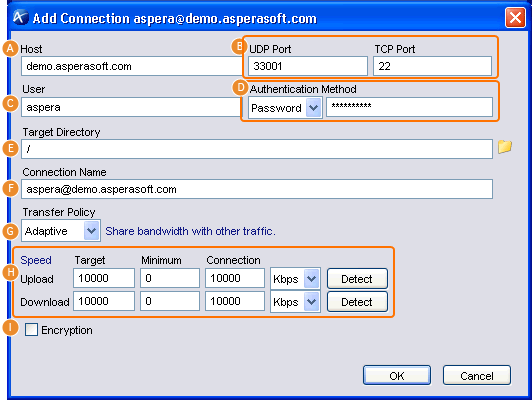
In the Add Remote Endpoint window, enter the following information in the specified fields:
|
Step 3 Download a file from the demo server
Once you have the remote endpoint configured, click Connect, browse to the folder /aspera-test-dir-large (full path: /home/aspera/aspera-test-dir-large/), download the file named 100MB. Click the Transfer Monitor icon
|
Step 4 Upload a file to the demo server
When the file is successfully downloaded, on the remote side, navigate to the folder /Upload (full path: /home/aspera/Upload/) and upload a file from your local machine to this location. |
If your computer and the network environment are correctly configured, both download and upload transfer testing should finish without problems.
Aspera Scp consists of the following panels:

Before transferring any files, you must set up a remote endpoint. Click New in the upper-right of the "Saved Remote" section. This opens the "Add Remote Endpoint" dialog.

The Add Remote Endpoint window contains the following items:
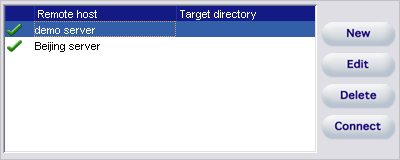
Check to make sure you have successfully added the remote endpoint. In the Saved Remote area of the Aspera Scp window, there should be a ![]() (check mark) next to it if the remote endpoint was added correctly. If there is an
(check mark) next to it if the remote endpoint was added correctly. If there is an ![]() (X mark) next to it, examine the remote endpoint configuration or the network connectivity.
(X mark) next to it, examine the remote endpoint configuration or the network connectivity.
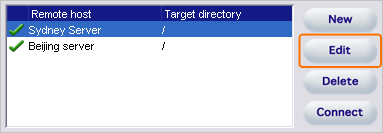
If you want to edit the endpoint's information, in the Saved Remote area of the Aspera Scp window, click Edit, To delete the remote endpoint, click Delete. After you set up the endpoint, you can create a connection by selecting the endpoint in the Remote host list and click Connect.
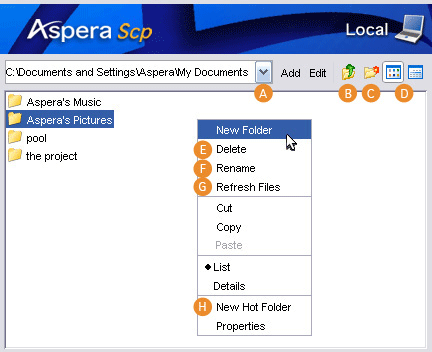
Aspera Scp lets you browse and manage your files. The left panel shows your local file system. When connected, the right panel also shows the remote file system. This following is a list of commonly-used buttons and right-click menu options:
Before starting a transfer, you can set the transfer policy and transfer rate directly on the Transfer Controls panel. The default transfer rates are the connection bandwidth set in the preferences.
During a transfer, you can pause or cancel your transfer by clicking ![]() (Pause) or
(Pause) or ![]() (Cancel) respectively. Also see the following Resume Transfers section.
(Cancel) respectively. Also see the following Resume Transfers section.
For more information about transfer policies, please refer to Appendix 1. Transfer Policies and Transfer Rate.
When connected to a remote endpoint, you can start file transfers between the endpoint and your computer. To download, first locate the file on the remote side and highlight the file by clicking on it. Navigate to the downloading path on your local machine, and click ![]() (Left-arrow) to start the download. To upload files, locate the file on your local side, navigate to the remote path, and click
(Left-arrow) to start the download. To upload files, locate the file on your local side, navigate to the remote path, and click ![]() (Right-arrow) to start.
(Right-arrow) to start.
To transfer multiple files, hold Ctrl key on the keyboard while clicking files, or hold Shift key to select a range of files.
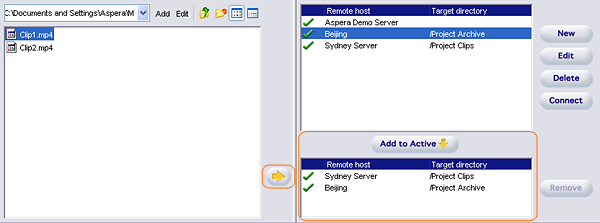
If you are transferring the same file to a group of remote endpoints, select designated endpoints from the list and click Add to Active for each remote host. Highlight files to upload and click the lower ![]() (Right-arrow) button to end files to active endpoints consecutively.
(Right-arrow) button to end files to active endpoints consecutively.
All previous and current transfers are listed in the Transfer List panel. If you use Aspera Sync to synchronizing hot folders, the User Transfers shows all the transfers initiated by you, whereas the tabs next to it with the hot folder's name indicate activities on all hot folders.
The transfer monitor gives you additional visibility and control over your transfers. To open it, click![]() (Transfer Monitor) on the right side of the main window.
(Transfer Monitor) on the right side of the main window.
Aspera Scp can resume unfinished transfers. If a transfer session is paused, click ![]() (Resume) in the Transfer Controls to continue the transfer. If the transfer is canceled, to resume, select the same file again from the source and start the transfer. The transfer should resume from where it left.
(Resume) in the Transfer Controls to continue the transfer. If the transfer is canceled, to resume, select the same file again from the source and start the transfer. The transfer should resume from where it left.
The resume setting can be found in the Preferences (Tools > Preferences), under the Transfers tab. In the preferences, you can enable or disable the resume feature, and choose between Fast integrity check(default), File size check, and Full integrity check.
| Resume Option | Description |
|---|---|
| File size check | Only check if the remote file is the same size |
| Fast integrity check | Perform a sparse checksum on the remote side |
| Full integrity check | Perform a full checksum on the remote side |

To access the Preferences window, go to Toolbar > [Tools] > [Preferences].

Public key authentication is an alternative to interactive password authentication, allowing the client to authenticate without entering or storing a user password. It is also useful for applications requiring a transparent, automatic, authentication method, such as a batch transfer script.
Public key authentication consists of two keys: a public key and a private key. Each key is a string of text stored in a file that allows two computers to automatically verify each other's identity.
Configuring a client with access to a server with public key authentication requires two steps by the client: Create the public-private key pair in the Aspera Scp and send only the public key to the server administrator. Additional steps are required by the server administrator.
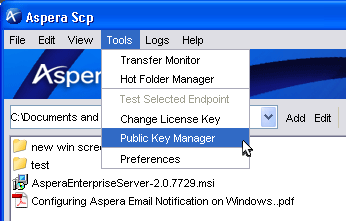
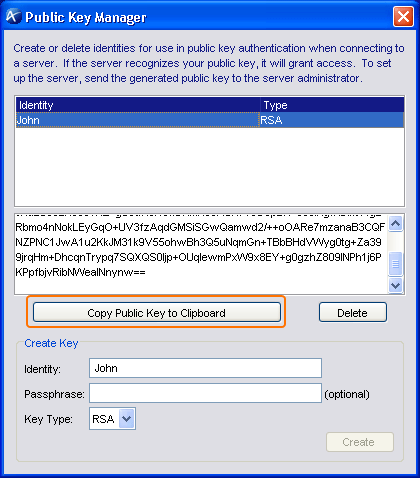
To create the public and private keys, launch Aspera Scp and go to Tool bar -> Tools -> Public Key Manager. Enter the required information:
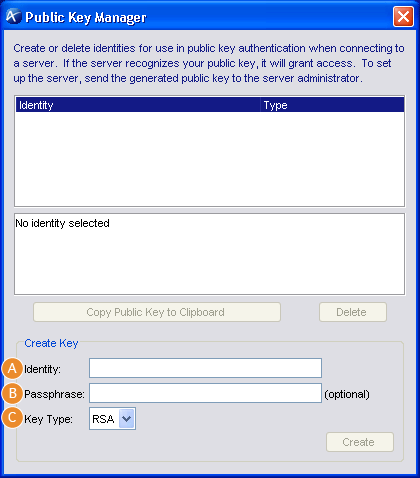
Click Create to generate the key pair. A new entry with the identity name you provided should appear in the Public Key Manager window. Highlight the newly created public key by clicking on it from the list, and click Copy Public Key to Clipboard. Paste the string into an email and address it to the server administrator.
fasp™ uses putty private key for the public key authentication. The key will be generated when you are connecting to a host using public key authentication in Aspera Scp. If you are using the public key authentication in the command-line transfer, make sure the putty private key is available.
Instead of using Aspera Scp, to create putty private manually, for example if you are creating a key-pair for the user "john", open Command Prompt and use the commands:
> cd "Documents and Settings"\john
> md .ssh
> cd .ssh
> ssh-keygen -t rsa
The program first prompts you for the file to save the key, hit enter to use the default name id_rsa. For a passphrase, you can either enter a password for additional authentication, or simply press return twice to leave the passphrase blank.
When the key-pair is created, generate a putty key for fasp™ 2 connection:
> cd "Documents and Settings"\john\.ssh
> puttygen id_rsa -o id_putty.ppk -O private
When finish, provide your public key file (id_rsa.pub) to the administrator of the server you are connecting to.
To configure your connection to use public key authentication on an existing remote endpoint, highlight the saved connection by clicking once, then choose Edit.
In the Edit Remote Endpoint window's Authentication section, select Public Key from the pull-down menu and select the key you want to use for this endpoint. Click OK when finish.
If the public key authentication fails, you will be prompted to enter the account's password. Contact the server administrator

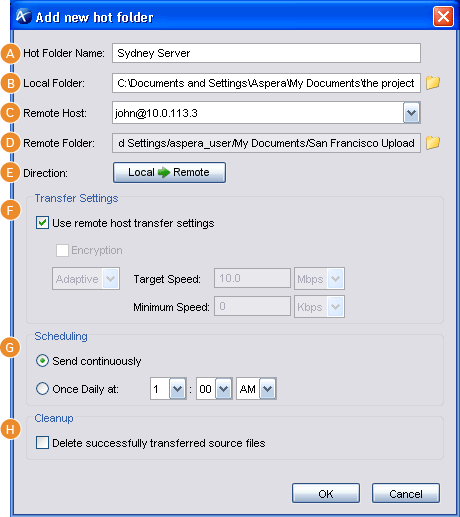
Aspera Sync is a feature that can be used to monitor configured "hot folders" for changes, automatically transferring any new or modified files. It can be used for one-way replication between two locations or simply as a way of forwarding files in your work-flow. The remote location will always be updated with local changes or vice versa.
On Windows, Aspera Sync is installed as a service on your computer, running in the background, so your files are sent even when Aspera Scp is not running. Transfer parameters can be configured for each hot folder, including the direction, speed, policy, and update interval.
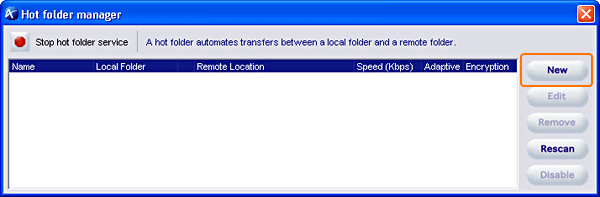
To set up a hot folder, start by clicking ![]() (Hot Folder manager) in the main window to open the Hot Folder Manager. Click
(Hot Folder manager) in the main window to open the Hot Folder Manager. Click![]() (New) to create a new hot folder.
(New) to create a new hot folder.
When a hot folder is created, you should see it appear in the Hot Folder Manager. If the ![]() (Right-arrow) is pressed,
the Sync service is running and your hot folders are synchronizing Pressing
(Right-arrow) is pressed,
the Sync service is running and your hot folders are synchronizing Pressing ![]() (Stop) stops synchronization.
(Stop) stops synchronization.
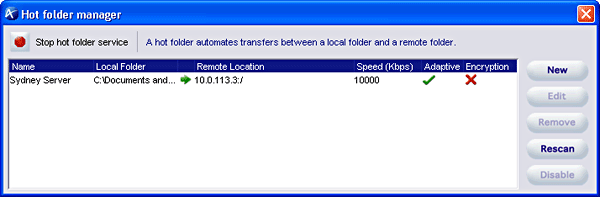
You can also manage each hot folder setting individually. To disable a hot folder, select it and click Disable. To delete a hot folder click Remove. Click Rescan to force Sync to check if the folder is synchronized.
When a hot folder is set up, the folder's transfer status is shown in a separate tab at the bottom. To refresh the status, click on the list or the Refresh Stats button on the lower right corner.

ascp is a core command-line program for fasp™ transfers. This section explains all the options of ascp and the common usage examples.
Please note that the Aspera syntax uses single-quote (' ') and forward-slashes ("/") for path, instead of the double-quote (" ") and regular Windows back-slashes ("\").
Aspera can perform cross-platform file transfers, but each platform has its own set of characters not allowed in file names. To ensure compatibility with all platforms, please avoid the following characters in file names:
/ \ " : ' ? > < & * |
The command-line arguments are as follows:
| Synopsis | |
|---|---|
| ascp |
[-AQTdpqrv] [-w {f|r}] [-l max-rate] [-m min-rate] [-E extension] [-k {0|1|2|3}] [-O fasp-port] [-P ssh-port] [-M mgmt-port] [-L local-log-dir][-R remote-log-dir] [-S ssh-program] [-i key-file] [-C node-id:num-nodes] [-g read-block-size] [-G write-block-size] [-Z pMTU-size] [−X number‐of‐bytes] [[[user@]host1:]source-file ... ] [[user@]host2:]target-path |
| Option | Description |
|---|---|
| -A | Display version and license information; then exit. |
| -Q | Enable adaptive rate control to be fair to other network traffic. Otherwise fasp™ transfers using fixed rate, which doesn't share bandwidth. Optionally use the -l and -m flags to set the target and minimum rates respectively. (default: fixed rate) |
| -T | Disable encryption for maximum throughput. |
| -d | Create target directory if it doesn't already exist. |
| -p | Preserve file date attributes. |
| -q | Quiet flag, to disable progress display. |
| -r | Recursively copy entire directories. |
| -v | Verbose mode, print connection and authentication debug messages in the log file. |
| -w{r|f} | Measures bottleneck bandwidth from either client to server (-wf), or server to client (-wr), if no sources files are specified in the ascp command. To use this function in a transfer, use -wf, and specify source files in the ascp command. Fasp uses the measured value as the target rate. |
| -l rate | Set the target transfer rate in kilobits per second. (Default: 10000) |
| -m rate | Set the minimum transfer rate in kilobits per second. (Default: 0) |
| -E extension | Exclude transferring both the files and directory with certain extension. You can use multiple statements to exclude many different types of files. |
| -k number | Enable resuming partially transferred files. (Default: always retransfer)
|
| -O port | Set the UDP port used by fasp™ for data transfer. (Default: 33001) |
| -P port | Set the TCP port used for fasp™ session initiation. (Default: 22) |
| -M port | Set a management port for fasp™ to connect to, allowing an application to monitor and control the transfer. |
| -L dir | Specify a directory for the log file in the local host, instead of using the default directory. |
| -R dir | Specify a directory for the log file in the remote host, instead of using the default directory. |
| -i | Enable public key authentication and specify the putty private key file. If key file is not specified, fasp™ looks for the identity file in $HOME/.ssh/id_[algorithm] by default. On Windows and Mac OS X, the putty private key is created when you have established a connection with public key authentication in Aspera Scp. On other UNIX-based operating system, you need to use putty-gen command to create a putty private key. |
| -C node-id:num-nodes | Participate in a parallel transfer. node-id is a number from 1 to the number of participants, and num-nodes is the number of participants. Each participant requires an independent UDP port. For very high speed transfers exceeding the limits of a single CPU core or one computer, one can take advantage of the parallel transfer capability in ascp. A single file or dataset is transferred by multiple ascp processes, running on a multi-core computer or on different clustered computers. |
| -g | Set the write size (in bytes), e.g. 1M for 1 megabyte |
| -G | Set the read size (in bytes), e.g. 1M for 1 megabyte |
| -Z size | Specify the datagram size (MTU) for fasp™ to use. Otherwise fasp™ uses the detected path MTU. |
| -X number-of-bytes | Adjust the size (number of bytes) of a retransmission request (max 1440). |
| Examples |
|---|
1.
To transfer the contents of directory "/space/files" to host 10.0.0.2 using FASP transport with a target transfer rate=100 Mbps and encryption ON: ascp -r -l 100000 space/files root@10.0.0.2:space |
2.
To perform the same transfer with encryption OFF: ascp -rT -l 100000 space/files root@10.0.0.2:space |
3.
To perform the same transfer with adaptive rate control ON. Set the maximum transfer rate at 100 Mbps and minimum rate at 1Mpbs: ascp -rTQ -l 100000 -m 1000 space/files root@10.0.0.2:space |
4.
To perform the same transfer with adaptive rate control ON and a maximum transfer rate of 90% of the user's bandwidth capacity: ascp -rTQ -wf -l 90p space/files root@10.0.0.2:space |
5.
Enable the bandwidth discovery feature (-wf), and run with adaptive rate control (-Q), with a maximum rate of arbitrarily high-speed, such as 500 Mbps (-l 500M): ascp -rT -l 500M -wf -Q root@10.0.0.2:/aspera/100MB space/files |
6.
To perform a transfer with public key authentication: ascp -rT -l 10000 -i ~/.ssh/asp1/asp1.ppk space/files root@10.0.0.2:space |
7.
To perform a transfer as a non-privileged user, specify a fasp™ port greater than 1024: ascp -r -l 100000 -O 42000 space/files user@10.0.0.2:space |
8.
If spaces are present in both the username and remote path, the entire target argument may be enclosed in double quotes: ascp -r -l 100000 space/files "User Name@10.0.0.2:the movies" |
9.
Start two processes on a dual-core system, together transferring at the rate 200Mbps, using UDP ports 33001 and 33002: (Commands are executed in different terminal windows.) ascp -C 1:2 -O 33001 -l 100m /file root@10.0.0.2:/t_folder & |
The transfer policy and speed determine how you utilize the network resource for fasp file transfers. It can be adjusted in both Transfer Control panel before initiating transfer sessions, and in Transfer Monitor when the transfer session is occurring.
There are four transfer policies, Fixed, Adaptive, Trickle, and Set Finish Time:
| Policy | Description |
|---|---|
| Fixed | fasp attempts to transfer at the specified target rate, regardless of the actual network capacity. If the target rate is under the network capacity, the transfer will not be faster than the target rate. Use Fixed mode if you want the transfer to run at a constant rate and finish in a guaranteed time. In this mode, you only need to set the maximum transfer rate. |
| Adaptive | fasp continuously monitors the network and adjusts the transfer rate to fully utilize the available link bandwidth up to the maximum rate, assuming the network is not congested. When other traffic builds up and congestion occurs, fasp shares the bandwidth with other traffic, self-throttles and stabilizes the transfer at a fair rate. In this mode, you need to set both the maximum and the minimum transfer rates. |
| Trickle | Similar to Adaptive mode, in Trickle mode fasp utilizes the available bandwidth up to the maximum rate. The difference is when congestion occurs, fasp only transfers at the user-defined minimum rate. In this mode, you need to set both the maximum and the minimum transfer rates. |
| Set Finish Time | This feature allows your to set the end time of file transmission by automatically adjusting the minimum transfer rate. This can be useful for file delivery deadlines. Once the time is set, a confirmation alerts you that the file transfer will end on or before the date and time set. This policy option is found in Aspera Scp Transfer Monitor only. |
To open the Aspera Scp Client application logs, in the Aspera Scp go to Toolbar -> Logs. You can choose either [View Transfer Log] to read about the fasp connection, or [View Scp Log] to see the Aspera Scp's log.
The logs are stored in the following files:
\program files\aspera\FASP\var\log\aspera-scp-transfer.log
\program files\aspera\FASP\var\log\aspera-ui.log.
You can review detailed transfer information in this file. The log file is also helpful in case you are requesting technical support.
In Control Panel, depending on the version of the Windows operating system, choose Add/Remove Programs or Uninstall a program. Click Aspera for Point-to-Point to select it from the list of programs, then select the Remove button or right-click and choose Uninstall from the available commands.