
Aspera Point-to-Point User Guide
Windows XP/2003/Vista/2008/7
Version 2.5.2
- Chapter 1 Introduction
- Chapter 2 Setting Up
- 2.1 Upgrade from a Previous Version
- 2.2 Installation
- 2.3 Enter the License Key
- 2.4 Configure the Firewall
- 2.5 Test Transfer with the Aspera Demo Server
- 2.6 Optimize the Transfer Performance
- 2.7 Set Up the Public Key Authentication
- Chapter 3 Administration
- 3.1 Manage Users
- 3.2 Server Configuration
- 3.3 Virtual Link
- Chapter 4 Point-to-Point User Interface
- 4.1 Application Overview
- 4.2 Manage Connections
- 4.3 Transfer Files
- 4.4 Initiate Transfers in Advanced Mode
- 4.5 File Synchronization with Hot Folders
- Chapter 5 ascp Command-line Reference
- 5.1 ascp Usage
- 5.2 ascp Examples
- Appendix 1 Transfer Policies and Transfer Rate
- 2 Locating the Log Files
- 3 Uninstall Aspera Point-to-Point
1. Introduction
Aspera Point-to-Point is a complete file transfer application supercharged with Aspera's fasp™ file transport technology. It includes the following components:
- fasp™ mini-server
- A transport that accepts incoming connections.
- User Interface
- A desktop application for initiating fasp™ file transfers.
- ascp Command
- A command-line transfer program.
- Hot Folders
- A synchronization feature in the user interface.
- Virtual Link
- Create aggregate bandwidth cap.
- Server Configuration
- Configure the transport server through the user interface's Server Configuration.
The most up-to-date documentation can be found at http://asperasoft.com/en/documentation/7.
For further assistance, please contact us at http://asperasoft.com/support.
2. Setting Up
2.1 Upgrade from a Previous Version
If you have one of the following products installed, follow these steps to prepare the system for upgrade:
- Aspera Scp for Point-to-Point Version 2.0.2
- Aspera Scp for Point-to-Point Version 2.1.x
- Aspera Scp for Point-to-Point Version 2.2.1
- Step 1 Backup the old configuration files
-
Backup the configuration files in the following locations:
- 32bit
Windows
-
- \Program Files\Aspera\FASP\etc\ Configuration files and license info
- \Program Files\Aspera\Aspera Scp\etc\ Remote Hosts info, Hot Folders info
- 64bit
Windows
-
- \Program Files (x86)\Aspera\FASP\etc\ Configuration files and license info
- \Program Files (x86)\Aspera\Aspera Scp\etc\ Remote Hosts info, Hot Folders info
- Step 2 Close all fasp transfer-related applications and connections.
-
Before upgrading the application, close the following applications and services:
- ascp connections
- SSH connections
- Aspera Scp
- asperasync Services
When ready, proceed to the next section to complete the upgrade installation.
- Note About the saved "Remote Endpoints"
-
Since 2.5.0, a connection (a.k.a. "endpoint") can be either shared with all users - like in previous versions - or kept exclusive to the user who created it. However, the sharing feature is only available for the Enterprise Server product. After installation, the application will import any existing connections to only the first user that launches it.
2.2 Installation
Make sure you have the correct setup if you are installing the product on the following environment or operating system:
- User Account Control
(UAC)
- To use the product on the Windows 7, 2008 or Vista, the User Account Control (UAC) should be turned off to perform the tasks such as adding users, changing license and adjusting the bandwidth cap.
- Active Directory
- If you are setting up this computer to work in the Active Directory environment, please log in as a domain administrator to install the Aspera transfer product.
Follow these steps to set up the application:
- Step 1 Download the installer
- Download the installer from the link below. Use the credentials provided to your organization by Aspera to access. If needed, contact Aspera Technical Support in determining your firm's access credentials.
http://asperasoft.com/en/downloads/7
- Step 2 Select the setup type
-
When downloaded, double-click the installer package and start the installation. Check the license agreement and select a setup type:
- Typical
- Install the standard Point-to-Point.
- Custom
- Install only the selected components. Refer to the next step for details.
- Complete
- (Same as the Typical installation)
When upgrading, the installer will skip this step and select previously-installed components.
- Step 3 Custom setup options (Optional)
-
There are two additional options when selecting the custom setup:
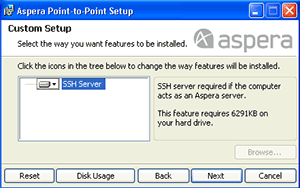 |
First, check the features to install. If you wish to configure your own SSH Server for fasp transfers, un-check the SSH Server and the installer will not install the OpenSSH Service.
|
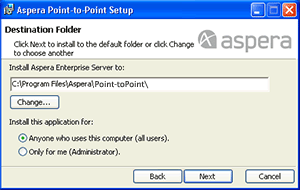 |
Second, Determine the destination folder for the installation. Under Install this application for:, choose between all users to allow all users on this computer to use this application, and Administrators to allow only your administrator user to use it. |
- Step 4 Set up the Aspera service (XP-64bit, Vista, 2003 and 2008)
-
On Windows XP 64bit, Vista, 2003 and 2008, you need to create an user account to run the following Aspera services:
- Aspera Central
- Aspera HTTPD
- Aspera Sync
- OpenSSH Service (Doesn't apply when the SSH Server isn't included in this installation)
The installer will prompt you to create or update the user. By default, the user name is svcAspera.
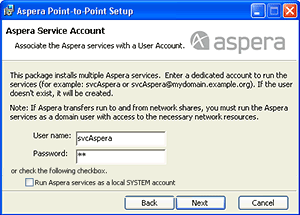
|
- If the account is not yet available, enter the credentials and click Next.
- If the account exists (E.g. created through the previous installation), enter the account's password and click Next. If the password that you entered is incorrect, try creating a new account, or update the password through the Computer Management.
|
If the server is configured to accept the domain user login, use a domain administrator account to run the services.
After the setup completes, you should see a installation successful message. Click Finish.
To change the user account that runs these services, go to Control Panel > Administrative Tools and launch Services. Right-click the name of the service and select Properties. Under Log On tab you should see the user account settings.
- Step 5 Remove the old components and configuration files. (Optional)
-
When the installation is completed, to avoid confusion of modifying the wrong configuration file, remove the following directories that contain the old components and configuration files:
- 32bit
Windows
-
- \Program Files\Aspera\Aspera Central
- \Program Files\Aspera\Aspera Scp
- \Program Files\Aspera\FASP
- 64bit
Windows
-
- \Program Files (x86)\Aspera\FASP
- \Program Files (x86)\Aspera\Aspera Scp
- \Program Files (x86)\Aspera\Aspera Central
2.3 Enter the License Key
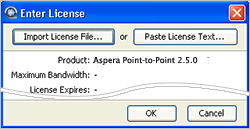
|
The user interface prompts for the license when first launched. Go to Start Menu > All Programs > Aspera > Point-to-Point and click Point-to-Point to start it up.
You should see the Enter License window. Click Import License File to locate the license, or click Paste License Text to copy-and-paste the license file's content. When selected, the license's info will appear in the window. Click OK to continue.
|
|
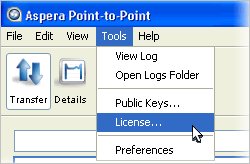
To change the license key afterwards, in the user interface, go to Menu bar > Tools > License to bring up the License window.
|
The Aspera transfer products require access through the ports listed in the table below. If you cannot establish the connection, review your local corporate firewall settings and remove the port restrictions:
- Server-side
-
- Allow inbound and outbound connections for the SSH. (TCP/22)
- Allow inbound and outbound connections for the fasp transfers.
(For example,
UDP/33001 - UDP/33010 for 10 concurrent transfers)
- To add it as a Console node, allow inbound and outbound connections. (TCP/40001)
- Client-side
-
- Allow outbound connection for the SSH. (TCP/22)
- Allow outbound connection for the fasp transfers. (Open all UDP ports that the server allows, e.g. UDP/33001)
2.5 Test Transfer with the Aspera Demo Server
To make sure the software is working properly, follow these steps to test download and upload transfers between your system and the Aspera Demo Server.
- Step 1 Launch the user interface
-
Go to Start menu > All Programs > Aspera > Point-to-Point and launch Point-to-Point.
- Step 2 Add the Aspera Demo Server as a remote endpoint
-
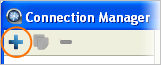
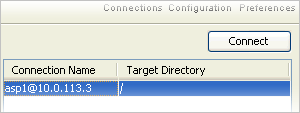
In the main window, click Connections toolbar button to bring up the Connection Manager window. Click
 to add a new connection, and enter the following info, leave other options with default values or blank:
 |
- Host:
- demo.asperasoft.com
- Users:
- aspera
- Authentication:
- Choose Password and enter demoaspera
|
- Step 3 Download from the Aspera Demo Server
-
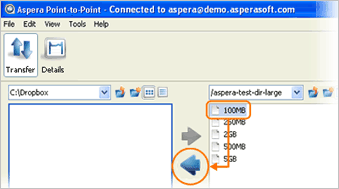 |
In the main window, select Aspera Demo Server and click Connect. On the server file browser (right panel), browse to the folder /aspera-test-dir-large, select the file 100MB and click "left arrow" (see picture) to download it to your local machine. |
- Step 4 Upload to the Aspera Demo Server
-
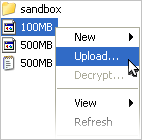
When the file is downloaded, try uploading the same file back to the Aspera Demo Server. Select the same file (100MB) on the local file browser (left panel), navigate to the folder /Upload on the server-side, and click the "right arrow" to upload it.
- Troubleshooting
-
- Invalid license key
- See 2.3 Enter the License Key and verify the key.
- Can't browse the Demo Server
- See 2.4 Configure the Firewall and review the SSH firewall settings.
- Can't transfer files
- See 2.4 Configure the Firewall and review the fasp firewall settings.
Aspera's fasp™ transport has no theoretical throughput limit. Other than the network capacity, the transfer speed may be limited by the rate settings and the resources of the computers. This section shows you how to optimize the transfer rate by adjusting the user interface's rate settings, perform a transfer rate testing, and a hardware upgrade guideline to improve the transfer speed.
2.6.1 User Interface Preferences
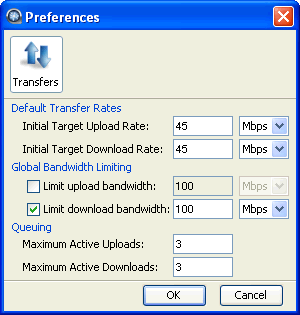 |
The global fasp bandwidth settings can be found in the preferences. Click Preferences toolbar button to bring up the window. Each option is explained below:
- Default Transfer Rates
- The initial download and upload rates for all transfers.
- Global Bandwidth Limiting
- Adjust the aggregated bandwidth cap for all fasp transfers on this computer. For more advanced bandwidth settings, refer to 3.2.2 Server Configuration - Bandwidth
- Queuing
- Set the maximum number of concurrent upload and download transfers.
|
2.6.2 Test the Transfer Speed
To verify that your system's fasp transfer can fulfill the maximum bandwidth capacity, follow these steps:
- Step 1 Start a transfer with Fair transfer policy
-
|
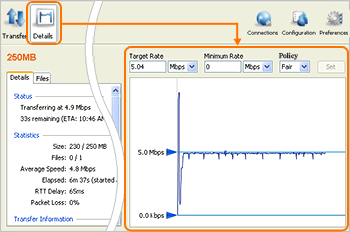
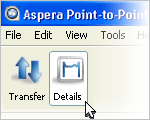
On the client machine, open the user interface and start a transfer. Go to the Details to open the Transfer Monitor.
To leave more network resource for other high-priority traffics, use Fair policy and adjust the Target Rate and Minimum Rate rate by sliding the arrows or enter the values.
|
- Step 2 Test the maximum bandwidth
-
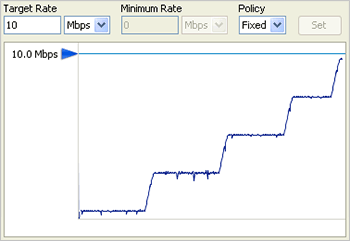
|
Use "Fixed" policy for the maximum transfer speed. Start with a lower transfer rate and increase gradually toward the network bandwidth.
Note: This test will typically occupy a majority of the network's bandwidth. It is recommended that this test be performed on a dedicated file transfer line or during a time of very low network activity.
|
2.6.3 Hardware Upgrade Guide
To improve the transfer speed, you may also upgrade the related hardware components:
- Hard disk
-
The I/O throughput, the disk bus architecture (e.g. RAID, IDE, SCSI, ATA, and Fiber Channel).
- Network I/O
-
The interface card, the internal bus of the computer.
- CPU
-
Overall CPU performance affects the transfer, especially when encryption is enabled.
2.7 Set Up the Public Key Authentication
Public key authentication is an alternative to password authentication, allowing users to authenticate without entering or storing a password. Setting up public key authentication involves generating a public and private key-pair, and giving the public key to servers you want to transfer with.
2.7.1 Create the computer's Key-Pair
If you are using this machine as a client to log in into other Aspera servers with the public key authentication, you need to create a key-pair on this machine. Follow these steps to do so:
- Step 1 Create a SSH public key-pair
-

|
In the user interface (Start menu > All Programs > Aspera > Point-to-Point > Point-to-Point), go to Menu bar > Tools > Public Keys....
In the Public key Manager window, click Create... and enter the following info:
|
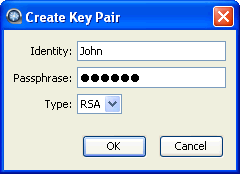
|
- Identity
- Give a name to your key pair, such as your user name.
- Passphrase
- (Optional) Set a passphrase on your SSH key, which will be prompted for whenever it needs to use the key. If you don't want the user to be prompted for passphrase when logging in, leave this field blank.
- Type
- Choose between RSA (default) and DSA keys.
|
- Step 2 Provide the public key
-
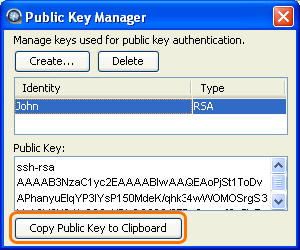
|
To acquire the key, select the key in the Public Key Manager window and click Copy Public Key to Clipboard. Paste the string into an e-mail and address it to the server administrator. The instructions for installing the public key on the server can be found in the 2.7.2 Install the Client's Public Key on the Server.
|
- Step 3 Connect with public key authentication
-
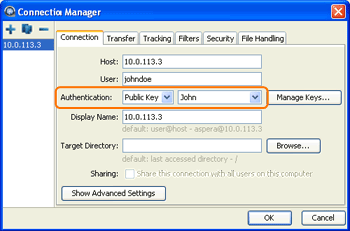
|
After your public key is installed on the server, click the Connections toolbar button from the user interface's main window and select the server.
In the Connection tab, select the Public Key from the Authentication pull-down menu and select the key you want to use for this endpoint. Click OK when finish.
|
2.7.2 Install the Client's Public Key on the Server
To install the client's public key on your server computer, follow these steps:
- Step 1 Prepare the User Account
-
To install the account's public key, create a folder called .ssh in the user's home directory. In this example, the key-pair is created using this setup:
- User account: asp1
- User's home directory: C:\Documents and Settings\asp1
To set up the user's public key, in Command Prompt (Start menu > All Programs > Accessories > Command Prompt) enter the following commands:
> cd "C:\Documents and Settings\asp1"
> md .ssh
- Step 2 Retrieve the public key file from the client
-
The client should send you an e-mail with the public key. It should be a text string attached in the secure e-mail or saved as a text file.
- Step 3 Install the public key
-
Use a text editor to create the following file, without file extension:
(User's home directory)\.ssh\authorized_keys
In the example, add the public key string into the file:
C:\Documents and Settings\asp1\.ssh\authorized_keys
Note: Some text editor appends the file extension automatically, such as .txt. Make sure to remove the file extension from the file authorized_keys.
Add the user's public key-string into this file and save it. The user should now be able to establish the fasp™ connections with the public key authentication.
3. Administration
3.1 Manage Users
You need to add system users to allow login with the user account. Each user account can be further assigned with the specialized transfer settings, such as the docroot, bandwidth, and the authentication method. This section shows you how to add the users, and test the connection between the server with a client.
3.1.1 Add Users
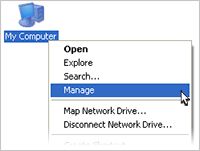
|
To authenticate incoming connections, user accounts must be configured for the Aspera product. To create system users, right-click the My Computer > Management to bring up the Computer Management. |
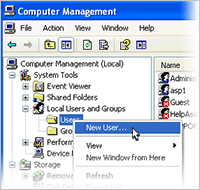
|
In the Computer Management's left panel, navigate into the Computer Management > System Tools > Local Users and Groups, right-click the Users and select New User. Enter the user name and password and click Create.
|
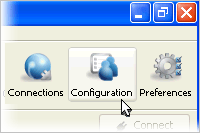
|
When the system user is created, launch the Point-to-Point (Start > All Programs > Aspera > Point-to-Point > Point-to-Point). On the main window, click Configuration to bring up the Server Configuration screen.
|
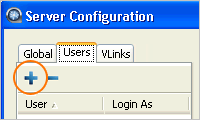
|
In the Server Configuration, go to the Users tab on the left panel, click and enter the name of the system user that you wish to add.
When the user is added into the Server Configuration, the remote client can use this credential to log into this computer. To further configure the user's access permissions and transfer settings, refer to 3.2 Server Configuration.
|
3.1.2 Test Transfer with a Client
When the user account is prepared, follow these steps to establish a fasp™ connection with a client. This testing procedure involves the operation on both the server and the client machines.
- Step 1 Prepare the user account on the server
-
On the server (This computer), create an user account for the connection. Refer to 3.1.1 Add Users.
- Step 2 Install Aspera product on the client machine
-
On the client machine, install an Aspera transfer product, such as the Aspera Client, Aspera Point-to-Point, or Aspera Enterprise Server. Provide another valid license key for the client machine. Refer to the proper documentation for installation.
- Step 3 Start Transfers
-
On the client machine, launch the user interface, and add the server. Enter the following info:
- Host
- Enter the server's IP address, such as 10.0.0.100
- User
- The user account to log in, such as asp1
- Authentication Method
- The user account's password
When the server is added, click Connect to establish the connection. Try to upload and download files between the server and the client.
- Troubleshooting
-
- Invalid license key
- See 2.3 Enter the License Key and verify the key.
- Duplicate license
- Use two different licenses on the client and the server computers.
- Can't browse the server
- See 2.4 Configure the Firewall and review the SSH firewall settings.
- Can't transfer files
- See 2.4 Configure the Firewall and review the fasp firewall settings.
3.2 Server Configuration
The Point-to-Point user interface offers the server configuration feature that enables the fasp transfer settings. You can configure the settings for global-level or individual user-level.
Go to the user interface and click the Configuration toolbar button. The configuration options can be found in the following sections:
- Authorization
- 3.2.1 Authorization
- Bandwidth
- 3.2.2 Bandwidth
- Advanced Network Options
- 3.2.3 Advanced Network Options
- Advanced File Handling
- 3.2.4 Advanced File Handling
- Docroot
- 3.2.5 Docroot
- Global-only Transfer Server
- 3.2.6 Transfer Server
- Global-only Database
- Enterprise Server feature
- Global-only HTTP Fallback Server
- Enterprise Server feature
3.2.1 Authorization
- 1. Incoming Transfersallow / deny / require token, default allow
- The default setting of allow allows users to transfer to this computer. Setting this to deny will prevent transfers to this computer. When set to require token, only transfers initiated with valid tokens will be allowed to transfer to this computer. Token-based transfers are typically employed by web applications such as Faspex™ and require a Token Encryption Key.
- 2. Incoming External Provider URLHTTP URL, default blank
- The value entered should be the URL of the external authorization provider for incoming transfers. The default empty setting disables external authorization. Aspera servers can be configured to check with an external authorization provider. This SOAP authorization mechanism can be useful to organizations requiring custom authorization rules.
- 3. Incoming External Provider SOAP Actiontext string, default blank
- The SOAP action required by the external authorization provider for incoming transfers. Required if External Authorization is enabled.
- 4. Outgoing Transfersallow / deny / require token, default allow
- The default setting of allow allows users to transfer from this computer. Setting this to deny will prevent transfers from this computer. When set to require token, only transfers initiated with valid tokens will be allowed to transfer from this computer. Token-based transfers are typically employed by web applications such as Faspex™ and require a Token Encryption Key.
- 5. Outgoing External Provider URLHTTP URL, default blank
- The value entered should be the URL of the external authorization provider for outgoing transfers. The default empty setting disables external authorization. Aspera servers can be configured to check with an external authorization provider. This SOAP authorization mechanism can be useful to organizations requiring custom authorization rules.
- 6. Outgoing External Provider Soap Actiontext string, default blank
- The SOAP action required by the external authorization provider for outgoing transfers. Required if External Authorization is enabled.
- 7. Token Encryption Cipheraes-128 / aes-192 / aes-256, default aes-128
- The cipher used to generate encrypted authorization tokens.
- 8. Token Encryption Keytext string, default blank
- This is the secret token that will be used to authorize those transfers configured to require token. Token generation is part of the Aspera SDK. See http://asperasoft.com/developer/web for more information.
- 9. Token Life (seconds)positive integer, default 1200
- Sets token expiration for users of web-based transfer applications.
- 10. Strong Password Required for Content Encryptiontrue / false, default false
- When set to true, require the password for content encryption to contain at least one letter, one number, and one symbol.
- 11. Content Protection Requiredtrue / false, default false
- When set to true, users will be required on upload to enter a password to encrypt the files on the server.
- 12. Encryption Allowedany / none / aes-128, default any
- Describes the type of transfer encryption accepted by this computer. When set to any the computer allows both encrypted and non-encrypted transfers. When set to none the computer restricts transfers to non-encrypted transfers only. When set to aes-128 the computer restricts transfers to encrypted transfers only.
3.2.2 Bandwidth
- 1. Incoming Vlink IDpre-defined value, default 0
- The value sets the Vlink ID for incoming transfers. Vlinks are a mechanism to define aggregate transfer policies. The default setting of 0 disables Vlinks. One Vlink—the virtual equivalent of a network trunk—represents a bandwidth allowance that may be allocated to a node, group, or user. Vlink ID are defined in each Vlink created in Aspera Console. The Vlink ID is a unique numeric identifier.
- 2. Incoming Target Rate Cap (Kbps)positive integer, default Unlimited
- The value sets the Target Rate Cap for incoming transfers. The Target Rate Cap is the maximum target rate that a transfer can request, in kilobits per second. No transfer may be adjusted above this setting, at any time. The default setting of
Unlimited signifies no Target Rate Cap. Clients requesting transfers with initial rates above the Target Rate Cap will be denied.
- 3. Incoming Target Rate Default (Kbps)positive integer, default 10000
- This value represents the initial rate for incoming transfers, in kilobits per second. Users may be able to modify this rate in real time as allowed by the software in use. This setting is not relevant to transfers with a Policy of Fixed.
- 4. Incoming Target Rate Locktrue / false, default false
- After an incoming transfer is started, its target rate may be modified in real time. The default setting of false gives users the ability to adjust the transfer rate. A setting of true prevents real-time modification of the transfer rate.
- 5. Incoming Minimum Rate Cap (Kbps)positive integer, default Unlimited
- The value sets the Minimum Rate Cap for incoming transfers. The Minimum Rate Cap is a level specified in kilobits per second, below which an incoming transfer will not slow, despite network congestion or physical network availability. The default value of Unlimited effectively turns off the Minimum Rate Cap.
- 6. Incoming Minimum Rate Default (Kbps)positive integer, default 0
- This value represents the initial minimum rate for incoming transfers, in kilobits per second. Users may be able to modify this rate in real time as allowed by the software in use. This setting is not relevant to transfers with a Policy of Fixed.
- 7. Incoming Minimum Rate Locktrue / false, default false
- After an incoming transfer is started, its minimum rate may be modified in real time. The default setting of false gives users the ability to adjust the transfer's minimum rate. A setting of true prevents real-time modification of the transfer rate. This setting is not relevant to transfers with a Policy of Fixed.
- 8. Incoming Bandwidth Policy Defaultfixed / high / fair / low, default fair
- The value chosen sets the default Bandwidth Policy for incoming transfers. The default policy value may be overridden by client applications initiating transfers.
- 9. Incoming Bandwidth Policy Allowedany / high / fair / low, default any
- The value chosen sets the allowed Bandwidth Policy for incoming transfers. Aspera transfers use fixed, high, fair and low policies to accommodate network-sharing requirements. When set to any, the server will not deny any transfer based on policy setting. When set to high, transfers with a Policy of high and less aggressive transfer policies (e.g. fair or low) will be permitted. Fixed transfers will be denied. When set to low, only transfers with a Bandwidth Policy of low will be allowed.
- 10. Incoming Bandwidth Policy Locktrue / false, default false
- After an incoming transfer is started, its Policy may be modified in real time. The default setting of false gives users the ability to adjust the transfer's Policy. A setting of true prevents real-time modification of the Policy.
- 11. Outgoing Vlink IDpre-defined value, default 0
- The value sets the Vlink ID for outgoing transfers. Vlinks are a mechanism to define aggregate transfer policies. The default setting of 0 disables Vlinks. One Vlink—the virtual equivalent of a network trunk—represents a bandwidth allowance that may be allocated to a node, group, or user. Vlink ID are defined in each Vlink created in Aspera Console. The Vlink ID is a unique numeric identifier.
- 12. Outgoing Target Rate Cap (Kbps)positive integer, default Unlimited
- The value sets the Target Rate Cap for outgoing transfers. The Target Rate Cap is the maximum target rate that a transfer can request, in kilobits per second. No transfer may be adjusted above this setting, at any time. The default setting of Unlimited signifies no Target Rate Cap. Clients requesting transfers with initial rates above the Target Rate Cap will be denied.
- 13. Outgoing Target Rate Default (Kbps)positive integer, default 10000
- This value represents the initial rate for outgoing transfers, in kilobits per second. Users may be able to modify this rate in real time as allowed by the software in use. This setting is not relevant to transfers with a Policy of Fixed.
- 14. Outgoing Target Rate Locktrue / false, default false
- After an outgoing transfer is started, its target rate may be modified in real time. The default setting of false gives users the ability to adjust the transfer rate. A setting of true prevents real-time modification of the transfer rate.
- 15. Outgoing Minimum Rate Cap (Kbps)positive integer, default Unlimited
- The value sets the Minimum Rate Cap for outgoing transfers. The Minimum Rate Cap is a level specified in kilobits per second, below which an incoming transfer will not slow, despite network congestion or physical network availability. The default value of Unlimited effectively turns off the Minimum Rate Cap.
- 16. Outgoing Minimum Rate Defaultpositive integer, default 0
- This value represents the initial minimum rate for outgoing transfers, in kilobits per second. Users may be able to modify this rate in real time as allowed by the software in use. This setting is not relevant to transfers with a Policy of Fixed.
- 17. Outgoing Minimum Rate Locktrue / false, default false
- After an outgoing transfer is started, its minimum rate may be modified in real time. The default setting of false gives users the ability to adjust the transfer's minimum rate. A setting of true prevents real-time modification of the transfer rate. This setting is not relevant to transfers with a Policy of Fixed.
- 18. Outgoing Bandwidth Policy Defaultfixed / high / fair / low, default fair
- The value chosen sets the default Bandwidth Policy for outgoing transfers. The default policy value may be overridden by client applications initiating transfers.
- 19. Outgoing Bandwidth Policy Allowedany / high / fair / low, default any
- The value chosen sets the allowed Bandwidth Policy for outgoing transfers. Aspera transfers use fixed, high, fair and low policies to accommodate network-sharing requirements. When set to any, the server will not deny any transfer based on policy setting. When set to high, transfers with a Policy of high and less aggressive transfer policies (e.g. fair or low) will be permitted. Fixed transfers will be denied. When set to low, only transfers with a Bandwidth Policy of low will be allowed.
- 20. Outgoing Bandwidth Policy Locktrue / false, default false
- After an outgoing transfer is started, its Policy may be modified in real time. The default setting of false gives users the ability to adjust the transfer's Policy. A setting of true prevents real-time modification of the Policy.
3.2.3 Advanced Network Options
- 1. Bind IP Addressvalid IPv4 address, default blank
- Specify an IP address for server-side ascp to bind its UDP connection. If a valid IP address is given, ascp sends and receives UDP packets ONLY on the interface corresponding to that IP address.
- 2. Bind UDP Portpositive integer, default 33001
- Specify a port number for server-side ascp to bind its UDP connection. This also prevents client ascp processes from binding to same UDP port. Valid port numbers range between 1 and 65535.
- 3. Disable Packet Batchingtrue / false, default false
- When set to true, send data packets back to back (no sending a batch of packets). This results in smoother data traffic at a cost of higher CPU usage.
- 4. Maximum Socket Buffer (bytes)positive integer, default 0
- Upper bound the UDP socket buffer of an ascp session below the input value. The default of
0 will cause the Aspera sender to use its default internal buffer size, which may be different for different operating systems.
- 5. Minimum Socket Buffer (bytes)positive integer, default 0
- Set the minimum UDP socket buffer size for an ascp session.
3.2.4 Advanced File Handling
- 1. Read Block Size (bytes)positive integer, default 0
- This is a performance tuning parameter for an Aspera sender. It represents the number of bytes an Asper sender reads at a time from the source disk drive. Only takes effect when server is sender. The default of
0 will cause the Aspera sender to use its default internal buffer size, which may be different for different operating systems.
- 2. Write Block Size (bytes)positive integer, default 0
- This is a performance tuning parameter for an Aspera receiver. Number of bytes an ascp receiver writes data at a time onto disk drive. Only takes effect when server is receiver. The default of
0 will cause the Aspera sender to use its default internal buffer size, which may be different for different operating systems.
- 3. Use File Cachetrue / false, default true
- This is a performance tuning parameter for an Aspera receiver. Enable or disable per-file memory caching at the data receiver. File level memory caching improves data write speed on Windows platforms in particular, but will use more memory. We suggest using a file cache on systems that are transferring data at speeds close to the performance of their storage device, and disable it for system with very high concurrency (because memory utilization will grow with the number of concurrent transfers).
- 4. Max File Cache Buffer (bytes)positive integer, default 0
- This is a performance tuning parameter for an Aspera receiver. This value corresponds to the maximal size allocated for per-file memory cache (see Use File Cache). Unit is bytes. The default of 0 will cause the Aspera receiver to use its internal buffer size, which may be different for different operating systems.
- 5. Resume Suffixtext string, default .aspx
- File name extension for temporary metadata files used for resuming incomplete transfers. Each data file in progress will have a corresponding metadata file with the same name plus the resume suffix specified by the receiver. Metadata files in the source of a directory transfer are skipped if they end with the sender's resume suffix.
When you change the resume suffix, you need to restart Aspera Sync in order for hot folders to pick new settings up. Go to Control Panel > Administrative Tools > Services and restart Aspera Sync.
- 6. Preserve Attributesnone / times, default undefined
- Configure file creation policy. When set to none, do not preserve the timestamp of source files. When set to times, preserve the timestamp of the source files at destination.
- 7. Overwriteallow / deny, default allow
- Overwrite is an Aspera server setting that determines whether Aspera clients are allowed to overwrite files on the server. By default it is set to allow, meaning that clients uploading files to the servers will be allowed to overwrite existing files as long as file permissions allow that action. If set to deny, clients uploading files to the server will not be able to overwrite existing files, regardless of file permissions.
- 8. File Manifesttext / disable, default none
- When set to text a text file "receipt" of all files within each transfer session is generated. If set to disable no File Manifest is created. The file manifest is a file containing a list of everything that was transferred in a given transfer session. The filename of the File Manifest itself is automatically generated based on the transfer session's unique ID. The location where each manifest is written is specified by the File Manifest Path value. If no File Manifest Path is specified, the file will be generated under the destination path at the receiver, and under the first source path at the sender.
- 9. File Manifest Pathtext string, default blank
- Specify the location to store manifest files. Can be an absolute path or a path relative to the transfer user's home.
- 10. Pre-Calculate Job Sizeany / yes / no, default any
- Configure the policy of calculating total job size before data transfer. If set to any, follow client configurations (-o PreCalculateJobSize={yes|no}). If set to no, disable calculating job size before transferring. If set to yes, enable calculating job size before transferring.
- 11. Storage Rate Controltrue / false, default false
- Enable/Disable disk rate control. When enabled, adjust transfer rate according to the speed of receiving I/O storage, if it becomes a bottleneck.
3.2.5 Docroot
- 1. Absolute Pathfile path, no default
- The Absolute Path describes the area of the file system that is accessible by Aspera users. The default empty value gives users access to the entire file system.
- 2. Read Allowedtrue / false, no default
- Setting this to true allows users to transfer from the designated area of the file system as specified by the Absolute Path value.
- 3. Write Allowedtrue / false, no default
- Setting this to true allows users to transfer to the designated area of the file system as specified by the Absolute Path value.
- 4. Browse Allowedtrue / false, no default
- Setting this to true allows users to browse the directory.
3.2.6 Transfer Server Options
- 1. Addressvalid IPv4 address, default 127.0.0.1
- This is the network interface address on which the transfer server listens. The default value 127.0.0.1 enables the transfer server to accept transfer requests from the local computer. Setting the value to 0.0.0.0 allows the Aspera transfer server to accept transfer requests on all network interfaces for this node. Alternatively, a specific network interface address may be specified.
- 2. Portpositive integer, default 40001
- The port at which the transfer server will accept transfer requests. Valid port numbers range between 1 and 65535.
3.3 Virtual Link
Virtual link (Vlink) is a feature that allows virtual bandwidth caps. Transfer sessions assigned to the same virtual link conform to the aggregate bandwidth cap and attain an equal share of it. This section first shows you how to set up vlinks, then explains how it can be applied to computers and users
3.3.1 Set Up the Virtual Link
To configure the Vlinks, launch the user interface and click Configuration. Go to the Vlinks tab in the left panel.
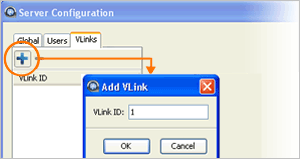 |
To begin, click the (Add), and assign a number between 1 and 255 for this Vlink.
When created, the Vlink can be configured through the following settings:
|
- 1. Vlink Name text string, default blank
- Name of the virtual link. This value has no impact on actual bandwidth capping.
- 2. On true / false, default false
- Setting this value to true to activate the Vlink. Select false to deactivate it.
- 3. Capacity positive integer in Kbps, default 50000
- This value reflects the virtual bandwidth cap in Kbps. When applying the Vlink to either the Incoming Vlink ID or the Outgoing Vlink ID bandwidth, the incoming or outgoing bandwidth will be restricted by this value, respectively.
3.3.2 Apply the Virtual Link
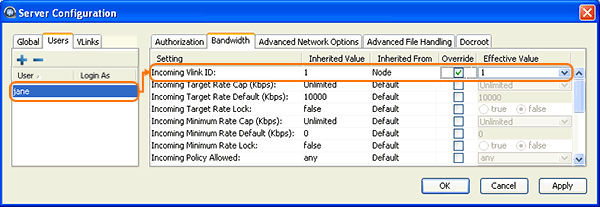
Once the Vlinks are set up in the aspera.conf, you can assign the Vlink to the computer and the user. To apply the Vlinks, first open the Configuration window. In the left panel, go to the Users tab and select the user to apply the Vlink. In the right panel, navigate into the Bandwidth tab, check the option Incoming Vlink ID and select the Vlink you wish to apply by it's ID:
4. Point-to-Point User Interface
The user interface is a desktop application for initiating fasp™ file transfers. This chapter covers all features of this application.
4.1 Application Overview
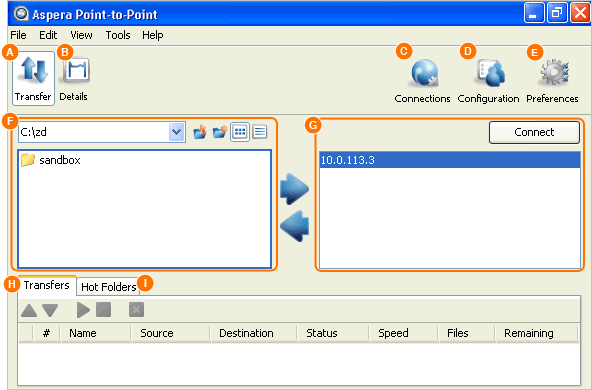
- A Transfer
-
The transfer mode. Reveal the local/remote file browsers.
- B Details
-
The transfer details mode. Show the selected transfer session's details and the transfer control options.
- C Connections
-
Bring up the Connection Manager window to manage the remote endpoints.
- D Configuration
-
Bring up the Server Configuration window to configure the computer's fasp transfer settings.
- E Preferences
-
Set the local computer's default transfer rate, fasp global bandwidth, and the number of simultaneous transfers in the queue.
- F Local Browser
-
Browse the local file system to find files to transfer.
- G Connections/Remote Browser
-
When not connected, this panel shows connections that lists the saved connections. When connected, it becomes the remote file browser.
- H Transfers panel
-
Display previous, ongoing, and queued transfers. Manage the priority.
- I Hot Folder Control Panel
-
Display all configured Hot Folders. Start or manage Hot Folders.
4.2 Manage Connections
|
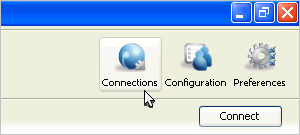
To connect to a remote computer, you need to add it into the Connection Manager before establishing the connection. To do so, click the Connections toolbar button in the user interface main window to begin.
|
|
In the Connection Manager, click the (Add) to create a new connection. When a connection is added, you can also use the  (Duplicate) and (Duplicate) and  (Remove) buttons to manage the connection profiles. (Remove) buttons to manage the connection profiles.
|
The configuration window contains six tabs. All tabs and the options are explained in the following sections:
4.2.1 Connection
- Hosts:
-
Required
The server's address, such as 192.168.1.10 or companyname.com.
- User:
- The login user for the server.
- Authentication:
- Choose either password or public key for authentication. To use the key-based authentication, refer to 2.7 Set Up the Public Key Authentication.
- Display Name:
- Enter a name for this connection.
- Target Directory:
- The default directory when connecting to this computer.
- Sharing:
Enterprise Server-only feature
Check this box to share this connection with other users on your computer. Notice that when this connection is authenticated through the public key, other users should have the same private key.- Advanced Settings:
-
- SSH Port (TCP): The TCP network port. Default: 22
- fasp PORT (UDP): The UDP network port: Default: 33001
- Connection Timeout: Timeout the connection attempt after the selected time.
4.2.2 Transfer
- Transfer Name:
-
- Automatically generate: Allow the user interface to generate the transfer name.
- Automatically generate and add prefix: Use auto-generated name with prefix.
- Specify: Use the specified name.
- Policy:
- Select the transfer policy. Refer to Appendix 1. Transfer Policies and Transfer Rate.
- Speed:
- Check the option to specify the transfer rate.
- Retry:
- Check the option to enable the retry, and specify the duration.
- Advanced Settings
-
Click the button to reveal the options:
- Specify the fasp datagram size (MTU)
- Disable calculation of source files size before transferring
4.2.3 Tracking
- Generate delivery confirmation receipt
- Check the option to create the delivery receipt file in the specified location.
4.2.4 Filters
Click Add and enter the pattern to exclude files or directories with the specified pattern in the transfer. The exclude pattern is compared with the whole path, not just the file name or directory name. Two special symbols can be used in the setting of patterns:
- *
- (Asterisk) Represents zero to many characters in a string, for example *.tmp matches .tmp and abcde.tmp.
- ?
- (Question Mark) Represents one character, for example t?p matches tmp but not temp.
The following examples show the names and the matching patterns:
- path/to/dirName
- *dirName
- filename
- *filename or path/to/filename
- a/b/file1
- *1
- pathA/fileB
- path?/file?
4.2.5 Security
- Encryption:
- When checked, fasp™ encrypts files while transferring. Encryption may decrease performance, especially at higher transfer speeds and with slower computers.
- Content Protection:
-
- Encrypt uploaded files with a password: Check the option to encrypt the uploaded files with the specified password. The protected file has the extension .aspera-env appended to the file name.
- Decrypt password-protected files downloaded: Check the option to prompt for the decryption password when downloading encrypted files.
4.2.6 File Handling
- Resume:
-
Check Resume incomplete files to enable the resume feature. Select a resume option:
- Compare file attributes: Only check if the existing file is the same size.
- Compare sparse file checksums: Perform a sparse checksum on the existing file.
- Compare full file checksums: Perform a full checksum on the existing file.
When a complete file already exists at the destination: Select an overwrite rule when the same file exists at the destination.
- File Attributes:
- Check Preserve file timestamps to preserve the transferred files' timestamps.
- Source Deletion:
- Check Automatically delete source files after transfer to delete the successfully-transferred files from the source.
Check Delete source directories to also remove the folder.
|
When finished, click OK to save this configuration. To connect to the computer, double-click the connection from the Connection panel in the Aspera main window, or select it and click Connect.
|
4.3 Transfer Files
In the user interface, avoid using the following characters in the file name:
/ \ " : ' ? > < & * |
All options in the File Browser are listed below:
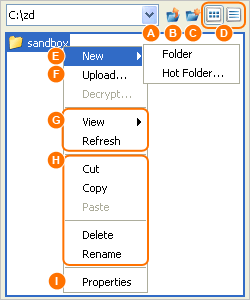 |
- A
 Path indicator/selector. Path indicator/selector.- B
 Go to the parent directory. Go to the parent directory.- C
 Create a new folder. Create a new folder.- D
  Choose between the detail or the list views. Choose between the detail or the list views.- E
- New Create a new folder, or set up a new Hot Folder.
- F
- Upload / Download
Bring up the advanced upload or download window.
- G
- View / Refresh
Choose between the detail or the list views. Refresh the folder.
- H
- Cut / Copy / Paste / Delete / Rename
Options to manipulation the selected files.
- I
- Properties Show the selected files' properties.
|
|
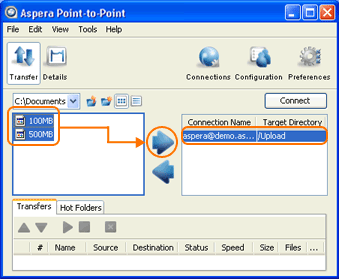
In the application main window, double-click a connection name in the right panel to browse this remote computer. To transfer a file to or from the remote computer, select the file in either side of the file browser, click the corresponding arrow to initiate the transfer. |
 |
If you have entered the target directory for this connection (See 4.2.1 Connection), you can also start a transfer without browsing the remote computer.
To do so, select the files from the left panel (local), select the connection name from the right panel (remote), and click  (Upload) to push files to the remote computer's target directory (as shown in the screenshot), or (Upload) to push files to the remote computer's target directory (as shown in the screenshot), or  (Download) to pull files from it. (Download) to pull files from it. |
When the transfer is initiated, you should see the transfer in the Transfers panel. If you have multiple ongoing transfers, use the  (Up) and
  (Down) to change the selected transfer's priority. The # field indicates the transfer's order in the queue. Also the
  (Start),
  (Stop), and
  (Delete) buttons can be used to control the selected transfer session.

 |
The Details tab gives you additional visibility and control over your transfers. Click the Details in the user interface and select a transfer from the Transfers panel, you should see the details of the transfer. |
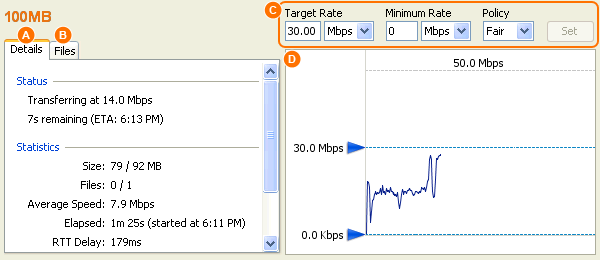
- A Details
- The transfer details, including the status, statistics and transfer information.
- B Files
- All files being transferred in this session, along with each files' size and transfer progress.
- C Transfer controls
- Set the transfer policy and transfer rate. Refer to Appendix 1. Transfer Policies and Transfer Rate.
- D Transfer Monitor
- The transfer graph. You can use the sliders to adjust the transfer rate.
4.4 Initiate Transfers in Advanced Mode
|
You can use the advanced mode to overwrite the transfer settings of a remote connection. When established the connection, right-click the file browser and select Upload or Download respectively.
The advanced transfer window contains six tabs. All tabs and the options are explained in the following sections:
|
4.4.1 Transfer
- Transfer Name:
- Specify the transfer session's name.
- Policy:
- Select a transfer policy. Refer to Appendix 1. Transfer Policies and Transfer Rate.
- Speed:
- Set the default transfer rate.
- Retry:
- Check the option to enable the retry rule, and specify the retry duration.
- Advanced Settings
-
Click the button to reveal the options:
- Specify the fasp datagram size (MTU)
- Disable calculation of source files size before transferring
4.4.2 Tracking
- Generate delivery confirmation receipt
- Check the option to create the delivery receipt file in the specified location.
4.4.3 Filters
Click Add and enter the pattern to exclude files or directories with the specified pattern in the transfer. The exclude pattern is compared with the whole path, not just the file name or directory name. Two special symbols can be used in the setting of patterns:
- *
- (Asterisk) Represents zero to many characters in a string, for example *.tmp matches .tmp and abcde.tmp.
- ?
- (Question Mark) Represents one character, for example t?p matches tmp but not temp.
The following examples show the names and the matching patterns:
- path/to/dirName
- *dirName
- filename
- *filename or path/to/filename
- a/b/file1
- *1
- pathA/fileB
- path?/file?
4.4.4 Security
- Encryption:
- When checked, fasp™ encrypts files while transferring. Encryption may decrease performance, especially at higher transfer speeds and with slower computers.
- Content Protection:
-
- Encrypt uploaded files with a password: Check the option to encrypt the uploaded files with the specified password. The protected file has the extension .aspera-env appended to the file name.
- Decrypt password-protected files downloaded: Check the option to prompt for the decryption password when downloading encrypted files.
4.4.5 File Handling
- Resume:
-
Check Resume incomplete files to enable the resume feature. Select a resume option:
- Compare file attributes: Only check if the existing file is the same size.
- Compare sparse file checksums: Perform a sparse checksum on the existing file.
- Compare full file checksums: Perform a full checksum on the existing file.
When a complete file already exists at the destination: Select an overwrite rule when the same file exists at the destination.
- File Attributes:
- Check Preserve file timestamps to preserve the transferred files' timestamps.
- Source Deletion:
- Check Automatically delete source files after transfer to delete the successfully-transferred files from the source.
Check Delete source directories to also remove the folder.
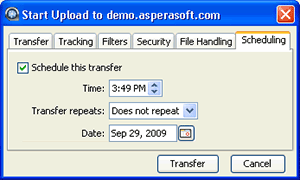
4.4.6 Scheduling
|
Check the option Schedule this transfer to enable the transfer scheduling.
- Time
- Specify the transfer time.
- Transfer Repeats
- Select a repeat mode. When enabling repeat, a corresponding date or repeat-rule setting will appear.
Cick Transfer to complete the scheduling.
|
|
When submitting a scheduled transfer, you should see it listed under the Transfers tab, with an icon  (Scheduled) under the # column. To modify the transfer, right-click it and select Edit to reveal the transfer settings. (Scheduled) under the # column. To modify the transfer, right-click it and select Edit to reveal the transfer settings.
When scheduling transfers, make sure that the Point-to-Point user interface is running. Unlike the Hot Folders, the scheduled transfers will not run when the user interface is closed.
|
4.5 File Synchronization with Hot Folders
Aspera Sync is a feature that can be used to monitor configured "Hot Folders" for changes, automatically transferring any new or modified files. It can be used for one-way replication between two locations or simply as a way of forwarding files in your work-flow. Sync runs as a service in the background.
4.5.1 Set Up the Hot Folders
 |
To set up the Hot Folders, use the file browser in the user interface to navigate into the path you wish to set up as the Hot Folder, for example, "C:\zd". Right-click the panel and select New > Hot Folder to bring up the New Hot Folder window. All tabs and the options are explained in the following tables:
|
- Name:
- The Hot Folders' name. Use the default name or enter your own
- Source:
- Specify the source for the Hot Folders.
- Destination:
- Specify the destination for the Hot Folders.
- Send Changes:
- Select when to perform the synchronization. Use Immediate to synchronize whenever a file in the folder is changed; specify a time to synchronize at the exact time.
- Policy
-
Select a transfer policy. Refer to Appendix 1. Transfer Policies and Transfer Rate.
- Speed
- Set the transfer rate.
Click Add and enter the pattern to exclude files or directories with the specified pattern in the transfer. Two special symbols can be used in the setting of patterns:
- *
- (Asterisk) Represents zero to many characters in a string, for example *.tmp matches .tmp and abcde.tmp.
- ?
- (Question Mark) Represents one character, for example t?p matches tmp but not temp.
The following examples show the names and the matching patterns:
- path/to/dirName
- *dirName"
- filename
- *filename or path/to/filename
- a/b/file1
- *1
- pathA/fileB
- path?/file?
Note that the temporary files used by Aspera to resume incomplete files are ignored according to the resume suffix setting of the sender. For more information about the resume suffix, see 3.2.4 Advanced File Handling.
- Encryption:
- When checked, fasp™ encrypts files while transferring. Encryption may decrease performance, especially at higher transfer speeds and with slower computers.
- Content Protection:
-
- Encrypt uploaded files with a password: Check the option to encrypt the uploaded files with the specified password. The protected file has the extension .aspera-env appended to the file name.
- Decrypt password-protected files downloaded: Check the option to prompt for the decryption password when downloading encrypted files.
- Resume:
-
Check Resume incomplete files to enable the resume feature. Select a resume option:
- Compare file attributes: Only check if the existing file is the same size.
- Compare sparse file checksums: Perform a sparse checksum on the existing file.
- Compare full file checksums: Perform a full checksum on the existing file.
When a complete file already exists at the destination: Select an overwrite rule when the same file exists at the destination.
- File Attributes:
- Check Preserve file timestamps to preserve the transferred files' timestamps.
- Source Deletion:
- Check Automatically delete source files after transfer to delete the successfully-transferred files from the source.
Check Delete source directories to also remove the folder.
4.5.2 Manage the Hot Folders
When added, the Hot Folders can be found in the Hot Folders panel:
In the Hot Folders panel, you can monitor the synchronization status, and use the (Start), (Stop), and (Delete) buttons to control the Hot Folders' transfer.
 |
To edit existing Hot Folders, right-click the entry in the Hot Folders panel and select Edit.... You can also create a new one by selecting New.... |
5. ascp Command-line Reference
ascp is a core command-line program for fasp™ transfers. This section covers the usage and examples.
5.1 ascp Usage
The basic ascp syntax guideline:
- The symbols used in the paths:
- Use single-quote (' ') and forward-slashes (/) on all platforms
- Characters to avoid in the file name:
- / \ " : ' ? > < & * |
If needed, you can use the command to set the password, token, and cookie in the environment variables:
- Password:
- set ASPERA_SCP_PASS=the-password
- Token:
- set ASPERA_SCP_TOKEN=the-token
- Cookie:
- set ASPERA_SCP_COOKIE=the-cookie
- Content Protection Password:
- set ASPERA_SCP_FILEPASS=content-protect-password
- ascp
-
[-{ATdpqv}] [-{Q|QQ}] [-l max-rate] [-m min-rate] [-w{f|r} [-K probe-rate]]
[-k {0|1|2|3}] [-i pubkey-file] [-Z dgram-size] [-M mgmt-port]
[-u user-string] [-X rexmsg-size] [-g read-size] [-G write-size]
[-S remote-ascp] [-L local-logdir] [-R remote-logdir][-e pre-post]
[-f config-file] [-C n-id:n-count] [-E pattern1 -E pattern2...]
[-O fasp-port] [-P ssh-port] [-o Option1=x[,Option2=y..]]
[-U {1|2}] [-W token-string] [-y {0|1}] [-j {0|1}]
[-Y key-file] [-I certif-file] [-t port] [-x proxy-server]
[[user@]host1:]source-file [[user@]host2:]target-path
- -A
- Display version and license information; then exit.
- -T
- Disable encryption for maximum throughput.
- -d
- Create target directory if it doesn't already exist.
- -p
- Preserve file timestamp.
- -q
- Quiet flag, to disable progress display.
- -v
- Verbose mode, print connection and authentication debug messages in the log file.
- -{Q|QQ}
- Enable fair (-Q) or trickle (-QQ) transfer policy. Use the -l and -m to set the target and minimum rates.
- -l max-rate
- Set the target transfer rate in Kbps. Default: 10000
- -m min-rate
- Set the minimum transfer rate in Kbps. Default: 0
- -w{r|f}
- Test bandwidth from server to client (r) or client to server (f). Currently a beta option.
- -K probe-rate
- Set probing rate (Kbps) when measuring bottleneck bandwidth.
- -k {0|1|2|3}
- Enable resuming partially transferred files. Default: 0, always retransfer
- 0 Always retransfer the entire file.
- 1 Check file attributes and resume if they match.
- 2 Check file attributes and do a sparse file checksum; resume if they match.
- 3 Check file attributes and do a full file checksum; resume if they match.
- -i key-file
- Use public key authentication and specify the private key file. Typically, the private key file is in the directory $HOME/.ssh/id_[algorithm].
- -Z dgram-size
- Specify the datagram size (MTU) for fasp™. By default it uses the detected path MTU.
- -M port
- Set a management port for monitoring and controlling the transfer.
- -u user-string
- Apply user string, such as variables for Pre- and Post-Processing, in the transfer.
- -X rexmsg-size
- Adjust the size in bytes of a retransmission request. Max: 1440.
- -g read-size
- Set the read block size (in bytes). E.g. 1M for 1 megabyte.
- -G write-size
- Set the write block size (in bytes), E.g. 1M for 1 megabyte.
- -S remote-ascp
- Specify the name of the remote ascp binary if different.
- -L local-log-dir
- Specify a logging directory in the local host, instead of using the default directory.
- -R remote-log-dir
- Specify a logging directory in the remote host, instead of using the default directory.
- -e pre-post
- Specify an alternate pre-post command. Use complete path and file name.
- -f config-file
- Specify an alternate Aspera configuration file other than aspera.conf.
- -C n-id:n-count
- Use parallel transfer on a multi-node/core system. Specify the node id (nid) and count(ncount) in the format 1:2, 2:2. Assign each participant an independent UDP port.
- -E pattern
- Exclude files or directories with the specified pattern in the transfer. This option can be used multiple times to exclude many patterns. Up to 16 patterns can be used by using -E.
Two symbols can be used in the pattern: * represents zero to many characters in a string, for example "*.tmp" matches ".tmp" and "abcde.tmp". ? represents one character, for example "t?p" matches "tmp" but not "temp".
- -O fasp-port
- Set the UDP port used by fasp™ for data transfer. Default: 33001
- -P ssh-port
- Set the TCP port used for fasp™ session initiation. Default: 22
- -o
- Advanced ascp options as listed below. Use comma "," to separate:
- SkipSpecialFiles=no
- Skip special files such as devices and pipes.
yes / no. Default: no
- RemoveAfterTransfer=no
- Remove source file except folder when finish.
yes / no. Default: no
- RemoveEmptyDirectories=no
-
Remove empty folder on the source.
yes / no. Default: no
- PreCalculateJobSize=no
-
Calculate total size before transfer.
yes / no. Default: no
- Overwrite=diff
-
Overwrite files with the same name.
Default: diff, Takes the following values:
- always Always overwrite the file.
- never Never overwrite the file.
- diff Overwrite if file is different from the source.
- older Overwrite if file is older than the source.
- FileManifest=none
- Generate a list of all transferred files information.
none / text. Default: none.
- FileManifestPath=(path)
- Specify the path to store the manifested file.
text string, Default: undefined
- FileCrypt=encrypt
- Encrypt or decrypt files. Passphrase is required.
encrypt / decrypt. Default: undefined.
- RetryTimeout=(secs)
- Specify the timeout duration in seconds, for a retry attempt. Default: undefined
- -U {1|2}
- Priority when sharing physical or virtual bandwidth cap. 1 for higher priority, 2 for regular. Default:2
- -W token-string
- Specify the token string for the transfer.
- -y {0|1}
- Enable HTTP Fallback transfer server when UDP connection fails. Set 1 to enable.
0 / 1. Default: 0
- -j {0|1}
- Encode all HTTP transfers as JPEG files. Set 1 to enable.
0 / 1. Default: 0
- -Y key-file
- The HTTPS transfer's key file name.
- -I certif-file
- The HTTPS certificate's file name.
- -t port
- Specify the port for HTTP Fallback Server.
- -x proxy-server
- Specify the proxy server address used by HTTP Fallback.
5.2 ascp Examples
- 1.
-
Transfer all files in \local-dir\files to 10.0.0.2 with target rate 100 Mbps and encryption OFF:
> ascp -T -l 100000 /local-dir/files root@10.0.0.2:/remote-dir
- 2.
-
Transfer with fair rate policy, with maximum rate 100 Mbps and minimum at 1 Mbps:
> ascp -TQ -l 100000 -m 1000 /local-dir/files root@10.0.0.2:/remote-dir
- 3.
-
To perform a transfer with UDP port 42000:
> ascp -l 100000 -O 42000 /local-dir/files user@10.0.0.2:/remote-dir
- 4.
-
To perform a transfer with the public key authentication, using the key file (home directory)/.ssh/asp1:
> ascp -T -l 10000 -i "/Documents and Settings/asp1/.ssh/asp1" \
local-dir/files root@10.0.0.2:/remote-dir
- 5.
-
Enclose the target in double-quotes when spaces are present in the username and remote path:
> ascp -l 100000 local-dir/files "User Name@10.0.0.2:/remote directory"
- 6.
-
Send files to a network shares location \\1.2.3.4\nw-share-dir, through the computer 10.0.0.2:
> ascp local-dir/files root@10.0.0.2:"//1.2.3.4/nw-share-dir/"
- 7.
-
Use parallel transfer on a dual-core system, together transferring at the rate 200Mbps, using UDP ports 33001 and 33002. Two commands are executed in different terminal windows:
> ascp -C 1:2 -O 33001 -l 100m /file root@10.0.0.2:/remote-dir &
> ascp -C 2:2 -O 33002 -l 100m /file root@10.0.0.2:/remote-dir
- 8.
-
Upload the file space\files to the server 10.0.0.2 with password protection (password: secRet):
> ASPERA_SCP_FILEPASS=secRet ascp -l 10m -o FileCrypt=encrypt \
local-dir/files root@10.0.0.2:/remote-dir/
Download from the server 10.0.0.2 and decrypt while transferring:
> ASPERA_SCP_FILEPASS=secRet ascp -l 10m -o FileCrypt=decrypt \
root@10.0.0.2:/remote-dir /local-dir
If the password-protected file is downloaded without descrypting (file1.aspera-env, with aspera-env appended), on the local computer, descrypt the file as file1:
> ASPERA_SCP_FILEPASS=secRet asunprotect -o file1 file1.aspera-env
Appendix 1. Transfer Policies and Transfer Rate
The transfer policy and speed determine how you utilize the network resource for fasp™ file transfers. Four transfer policies described below:
- Fixed
-
fasp™ attempts to transfer at the specified target rate, regardless of the actual network capacity. This policy transfers at a constant rate and finishes in a guaranteed time. In this mode, a maximum (target) rate value is required.
- High
-
fasp™ monitors the network and adjusts the transfer rate to fully utilize the available bandwidth up to the maximum rate. When congestion occurs, a fasp™ session with high policy transfers at a rate twice of a session with fair policy. In this mode, both the maximum (target) and the minimum transfer rates are required.
- Fair
-
fasp™ monitors the network and adjusts the transfer rate to fully utilize the available bandwidth up to the maximum rate. When other types of traffic builds up and congestion occurs, fasp™ shares bandwidth with other traffic fairly by transferring at an even rate. In this mode, both the maximum (target) and the minimum transfer rates are required.
- Low
-
Similar to Fair mode, the low policy uses the available bandwidth up to the maximum rate, but much less aggressive when sharing bandwidth with other network traffic. When congestion builds up, the transfer rate is decreased all the way down to the minimum rate, until other traffic retreats.
Appendix 2. Locating the Log Files
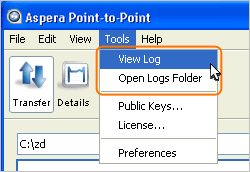 |
The log file includes detailed transfer information and can be useful for review and support request. to view the user interface log, in the user interface, go to Tools > View Log. To review logs of other components,click Open Logs Folder to open the following folder:
- 32bit
- \Program Files\Aspera\Point-to-Point\var\log
- 64bit
- \Program Files (x86)\Aspera\Point-to-Point\var\log
|
The logs folder contains files of specific components. Older logs are stored in the same file name with incremental number attached, such as ascmd.0.log.
- ascmd.log
- File browsing and manipulation in user interface.
- asconfigurator.log
- Server configuration information.
- asperacentral.log
- A server-side service that handles transfers, web services and database logging.
- aspera-scp-transfer.log
- The fasp™ transfers.
- aspera-scp-http-transfer.log
- The HTTP Fallback server.
- asperasync.log
- The Hot Folders (File synchronization).
Appendix 3. Uninstall Aspera Point-to-Point
The un-install can be done in Control Panel, depending on the version of your Windows, choose Add/Remove Programs or Uninstall a program. Prior to removing the application, close the following applications and services:
- ascp connections
- SSH connections
- User interface
- asperasync Services
Copyright 2009 © Aspera Inc. All Rights Reserved