Administrators can create IBM Aspera Shares local groups, in which all users who belong to the group have the same Shares access permissions and belong to the local database, rather than a DS.
- Log in to Shares and navigate to Admin > Accounts > Groups > New.
-
Enter the new local group's Name.
The Group dialog appears, which displays following six tabs:
-
Configure specific settings for your new local group:
Tab Description Detail
Update the local group’s name, username, and email address, or delete the local group from Shares.
Member of
Add members to the local group by selecting local users from the drop-down list. You will only see local users who have been added to Aspera Shares. Note: You cannot add DS users to a local group. You can configure DS groups by navigating to Admin > Accounts > Directories.After adding a member to your local group, you can click Edit to modify users’ settings, or click Remove to delete them from the group.When you click Edit, the individual user's configuration page appears. See Adding Local Users for details on modifying a local user's settings.
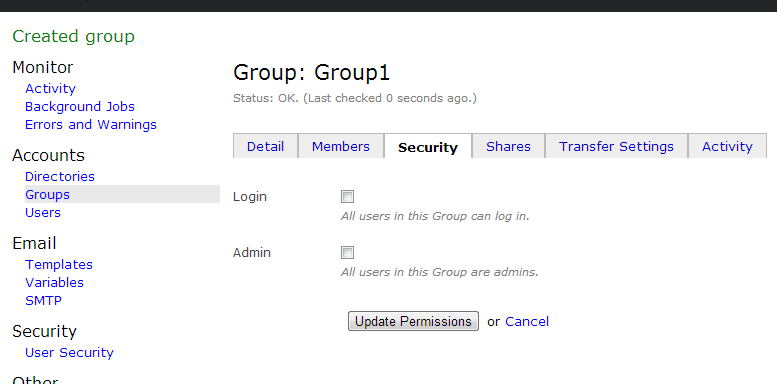
Security
Configure specific security settings for all members of the group, including whether members of the group can log into Shares, and whether all groups are administrators.
- If you select Login, all users in this group can log into Shares. If left clear, you may give individual users access to log in.
- If you select Admin, all users in this group have administrative permissions. If left clear, you may give individual users administrative access.
To configure users' security settings from their individual account pages, see Adding Local Users for details.
Shares
Click Add Share to authorize specific shares for the members of this group to access.
A list of nodes and shares that are currently configured in Shares appears. Click Authorize to authorize a share.
After authorizing a share, you can modify the group's permissions for browsing, transferring, and performing file operations within it. The default permission is browse. To edit these permissions or disallow the group's access to the share, click edit.
Select permissions that group members have for the authorized share. Click Update. You can disallow access to this share by clicking Delete.
Transfer Setting
You can override Shares settings for this group by implementing transfer settings specifically for members of this group. Click Override these settings to make transfer settings changes in the enabled text boxes.
Transfer settings include the following:
- Upload target rate For example, 1.5 Gbps, 500Mbps, 10 K, 3000. Leave blank to use the node's settings.
- Upload target rate cap For example, 1.5 Gbps, 500Mbps, 10 K, 3000. Leave blank to use the node's settings.
- Download target rate For example, 1.5 Gbps, 500Mbps, 10 K, 3000. Leave blank to use the node's settings.
- Download target rate cap For example, 1.5 Gbps, 500Mbps, 10 K, 3000. Leave blank to use the node's settings.
- Starting policy: Select the policy to be enforced
when the transfer starts:
- Fixed The transfer transmits data at a rate equal to the target rate, although this may impact the performance of other traffic present on the network.
- High The transfer rate is adjusted to use the available bandwidth up to the maximum rate.
- Fair The transfer attempts to transmit data at a rate equal to the target rate. If network conditions do not permit that, it transfers at a rate lower than the target rate, but not less than the minimum rate.
- Low The transfer rate is less aggressive than Fair when sharing bandwidth with other network traffic. When congestion occurs, the transfer rate is decreased to the minimum rate, until other traffic retreats.
- Allowed policy: Select the policies that are available to the user during transfer. If you do not make any selections, the Inherit from node setting is displayed, which will apply the settings inherited from the node.
- Encryption: Select Optional or AES-128. If you do not make any selections, the Inherit from node setting is displayed, which will apply the settings inherited from the node.
- Encryption at rest: Select Optional or Required. If you do not make any selections, the Inherit from node setting is displayed, which will apply the settings inherited from the node. If you select Required, the uploaded files must be encrypted during a transfer to protect them while they are stored on a remote server. The uploader sets a password before uploading the file, and the downloader needs to enter that password to decrypt the file.
Click Save to keep the new settings or Cancel cancel setting changes. You may also click Use Inherited Settings to return to the application-wide transfer configuration.
Activity
View and search for Shares activities by this group.