For details on upgrading IBM Aspera Shares see
Upgrading Shares
-
Download Shares from http://downloads.asperasoft.com/en/downloads/34. You
need your Aspera credentials for downloading the software.
-
To unpack, run the following command as root, where
version is the package version:
[root] $ rpm -Uvh aspera-shares-version.rpm
The following is an example of what you can expect to see:
  [root] $ rpm -Uvh aspera-shares-1.9.2.107140-1.x86_64.rpm
Preparing...                ########################################### [100%]
   1:aspera-shares          ########################################### [100%]

To use a remote MySQL server and disable the local MySQL server,
add the connection information to this file:

    /opt/aspera/shares/etc/my.cnf.setup

To complete the installation, please run this script as the root user:

    [root]$ /opt/aspera/shares/u/setup/bin/install
-
Run the install script:
 $ /opt/aspera/shares/u/setup/bin/install
Starting aspera-shares ...
Started
Testing 20 times if MySQL is accepting connections ...
Waiting for MySQL server to answer.
mysqld is alive
Writing /etc/init.d/aspera-shares ...
Running chkconfig to add the service to the runlevels ...
Generating a private key and self-signed certificate ...
To install your own private key and certificate authority-signed certificate, replace these files
  /opt/aspera/shares/etc/nginx/cert.key
  /opt/aspera/shares/etc/nginx/cert.pem
Creating the shares database ...
Loading the shares database schema ...
Initializing the shares database ...

To create an admin user, run this command:

    /opt/aspera/shares/u/shares/bin/run rake aspera:admin NAME="admin" PASSWORD="jFOBTzkgoJBk836cVW3zFXTX7XvOJSg" EMAIL="aspera@example.com"

Creating the stats collector database ...
Generating stats collector keys ...
Done
Shares randomly generates a password that you can copy and paste to create
the admin user.
Note: If you forget to make a note of the password at installation time, you can
reset it by running the following command from the
Shares server root
shell:
/opt/aspera/shares/u/shares/bin/run rake aspera:admin NAME="admin"
PASSWORD="jFOBTzkgoJBk836cVW3zFXTX7XvOJSg" EMAIL="aspera@example.com"
-
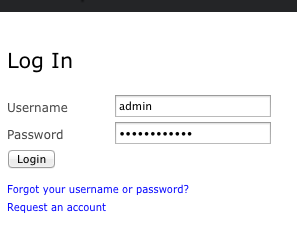
Login to Shares.
On the computer where
Shares is installed, launch
a web browser and navigate to http://
shares_ip_address. The
Shares login page appears. Log in using the administrator
username and password you created during the installation process.
Provide a new password when prompted.
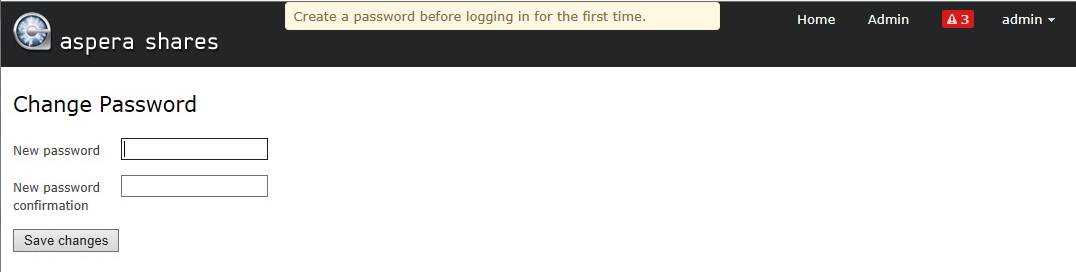
Finally, log in with your new password.
-
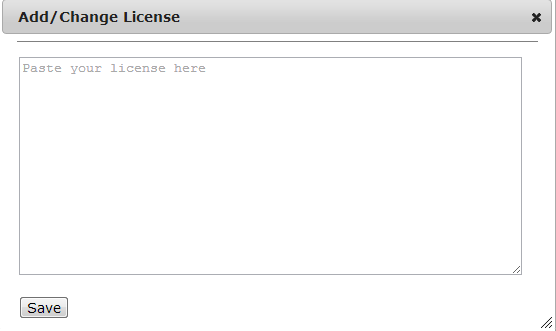
In the Add/Change License dialog that appears, paste your license key, and
click Save.
-
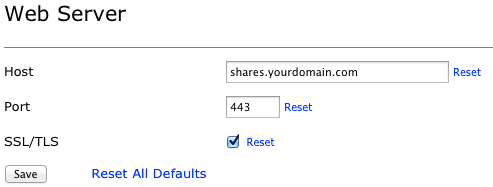
Select Admin from the Shares menu. Under the Other
column select Web Server. Update
Host with your computer's IP Address.
By default the port is set to 443, and SSL/TLS is selected.
-
Secure IBM Aspera Enterprise Server by doing the following: