Setting Up Transfer Users

The Aspera server uses your system accounts to authenticate connections from remote clients. The system users must be added and configured as Aspera transfer users before remote clients can run FASP transfers with the server. When creating transfer users, you can also specify user-specific settings, such as transfer bandwidth, docroot, and file handling.

User configuration is an important part of securing your server. For a complete description, see Aspera Ecosystem Security Best Practices.

Important Configuration Notes:

  • Some Aspera features require a docroot in URI format or require a file restriction instead of a docroot. For more information, see Docroot vs. File Restriction.
  • If users connect to the server by providing Shares credentials or by providing Node API credentials that are associated with the transfer user, changes to a user's configuration, such as their docroot, are not applied to the user until the Aspera NodeD Service is restarted. For instructions, see Restarting Aspera Services.

To configure a system user account as an Aspera transfer user:

  1. Configure Web UI authentication for the system user.
    In addition to SSH authentication, Connect Server uses Apache's authentication to authorize Web UI access. To set up a system user (asp1 in this example) for Apache authentication, run the htpasswd command below.
    Note: On the first run of htpasswd, you must use the -c option to create the file for credential storage, webpasswd. Do not use the -c option otherwise.
    $ htpasswd [-c ]/Library/Aspera/etc/webpasswd asp1
  2. Create default (global) transfer settings.
    To set default values to prohibit transfers in and out, set the encryption key, and set the default docroot for all users, run the following commands (if not already set):
    $ asconfigurator -x "set_node_data;authorization_transfer_in_value,deny"
    $ asconfigurator -x "set_node_data;authorization_transfer_out_value,deny"
    $ asconfigurator -x "set_node_data;token_encryption_key,token_key"
    $ asconfigurator -x "set_node_data;absolute,docroot"

    For server security, Aspera recommends the following settings:

    • Deny transfers by default, then enable transfers for individual users as required (described in a later step).
    • Set the token encryption key to a string of at least 20 random characters.
    • Set a default docroot to an empty folder or a part of the file system specific to each user.
    If there is a pattern in the docroot of each user, for example, /sandbox/username, you can use a substitutional string. This way you assign independent docroot to each user without setting a docroot for each user individually
    Substitutional String Definition Example
    $(name) system user's name /sandbox/$(name)
    $(home) system user's home directory $(home)/Documents
  3. For server security, Aspera recommends restricting users' read, write, and browse permissions.
    Users are given read, write, and browse permissions to their docroot by default. For increased security, change the global default to deny these permissions:
    $ asconfigurator -x "set_node_data;read_allowed,false;write_allowed,false;dir_allowed,false"

    Run the following commands to enable permissions per user, as required:

    $ asconfigurator -x "set_user_data;user_name,username;read_allowed,true"
    $ asconfigurator -x "set_user_data;user_name,username;write_allowed,true"
    $ asconfigurator -x "set_user_data;user_name,username;dir_allowed,true"
  4. If you provided an Aspera license during installation (rather than an entitlement), ensure that the transfer user has read permissions on the Aspera license file (aspera-license) so that they can run transfers.
    The license file is found in: /Library/Aspera/etc/
  5. Restrict user permissions with aspshell.
    By default, all system users can establish a FASP connection and are only restricted by file permissions. Restrict the user's file operations by assigning them to use aspshell, which permits only the following operations:
    • Running Aspera uploads and downloads to or from this computer.
    • Establishing connections in the application.
    • Browsing, listing, creating, renaming, or deleting contents.

    These instructions explain one way to change a user account or active directory user account so that it uses the aspshell; there may be other ways to do so on your system.

    1. Go to Apple menu > System Preferences > Users & Groups.
    2. Click Click the lock to make changes and enter admin credentials.
    3. Right-click the user account and select Advanced Options.
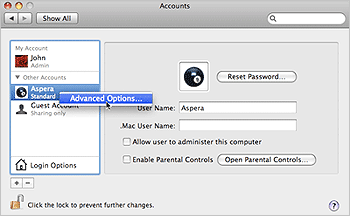
      Open an account's advanced options.
    4. Replace the default value (/bin/bash) in the Login Shell field with /Library/Aspera/bin/aspshell.
    Note: If you use SSH with Open Directory for authentication: To make aspshell the default shell for domain users, open server.app, go to Users, select the users that are used for transfer, and change the shell to /Library/Aspera/bin/aspshell.
  6. For each user, create a file /Users/username/.ssh/environment.
    Paste the following content into the file:
    PATH=/bin:/usr/bin:/usr/sbin:/sbin:/usr/local/sbin:/usr/local/bin:/opt/pkgconfig/bin:/Library/Aspera/bin:/Library/Aspera/sbin
  7. Configure user-specific transfer settings.
    Besides the default (global) transfer settings, you can create user-specific and group-specific transfer settings. The user-specific settings have the highest priority, overriding both group and global settings. For more information, see Configuration Precedence.

    To set user-specific values to authorize transfers in and out, docroot, and target rate, run the following commands:

    $ asconfigurator -x "set_user_data;user_name,username;authorization_transfer_in_value,allow"
    $ asconfigurator -x "set_user_data;user_name,username;authorization_transfer_out_value,allow"
    $ asconfigurator -x "set_user_data;user_name,username;absolute,docroot"
    $ asconfigurator -x "set_user_data;user_name,username;transfer_in_bandwidth_flow_target_rate_default,rate"
    $ asconfigurator -x "set_user_data;user_name,username;transfer_out_bandwidth_flow_target_rate_default,rate"

    For more information about other user settings, see aspera.conf - Authorization Configuration, aspera.conf - Transfer Configuration, and aspera.conf - File System Configuration.

  8. Verify the configuration.
    If you modify aspera.conf by editing the text, use the following command to verify the XML form and values:
    $ /opt/aspera/bin/asuserdata -v
  9. Restart asperanoded and asperacentral to activate your changes.
    Run the following commands to restart asperanoded:
    $ sudo launchctl stop com.aspera.asperanoded
    $ sudo launchctl start com.aspera.asperanoded
    Run the following command in a Terminal window to restart asperacentral:
    $ sudo launchctl stop com.aspera.asperacentral
    $ sudo launchctl start com.aspera.asperacentral