Configuring the Apache Server to Host the Connect Server Web UI

Connect Server is a web-based file server that enables file access through a web browser, and transfers files using IBM Aspera Connect. You can set up HTTP fallback to establish HTTP- or HTTPS-based file transfers with clients that don't have FASP connectivity.

These instructions describe how to configure your system's Apache server to host Connect Server's Web UI. The files described below may have different paths or your Apache server could require additional settings, depending on your operating system's distribution and configuration. For additional information, see your operating system documentation or contact Aspera Technical Support.

Note: If Connect Server and Faspex versions 4.1.0 or newer are installed on the same computer, they cannot use the same Apache.
  1. Locate and open your Apache configuration file.
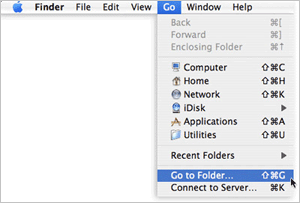
    On your OS X system, open Finder and select Menu bar > Go > Go to Folder and enter /etc/apache2/.
    Go to folder.

    Select httpd.conf. Modify its permissions to allow modifications by clicking Menu bar > File > Get Info. Under Sharing and Permissions, add your current account with the privilege Read & Write.

  2. Review the ServerName setting.
    Locate the ServerName section in httpd.confand verify that the server name is correct. The following example shows how to set the Connect Server domain name or IP address. Set only one.
    ServerName www.ConnectServerName.com
    ServerName 10.0.0.1
  3. Review or modify your Web UI settings.
    Add the following section at the end of the httpd.conf file:
    #BEGIN_ASPERA
    <Directory /Library/Aspera/var/webtools>
       AllowOverride All
       Allow from all
    </Directory>
    <Directory /Library/Aspera/var/webtools/scripts>
       AddHandler cgi-script .pl
       SetHandler cgi-script
       Options +ExecCGI
       AllowOverride All
    </Directory>
    ScriptAlias /aspera/scripts/ "/Library/Aspera/var/webtools/scripts/"
    Alias /aspera/ "/Library/Aspera/var/webtools/"
    #END_ASPERA
  4. Enable the cgi and the dir modules.
    Your Apache web server must have both the cgi and the dir modules enabled. Search for the following lines in httpd.conf. If they are present, ensure that they are uncommented. If they are not present, add them to the "Dynamic Shared Object (DSO) Support" section.
    LoadModule cgi_module libexec/apache2/mod_cgi.so
    LoadModule dir_module libexec/apache2/mod_dir.so

    After performing the configuration file modifications, save your changes and revert its permissions settings.

  5. Configure SSL. (Optional)
    For instructions on generating an RSA Private Key, a Certificate Signing Request (CSR), and an optional self-signed certificate by using OpenSSL, see Create an SSL Certificate (Apache).

    Once you create your private key and Certificate (or you are using the unsigned Certificate provided by Aspera), see Enable SSL (Apache).

  6. Restart your Apache web server.
    Open a Terminal window and run the following command:
    $ sudo apachectl stop
    $ sudo apachectl start
  7. Enable system-level security.
    Enabling system-level security allows the Web UI to accurately display users' files and show or hide controls depending on users' permissions (this includes the delete and make directory functions). To enable system-level security, run the following command (as root) in a Terminal window:
    $ sudo /Library/Aspera/sbin/enablesecure enable

    Once the script is executed, you are prompted to input the name of the Apache user.

    User running apache (default _www): 

    Based on your input, the script generates text similar to the following. Use visudoers to copy-and-paste the generated text into your /etc/sudoers file. In the following example output, _www is the account that is running Apache and /Library/Aspera is the Aspera installation directory.

    Important: Do not paste the example output shown below into your sudoers file. Paste the ouput generated when you ran the enablesecure script as described above.
    # BEGIN Aspera Connect Server
    # The user account that runs the web server will impersonate
    # the logged-in user to present that user's files and folders.
    Defaults env_keep += "SERVER_NAME REQUEST_URI REQUEST_METHOD REMOTE_USER QUERY_STRING CONTENT_LENGTH SESSION_ID CSRF_TOKEN"
    Defaults:_www !requiretty
    _www ALL=(ALL) NOPASSWD: /Library/Aspera/var/webtools/scripts/aspera-dirlist.pl,
    SETENV: /Library/Aspera/var/webtools/scripts/aspera-dirlist.pl
    # END Aspera Connect Server
    Note: Once secure permissions are enabled, users see the Delete and Create Folder buttons, allowing then to remove files and create directories on the server (within their docroot). To hide the Delete and Create Folder buttons, update the Web UI configuration parameters EnableDelete and EnableCreateFolder, respectively. See Configuring your Web UI Settings for details.

    To disable the secure permissions, run the enablesecure script again with the argument disable.

    $ sudo /Library/Aspera/sbin/enablesecure disable
  8. Verify that cookies are enabled in the client Web browsers.
    Note: Cookies must be enabled in client browsers. Otherwise, they might get an error message when they attempt to access the Connect Server Web UI.