Setting Up Transfer Token Authorization

To use transfer tokens, the user must be configured to use the token authorization public key and other specific setup.
  1. Choose or create the transfer user on the server.
    The user should not have a password. If the system does not allow this, create a very large password.

    The examples below use the transfer user aspera_user_1.

  2. Restrict user permissions with aspshell.
    By default, all system users can establish a FASP connection and are only restricted by file permissions. Restrict the user's file operations by assigning them to use aspshell, which permits only the following operations:
    • Running Aspera uploads and downloads to or from this computer.
    • Establishing connections in the application.
    • Browsing, listing, creating, renaming, or deleting contents.

    These instructions explain one way to change a user account or active directory user account so that it uses the aspshell; there may be other ways to do so on your system.

    1. Go to Apple menu > System Preferences > Users & Groups.
    2. Click Click the lock to make changes and enter admin credentials.
    3. Right-click the user account and select Advanced Options.
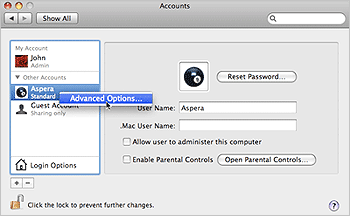
      Open an account's advanced options.
    4. Replace the default value (/bin/bash) in the Login Shell field with /Library/Aspera/bin/aspshell.
    Note: If you use SSH with Open Directory for authentication: To make aspshell the default shell for domain users, open server.app, go to Users, select the users that are used for transfer, and change the shell to /Library/Aspera/bin/aspshell.
  3. Set the Aspera Connect public SSH key as an authorized key for the transfer user, and ensure that they own the file.
    1. Create the .ssh directory in the user's home folder.
      $ mkdir /Users/aspera_user_1/.ssh/
    2. Copy the Aspera public SSH key into .ssh and rename it authorized_keys (or append the public key to authorized_keys if the file already exists).
      $ cp /Library/Aspera/var/aspera_tokenauth_id_rsa.pub /Users/aspera_user_1/.ssh/authorized_keys
    3. Ensure that .ssh and .ssh/authorized_keys are owned by the user.
      $ chown -R aspera_user_1:aspera_user_1 /Users/aspera_user_1/.ssh
      $ chmod 600 /Users/aspera_user_1/.ssh/authorized_keys
      $ chmod 700 /Users/aspera_user_1
      
      $ chmod 700 /Users/aspera_user_1/.ssh
  4. Configure the user for transfer token authorization
    To configure user authorization from the GUI, see Configuring Transfer Token Authorization in the GUI. To configure user authorization from aspera.conf, see Configuring Transfer Token Authorization from the Command Line.
    Note: Instead of setting authorization for each user individually, you can set it for a group, or set it globally for all users.