Installing Faspex with a Local Node

Note: The following instructions assume you have already completed the steps in Preparing Your System for Installation.

Follow the steps below to install Faspex on a machine running Enterprise Server on the same machine.

  1. Launch the Faspex installer.

    Double-click the Faspex installer to begin the installation process.

    Note: If your Windows Operating System has User Account Control (UAC) enabled, confirm or enter the admin password to allow the installer to make changes to your computer.
  2. After the license agreement screen, select your desired setup type. You may select Typical or Custom. Setup types are described below:
    Option Description
    Typical Install all required components, including the Faspex application, common files (Ruby and MySQL) and the Faspex MySQL database.
    Custom Select individual components to install. You may use your existing installations of Ruby, MySQL, or the Faspex MySQL database.
    If you selected the Custom setup type, identify which optional features you want to install.
  3. Associate the Aspera services with a user account.
    • Create or update an Aspera service account: If the existing user's password you have entered is incorrect, or you wish to change the Aspera service user, see Managing the Aspera Service Account. By default, the user name is "svcAspera".
      OS Instructions
      Windows XP 64-bit, Vista, 2003, 2008: The installer prompts you to create or update an Aspera service account that runs the services for Aspera products (if installed). If the server is configured to accept the domain user login, use a domain account that has been added to the local admin group to run the services.
      Windows XP 32-bit: Instead of creating a user account, you may check the option Run Aspera services as a local SYSTEM account to run these services with the local user "SYSTEM". Otherwise, enter the Aspera service account username and password that you created for your installation of IBM Aspera Enterprise Server or IBM Aspera Connect Server and click the Next button.


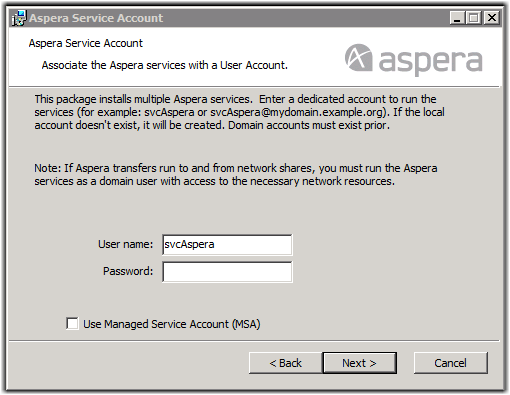
    • Use a Managed Service Account (MSA): Select Use Managed Service Account (MSA) and enter your MSA user name in the form: "identity$@domain" (For example: AsperaMSA$@msa.test.local). For more information on MSA, see the Managed Service Accounts page on the Microsoft website.
  4. Launch asctl to continue the Faspex setup process.

    Once the IBM Aspera Faspex Setup Wizard completes, you are prompted to finish the installation. By default, the Launch asctl to continue the Faspex setup checkbox is selected. Once you click Finish, the installer automatically runs the setup command. If you do not want to run the setup command automatically, then clear the Launch asctl to continue the Faspex setup checkbox.

    If Faspex doesn't automatically run the setup command or an error halts the process, then you can run the command manually, as shown below.
    asctl faspex:setup
    Follow the onscreen configuration instructions to complete the setup.
    Tip: You may choose not to run the setup command if you plan on installing Faspex from a setup file. For more information on installing from setup files, see Installing Faspex with a Setup File.
    These instructions include identifying whether you want to perform a streamlined (s) setup or a detailed (d) setup. Select detailed (d) to view and edit advanced configuration options.
    Important: If you installed Enterprise Server on a remote host, you must perform a detailed (d) setup. First, configure the remote host to work with Faspex (see Configuring a Remote Transfer Node for Faspex), then follow the instructions in Installing Faspex with a Remote Node.
  5. Restart the Aspera Node Server.

    In order to use Faspex, the Aspera Node Server must be running. If you did not choose to restart the Aspera Node Server when prompted during the setup process, or if it has been stopped, you must restart it before using Faspex.

    To check whether the Aspera Node Server is running or to restart it, open the Services window from Control Panel > Administrative Tools > Services. Select Aspera NodeD and choose to Restart the service.

Your Faspex installation is now complete. To access Faspex from a browser, enter the Faspex hostname or IP address followed by /aspera/faspex in the browser URL. For example:

http://faspex.example.com/aspera/faspex

or

http://198.51.100.24/aspera/faspex

As an admin, you must log in and activate Faspex with a valid license key before you can begin configuring users and sending or receiving packages. For more information on installing your license key, see Updating Your License.