Start a one-time transfer session that requires entering all transfer information.
When accessed with the proper permissions, Aspera Console can initiate transfers between nodes. A simple transfer is a one-time transfer session that prompts you for all transfer information.
Starting a Simple Transfer
To start a simple transfer, select from the Console menu.

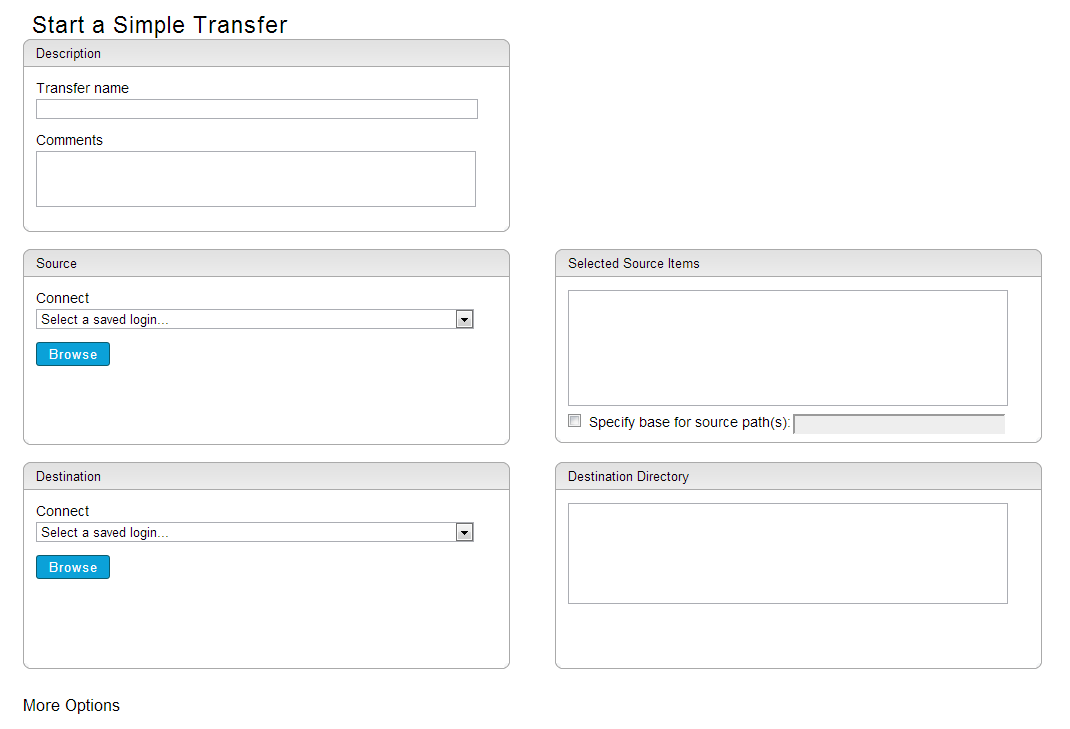
Complete the form on the Start a Simple Transfer page, including the More Options panel at the bottom of the page.

| Panel | Description |
|---|---|
| Description | Enter the transfer name and optional comments. The name and comments can be helpful if you want to search for this transfer later. |
| Source |
Select the source endpoint and files/folders to transfer. If you select a node instead of an endpoint (that is, an IP address without a login interface), you are prompted to enter the fasp transfer login credentials. This information is stored in Preferences > Saved Endpoint. To select items, click the Browse button to open
the Select Files/Folders dialog. The files and folders you select are
added to the Selected Source Items panel on the right.
Note: When
specifying a filter, the asterisk (*) is not a wildcard. Any string you
enter as a filter is treated as a "search within". In other words, the
string "foo" will match "123foo", "foo456", and "123foo456".
By default, if a source item is a file, only the file is transferred. None of the folders in the file's path are transferred. Similarly, if a source item is a folder, the folder and its entire contents are transferred, but none of the higher-level folders in its path are transferred. You can modify which directory levels are transferred by enabling Specify base for source path(s). This lets you specify a portion of the source path to remove from the transfer, thereby allowing any remaining folders in the path to be included in the transfer. For example, a source computer has a /clips/out/ready directory containing the following folders and files: /clips/out/ready/file1 /clips/out/ready/folderA/file2 ... file9 If your source selection (shown in the Selected Source Items panel) is the /clips/out/ready directory, by default, the transfer will consist of the ready directory and its entire contents: ready/file1 and ready/folderA/file2 ... file9 with no further path information. If the destination directory is specified as /incoming, your transfer will appear as follows on the destination computer: docroot/incoming/ready/file1 docroot/incoming/ready/folderA/file2 ... file9 However, by enabling Specify base for source paths(s), the ready folder itself can be excluded. By specifying /clips/out/ready, only file1 and folderA/* will be transferred. Specify base for source paths(s) can also be used to include more path depth than the default. If the source-base path is specified as /clips, then out/ready and everything below it will be transferred. Similarly, if the source-base path is specified as / only, the entire source path clips/out/ready and everything below it will be transferred. If any files or folders that are selected for transfer fall outside the specified source-path base, they are omitted from the transfer. For example, if the source-base path is specified as /clips/out/ready/folderA, then file1 is not transferred at all because it is not in folderA. Only file2 ... file9 are transferred (and with no path). |
| Destination | Select the destination endpoint and the directory to receive the files.
If you select a node instead of an endpoint (that is, an IP address without
a login interface), you will be prompted to enter the fasp transfer
login credentials. This information is stored in . The folders you select are added to the Destination
Directory panel on the right. As in the example above, if the specified destination directory is /incoming, your transfer will appear on the destination computer as docroot/incoming. |
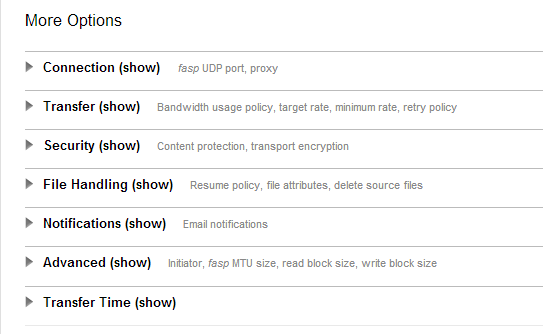
The More Options panel (on the lower portion of the page) contains the following sections:

| Fasp Port (UDP) | Specify the UDP port for fasp file transfers. |
| Fasp proxy | Enable transferring through a fasp proxy server, and specify the proxy host address, port, username, and password. |
| Target rate | Specify the transfer target rate. |
| Minimum rate | Set the transfer minimum rate |
| Bandwidth policy | Choose a transfer policy among fixed/high/fair/low. |
| Retry policy | Check the option to enable the retry policy, as well as specify the number of attempts and the duration. |
| Content protection | Check the option to enable the content protection that encrypts the files on destination, using the entered password. |
| Transport encryption | Select aes-128 to transfer with this encryption method. |
| Resume policy | Specify a resume policy and the overwrite rule when the file exists on the destination. |
| File attributes | Check the option to preserve the file permissions on the destination. |
| Symlinks | Specify how to deal with symbolic links: follow, copy, copy and force, or skip. Leave this option blank if the source is on Windows. For all others, leaving it blank is the same as choosing "follow". |
| Source deletion | Check the option to delete the transferred files from the source computer. |
| Exclude filter | Enter file-name pattern to exclude from the transfer. Two symbols can be used in the pattern: * represents zero to many characters in a string, for example "*.tmp" matches ".tmp" and "abcde.tmp". ? represents one character, for example "t?p" matches "tmp" but not "temp". |
| Email address | To send status notifications for transfer events (start, success, or error), enter an email address and click Add. When the email address appears in the table, specify which email template to use for each transfer event. |
| Initiator | Check this option to initiate transfers from the destination node (if possible). Console normally initiates transfers from the source node unless the source is an unmanaged node. |
| fasp datagram size (MTU) | Check the option and enter the datagram size in bytes. |
| Read block size | Check the option and enter the source read-block size in bytes. |
| Write block size | Check the option and enter the destination write-block size in bytes. |
| Transfer | Specify when to submit the transfer. |
When finished, start your simple transfer by clicking the Transfer button at the bottom of the page.
Canceling a Simple Transfer
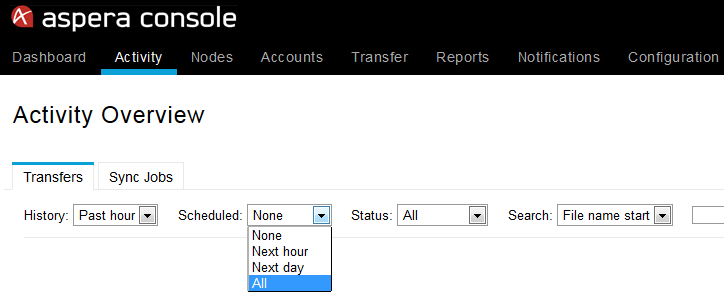
Note that if you schedule your simple transfer for a future date/time, you can easily cancel it. Start by going to and selecting All from the Scheduled drop-down menu.

Within the row that contains your scheduled transfer, click the Cancel link.

For information on setting up a smart transfer instead, see Smart Transfer.