IBM Aspera Faspex on Demand 3.X gives you the ability to allow non-registered users to request accounts on the IBM Aspera Enterprise Server login page. This relieves the workload of Administrators and Managers; however, you must ensure that proper security settings have been put into place before allowing self-registration.
The self-registration feature is turned off by default (for both fresh installs and upgrades); thus, you'll need to enable it under your Server configuration. Here, you can choose between none (not allowed), moderated (an administrator must approve the account before it is created), and unmoderated (once a user registers, his or her account will be automatically created). If you allow self-registration, the moderated setting is recommended for security. Please review the Configuring Additional Features configuration topic for additional information.
This topic assumes that you have turned on the moderated self-registration setting. Once a user self-registers, you will see the Pending Registrations (X) tab under your Accounts menu (where X stands for the number of pending registrations).
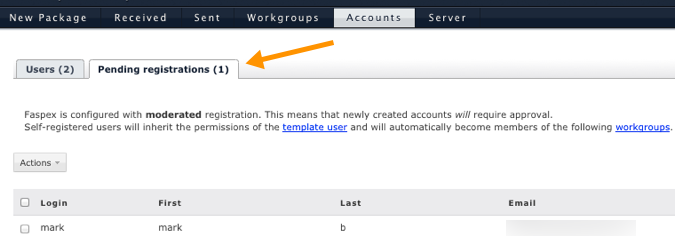
Approving or Denying a Pending Registration
To approve or deny a pending registration or group of pending registrations, mark the corresponding checkbox(es). Then, select either Approve or Deny from the Actions drop-down list.
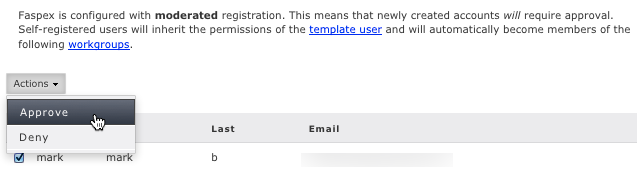
If you approve users, they will automatically inherit the permissions of the template user and will become members of a workgroup(s), if configured to do so. Note that you still update their permissions and workgroup memberships from the Users tab.
Changing Permissions for the Template User
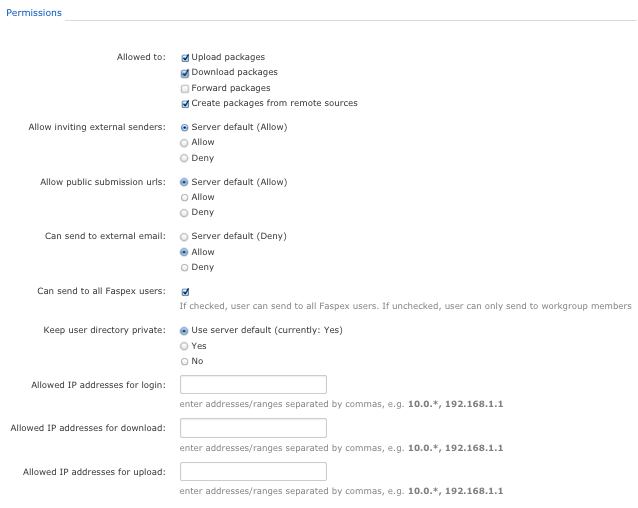
As described above, approved users will inherit the permissions of the template user. This user has default settings, which you can view and modify by clicking template user link. On the Edit Template User page, you will find the following settings:

| Option | Description |
|---|---|
| Account expires | (Disabled by default) Enable this setting if you would like a self-registered user's account to expire (i.e. deactivate) after "X" number of days (where "X" is any integer). Once the account expires, that user will no longer be able to log into Faspex, unless you re-activate the account. Note that within the Accounts list, inactive accounts are shown in gray. Packages sent to this user will remain on the server (if configured to do so). |
| Account auto-deletes | (Disabled by default) Enable this setting if you would like a selfregistered user's account to autodelete after "X" number of days (where "X" is any integer). Note that if this setting is enabled, the user's account will be completely removed from the Faspex database and you cannot re-activate it. Packages sent to this user will remain on the server (if configured to do so). |
| Option | Description |
|---|---|
| Upload Packages | Enable allowing the user to send file packages. |
| Download Packages | Enable to allow the user to download packages that have been received. A user who does not have this marked will still receive packages, but will not be able to download the files. |
| Forward Packages | Enable to allow the user to forward received file packages to other users. The package will be made accessible to the forwarded users within their Faspex accounts. |
| Create packages from remote sources | Enable to allow user to create a package from a remote source (i.e. a remote server, which is configured via the Aspera Node API). Note that this setting is ON, by default, and that it must be set on a per-user basis (i.e. there is no global option). |
| Allow inviting external senders | When enabled, external senders (those who do not have Faspex accounts) can be invited to send a package. Changing this user setting overrides the system default. |
| Allow public submission URLs |
A Public URL can be used by external senders to submit packages to registered Faspex users. The benefit of using a Public URL is in the time-savings, such that external senders no longer need to be individually invited to submit a package (although that functionality still exists). When a Public URL is enabled and posted to a an email, instant message, website, etc., the following workflow occurs:
Thus, when the field Allow public submission URLs is enabled (e.g. set to Allow), the Public URL feature is turned on for this user. If set to Deny, then the feature is turned off for this user. Note that changing the user setting overrides the system default. Important:
Even if the Public URL feature is enabled for a registered Faspex user, he or
she can override the feature for their own account by going to and disabling the checkbox.
|
| Can send to external email | Enable to allow the user to send a download link to external emails addresses (which are not Faspex users). |
| Can send to all Faspex users | Enable to allow the user to send packages to all Faspex users (as opposed to only being able to send packages to the user's workgroup members). |
| Keep user directory private | Override the default system setting to either allow users to see all other users, or prevent them from seeing all other users. |
| Allowed IP addresses for login | Specify the IP address(es) that a Faspex user can login from to view his or her account. A wildcard (*) can be used in this option (e.g., 192.168.10.*., which allows the user to login from 192.168.10.1, 192.168.10.2, etc.). Separate multiple email addresses with commas (,). |
| Allowed IP addresses for download | Specify the IP address(es) that a Faspex user can login from to download packages. A wildcard (*) can be used in this option (e.g., 192.168.10.*., which allows the user to login from 192.168.10.1, 192.168.10.2, etc.). Separate multiple email addresses with commas (,). |
| Allowed IP addresses for upload | Specify the IP address(es) that a Faspex user can login from to upload packages. A wildcard (*) can be used in this option (e.g., 192.168.10.*., which allows the user to login from 192.168.10.1, 192.168.10.2, etc.). Separate multiple email addresses with commas (,). |

Options available after downloading a package:
| Option | Description |
|---|---|
| Override system default | If you opt to override the system default, you can enable one of the following
actions to occur after downloading:
|
| Allow user to set own delete setting on a package-by-package basis | Provide the policy settings in the user's New Package screen. The user can determine the file package's expiration rule when preparing it. |
Faspex uses the transfer settings from the Aspera Central Server section by default. However, when Override default settings is checked, you can set user-specific transfer settings, which will take precedence over the server-wide settings.
| Option | Description |
|---|---|
| Initial Transfer Rate | Specify the initial upload and download transfer rate. When the option Lock minimum rate and policy is checked, the user is not be able to adjust transfer policy or minimum transfer rate. |
| Maximum Allowed Rate | Specify the maximum upload and download transfer rate for this user. |