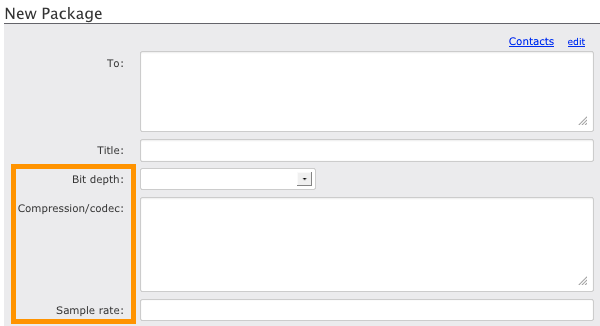
Metadata refers to the additional information that an IBM Aspera Faspex on Demand user can send with a file package. For example, when a user sends an audio-file package to his producer, he is required to specify the sample rate, bit depth and compression. In this case, the sample rate, bit depth and compression represent a package's metadata. The "Submit Package" form can be easily configured to include input fields for sample rate, bit depth and compression. To do so, we must set up a metadata profile. The metadata profile contains your metadata fields. To continue this example, we'll be setting up a metadata profile to capture key information for this audio file. The profile Audio Details will contain the following fields:
- Sample rate (text input field)
- Bit Depth (option list that includes 8-bit, 16-bit and 24-bit)
- Compression (text input field)
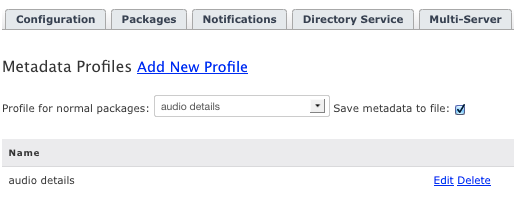
To create, view and edit metadata profiles, start by going to . As an Administrator, you can designate which metadata profile each Dropbox's "Submit Package" page will use, as well as which profile the normal "New Package" page will use. Admins can also elect to assign "(none)" as a metadata profile in cases where no metadata fields are desired.

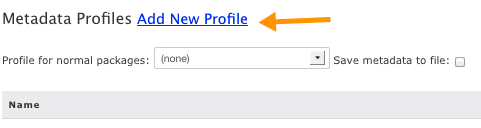
On the Metadata Profiles page, any profiles that you have previously created will be available under the Profile for normal packages drop-down list.
-
To create a new profile, click the Add New Profile
link.
-
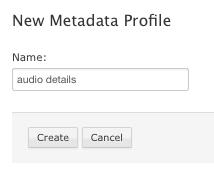
Name your new profile and click the Create button.
Once you have clicked Create button, you will be prompted to select the metadata type from the Add drop-down list. Select Text input to create a single-line text field, Text area to create a multiline text field and Option list to create a radio button-based options list.
 Note: You can add more than one metadata field.
 -
Modify the field template
Each field option has a template associated with it. Using the template, you can modify a field's label and, for the Option list metadata field, its options. Once the template appears, click the Edit button to launch edit mode.
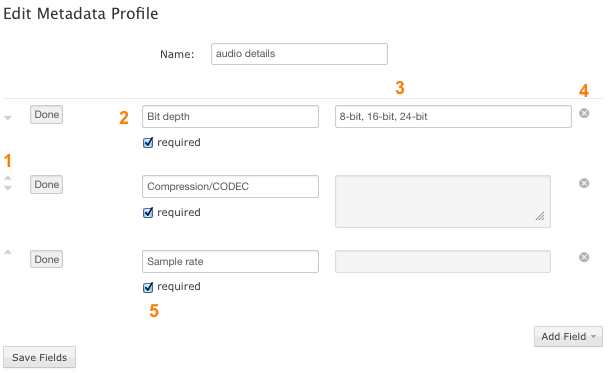
# Description 1 Use the arrows to re-order multiple metadata fields. 2 Enter the metadata field's label. This label will appear next to the field on the send form. 3 If this is an options list, enter multiple options that are separated by commas (,). 4 Use the "x" icons to delete fields. 5 If the field is required, check Required. -
When finished editing your metadata field(s), click the
Done button next to the corresponding field and then
click Save Fields.
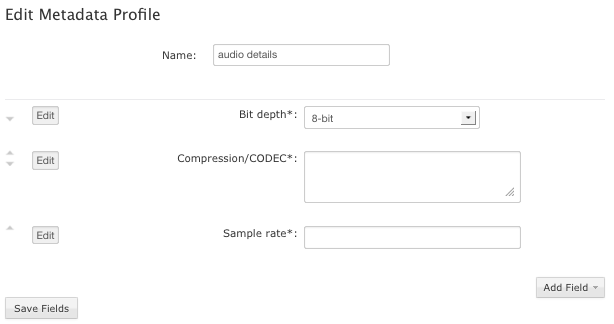
You will now see the new metadata profile listed on your Metadata Profiles page (along with any other profiles that you have created). From here, you can perform the following functions:
- Edit your profile
- Delete your profile
- Select a profile as your normal packages default metadata template (via the Profile for normal packages drop-down list).
You can also enable the Save metadata to file checkbox. When enabled, the package's metadata is saved to its root directory in the file aspera-metadata.xml. You can use the XML data for post-processing and automation.
When sending a normal package, you will see the new metadata fields on the New Package page.
 Note: When you forward a package (normal or dropbox), the original metadata is preserved in the note, even as new metadata fields from the current profile are available. However, even if "Save metadata to file" is enabled, no new aspera-metadata.xml is created.
Faspex can also be configured so that the metadata file is included inside the package itself, instead of being placed at the root directory of the package. To enable this, set the SaveMetadataInPackage option to true in the configuration file faspex.yml as follows:
...
SaveMetadataInPackage:true
...
The faspex.yml file is located in the following directory:
/opt/aspera/faspex/config/faspex.yml
Then, whenever the Save metadata to file checkbox is enabled, aspera-metadata.xml will be inserted in packages, and it will be visible when the package contents are viewed in Faspex.