A Console user is an Aspera Console login account with customizable access permissions. Except for administrator accounts, Console user permissions are managed through the group assignment. A Console user inherits the permissions from the group(s) one belongs to.
IMPORTANT NOTE: A Console user is not directly related to the login account to a node.
To create a Console user, follow these steps:
-
Add a new Console user
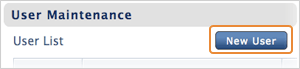
Select Users from the Console menu. All user management options can be found here.

In User Maintenance, click New User.
In Creating a New User, enter the user's info in the specified fields. Click Create when finished.
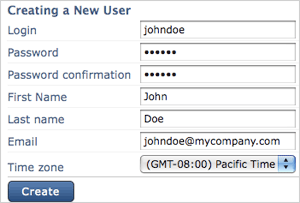
IMPORTANT NOTE: All activity on the Console will display the time and date based on the user's time zone.
-
Assign the user to Console groups
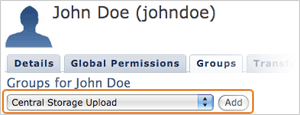
When created, the Console user can be assigned to groups, and inherits permissions (Transfer Paths) from them. Go to the Groups tab in the user's User Maintenance page, select a group from the drop menu that you wish to add this user into, and click Add. The added group will appear in the table below.
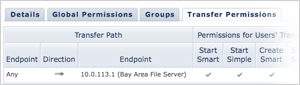
To review the Console user's permissions, select the Transfer Permissions tab. All Transfer Paths that are accessible to this Console user are listed in this table.
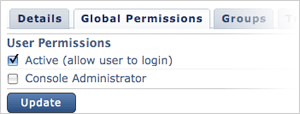
When the Console user is created, one can log in Console using its credentials. To deactivate this user account, or make it a Console administrator, in the user's User Maintenance page, select the Global permissions tab to make these changes.