Securing the Systems that Run Aspera Software
The systems that run Aspera software can be secured by keeping them up to date, by applying security fixes, and by configuring them using the recommended settings.
Updates
Aspera continually improves the built-in security of its products, as do the producers of third-party components used by Aspera, such as Apache, Nginx, and OpenSSH. One of the first lines of defense is keeping your products up to date to ensure that you are using versions with the latest security upgrades:
- Keep your operating system up to date.
- Keep your Aspera products up to date. To be automatically notified when a new version of your product has been released, go to the Aspera Support website (http://support.asperasoft.com) and locate the "Release Notes" section for your product. Click Follow this section. You will receive an email each time this section is updated.
- If using, keep OpenSSH up to date. The server security instructions require that OpenSSH 4.4 or newer is installed on your system in order to use the Match directive. Match allows you to selectively override certain configuration options when specific criteria (based on user, group, hostname, or address) are met.
- If you are using Connect Server on Linux, keep your Apache server up to date. If you are using Connect Server on Windows, keep your IIS up to date.
Security Fixes
Rarely, security vulnerabilities are detected in the operating systems and third-party components that are used by Aspera. Aspera publishes security bulletins immediately that describe the affected products and recommended remediation steps. To be automatically notified when a new security bulletin is published to the Aspera knowledge base, go to http://support.asperasoft.com, click Announcements > Security Bulletins > Follow this section.
Security Configuration
Recommended security settings vary depending on the products you are using and how they interact. See the following subsections for your Aspera products.
Enterprise Server and Connect Server
-
Configure your server's firewall to permit inbound access to only
Aspera-required ports.
Aspera requires inbound access on the following ports:
- For SSH connections that are used to set up connections, TCP/33001.
- For FASP transfers, UDP/33001.
- If you use HTTP and HTTPS fallback with Connect Server, TCP/8080 and TCP/8443. If you only use HTTPS, only open TCP/8443.
- If your clients access the Connect Server web UI, TCP/80 (for HTTP) or TCP/443 (for HTTPS).

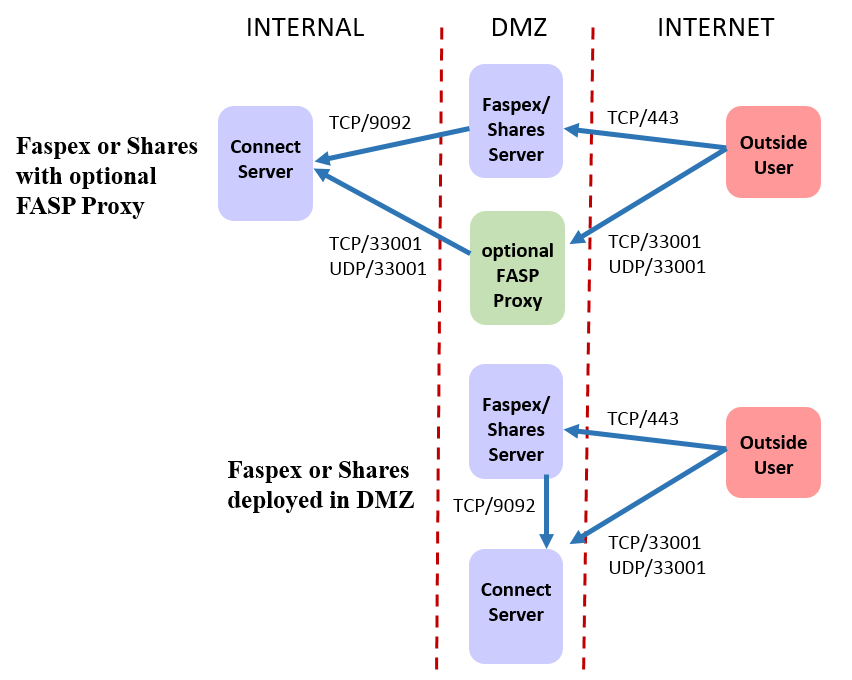
Faspex and Shares
-
Configure your Faspex or Shares server firewall to allow inbound access
to TCP/443, the default HTTPS port.
Console
- For HTTP or HTTPS access for the web UI, inbound TCP/80 or TCP/443.
- For SSH connections, outbound TCP/33001 to managed nodes.
- For Node API connections, outbound TCP/9092 to managed nodes.
- For connections to legacy nodes (those running Enterprise Server older than 3.4.6), outbound TCP/40001 and inbound TCP/4406. For security and reliability, Asepra strongly recommends upgrading all nodes to the latest version.