IMPORTANT NOTE: If this is a product upgrade, ensure that you have reviewed all prerequisites detailed under the topic "Before Upgrading."
Aspera Connect Server is a web-based file server that enables file access through a browser, and transfers files using the Aspera Connect browser plugin. Additionally, you can set up HTTP Fallback to establish HTTP- or HTTPS-based file transfers with clients that don't have fasp connectivity.
IMPORTANT NOTE: On Windows, Connect Server uses Internet Information Service (IIS) authentication. If user names use the extended character set, both the client and server machine must be set to use the same codepage, and the client must use IE 7 or later (other browsers don't support users names using extended characters). For more information, refer to http://support.microsoft.com/kb/938418.
To install Aspera Connect Server, log into your computer with Administrator (or Domain Administrator if you are in an Active Directory environment) permissions, and follow the steps below.
-
Install Windows Internet Information Service (IIS)
The Connect Server Web UI requires Internet Information Service (IIS) 6, or IIS 7 with the IIS 6 Compatibility component. Depending on your version of Windows, IIS may not be installed by default. Please refer to the table below for instructions on installing/enabling IIS for your specific Windows OS. Note that Windows 7, 8 and 2008 require installation of IIS 7 with the IIS 6 Compatibility component. You will also need to ensure that ASP, ASP.NET, and Basic Authentication services are installed.
OS Instructions Windows 7, 8 and Vista NOTE: Requires installation of IIS 7 with the IIS 6 Compatibility component.
In Windows 7 and 8, go to the .
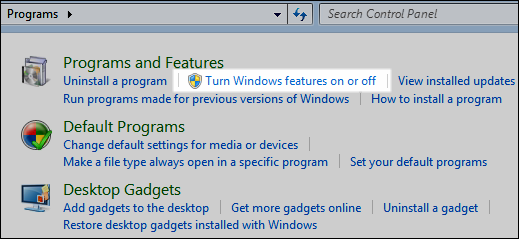
(Fig: Windows 7 and 8)
In Windows Vista, go to the (located in the left panel).
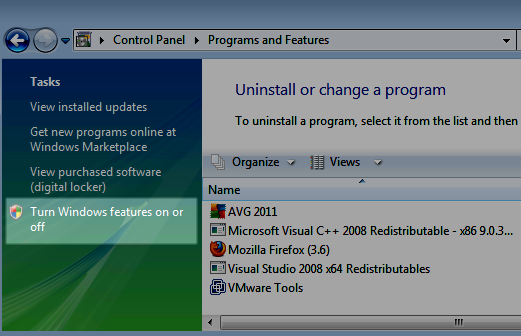
(Fig: Windows Vista)
In the Turn Windows features on or off window, turn on the following features and click "OK":
- Place a check next to Internet Information Services and then expand the tree.
- Expand the Web Management Tools tree and place a check next to IIS 6 Management Compatibility. Then, expand the IIS 6 Management Compatibility tree and place a check next to each IIS 6 component.
- Within , place a check next to ASP and ASP.NET. Note that if you are running Windows 8, you can select either .NET 3.5 or .NET 4.5.
- Within , place a check next to Static Content.
- Within , and place a check next to Basic Authentication.
 (Fig: Windows 8)
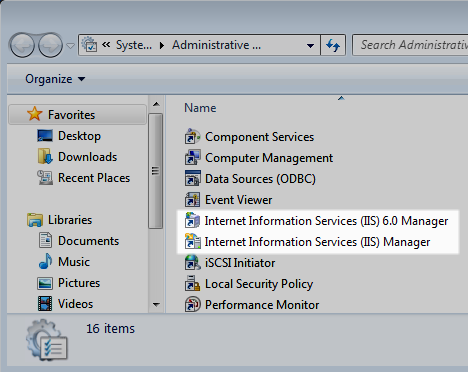
Your computer may take a few minutes to configure itself. You can verify a successful installation by navigating to "Administrative Tools." In Windows 7 and 8, go to . In Windows Vista, go to .
Within "Administrative Tools," you should see the following features:
- Internet Information Services (IIS) 6.0 Manager (or IIS6 Manager on Windows Vista)
- Internet Information Services (IIS) Manager (or IIS Manager on Windows Vista)
Windows 2008 IMPORTANT NOTE: Requires installation of IIS 7 with the IIS 6 Compatibility component.
Go to .
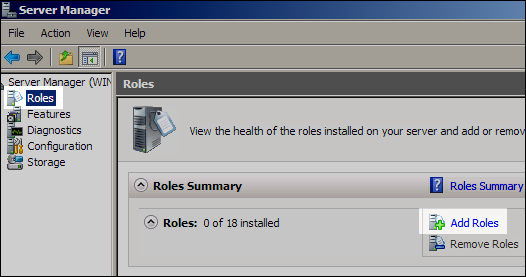
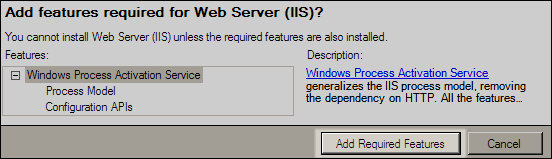
In the Add Roles Wizard, check Web Server (IIS). Upon checking it, a pop-up window will appear, which requires you to identify features that are required for the Web Server. Click the Add Required Features button in the pop-up window and click Next. Read the information on the following screen and then click Next again to proceed with adding required features.
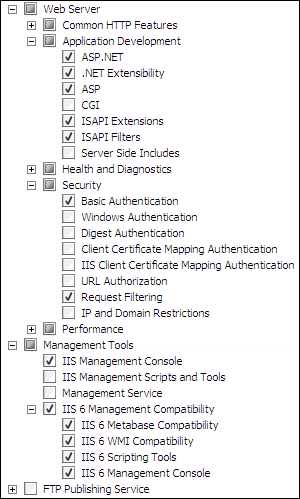
Add the following role services as required features by checkmarking the appropriate boxes and click Next when finished.
- ASP.NET
- ASP
- Basic Authentication
- IIS 6 Management Compatibility (entire tree)
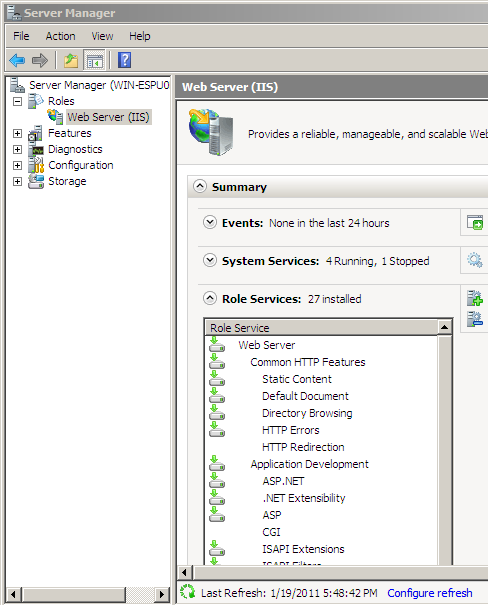
Once you read the confirmation message and click install, your server will take a few minutes to configure itself. You can verify a successful installation by navigating to your "Role Summary."
Go to the .
Windows XP and Windows 2003 Go to the (located in the left panel). 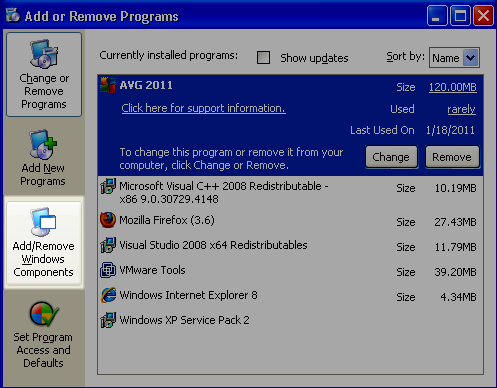
For Windows XP, in the Windows Components Wizard window, place a checkmark next to Internet Information Services (IIS), and click Next.

(Fig: Windows XP)
For Windows 2003, in the Windows Components Wizard window, place a checkmark next to Application Server, and click Next.
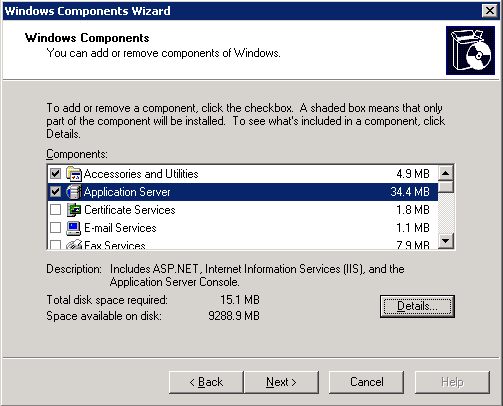
(Fig: Windows 2003)
Your computer may take a few minutes to configure itself. You can verify a successful installation by going to (located in "Classic View" in Windows XP). Here, you should see the Internet Information Services (IIS) Manager.
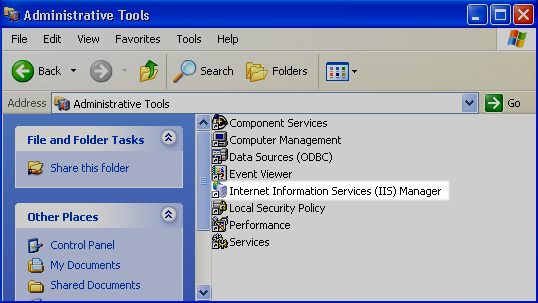
(Fig: Windows XP)
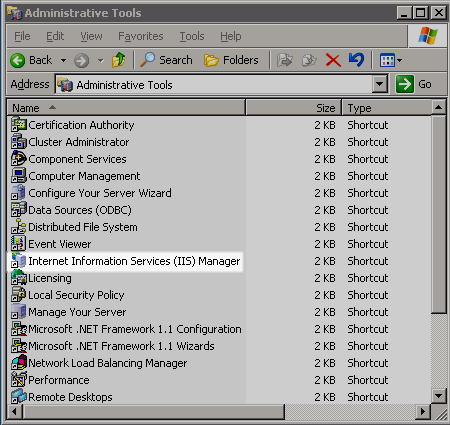
(Fig: Windows 2003)
IMPORTANT NOTE: When you elect to install the Connect Server Web UI feature (as directed in the steps below), the Aspera installer automatically configures the following settings in IIS:
If you do not install the Connect Server Web UI feature, then the settings will not be modified.
-
Select features and install path (Custom setup type)
If you selected the custom setup type, you will see the two additional steps during installation, as follows:
Check the features to install. If you wish to configure your own SSH Server for fasp transfers, deselect the SSH Server (so that the OpenSSH Service is not installed). Check the Connect Server Web UI only if you have a Connect Server license and you have installed IIS, as described in Step 1, above.
Select the destination folder for the installation. Under Install this application for:, choose between Anyone who uses this computer (all users) to allow access for all system users, or Only for me to allow only your user account to use the application.
-
Set up Aspera service account
On Windows XP 64-bit, Vista, 2003, 2008 and 7, the installer will prompt you to create or update an Aspera service account that runs the services for Aspera products. These services include the following:
- Aspera Central
- (Optional) OpenSSH Service
- Aspera NodeD
- Aspera HTTPD
- Aspera Sync
By default, the user name is svcAspera. If your machine is not joined to a Windows domain, then a local user (such as the default svcAspera) is all that is required to run Aspera services. If your machine is already joined to a domain, or you need to support requirements #2 and/or #3 below, then the type of account specified will vary. Please refer to the following table:
No. Requirement Type of Service Account User 1 Provision local transfer users only. Local account. Domain account with local admin privileges can be used, but is not required. 2 Provision Active Directory accounts for transfer users (users who wish to transfer with your server are authenticated through Active Directory). Domain account with local admin privileges. 3 Transfer users store files on a remote file system (not on your server machine), such as an SMB file share. Domain account with local admin privileges. In some cases, additional actions are required to support this requirement. Please refer to the aspera knowledgebase or contact Aspera Technical Support for assistance. If the server is configured to accept the domain user login, use a domain account that has been added to the local administrator's group to run the services. You must create this domain account on your Domain Controller first. On Windows XP 32-bit, instead of creating a user account, you may check the option Run Aspera services as a local SYSTEM account to run these services by the local user "SYSTEM."
If the local account does not already exist, enter new credentials and click Next. If the account exists (e.g. created through the previous installation), enter the account password and click Next. If the existing user's password you have entered is incorrect, or you wish to change the Aspera service user, refer to Updating Aspera Service Account.
If you are entering details for a domain account, then the user name must be in the form "username@fully.qualified.domain.name." Please refer to the example below.
-
Select website for Connect Server Web UI
During IIS installation, a default Web site configuration is created on your Web server (e.g. "Default Web Site (ID:1)"). You may have elected to use this default directory to publish your Web content, or you may have created a directory at a file system location of your choice. In this step, select the website (default or other) that you created for the Connect Server Web UI.
NOTE: If you are upgrading Connect Server from a previous version, it is recommended that you select the same website that your current Web UI is running on.
-
Install the license
When installation is finished, launch the application to add or update the license. Go to .
If this is a fresh install, an Enter License window will appear. You may click the Import License File... and select the license file, or Paste License Text... to copy-and-paste the license file's content. When finished, the license information will appear in the window. Verify that it is correct and click Close.
If you are updating your product license after the installation, refer to Updating Product License.