Configuring for Faspex

The steps below describe configuring Connect Server as the transfer server for Faspex.

  1. Install Enterprise/Connect Server.

    If you haven't already, follow the steps in Standard Installation to install Connect Server (the transfer server).

    The transfer server can be set up in either of the following configurations:
    • locally, on the same host as Faspex
    • remotely, on a separate host

    Note: For a local setup, most configuration is taken care of automatically when Faspex is installed in a later step. For this reason, Enterprise Server/Connect Server should be installed first.

    All steps must be performed with administrator permissions.

  2. (LOCAL SETUP ONLY) Check aspera.conf settings and adjust if necessary.
    In the aspera.conf file (C:\Program Files[ (x86)]\Aspera\Enterprise Server\etc\aspera.conf) check the following:
    • Look for <persistent_store> in the <central_server> section, and be sure that it is set to enable (default value). This setting allows the retention of historical transfer data used by the stats collector.
    • Look for the <dir_allowed> setting for the faspex user, and ensure that it's set to true.

    If you change settings, you must restart asperacentral and asperanoded.

    To restart these services, go to Control Panel > Administrative Tools > Services, right-click Aspera Central and Aspera NodeD, and select Restart.

    Note:

    If you are installing Connect Server locally (on the same machine as Faspex), continue by installing Faspex as described in the Aspera Faspex Admin Guide.

    If you are setting up Connect Server as a remote transfer server node, continue with the steps below.

  3. Create the system user on the transfer-server host.

    The system user authenticates the actual ascp transfer and must be an operating system account. To create a new system user faspex on your Windows system, go to Control Panel>User Accounts. After adding the faspex user, change the user's password.

  4. Create and configure the Faspex packages directory.

    Create the directory:

    C:\faspex_packages
  5. Add the faspex user to Enterprise/Connect Server.

    Launch the desktop application and click Configuration.

    Click the Configuration.

    In Server Configuration, select the Users tab. Then click the Add user button.

    Add the test user.

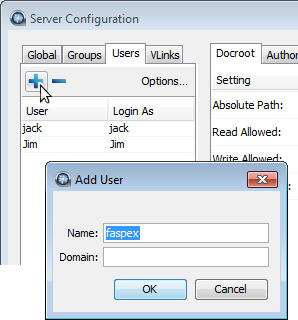
    In the Add User dialog that appears, fill in the name "faspex" and click OK; faspex is then added to the user list.

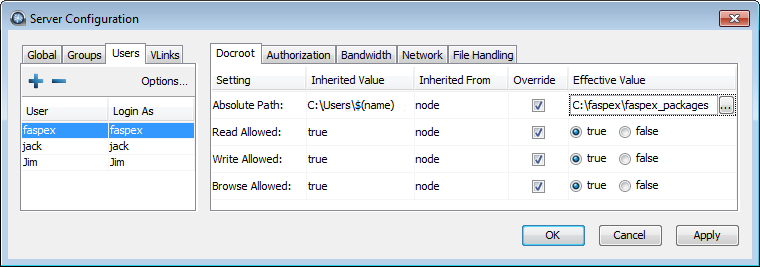
    To specify a docroot, make sure faspex is selected in the user list, and open the Docroot tab in the right panel. For the Absolute Path setting, check the Override box, and under Effective Value fill in /Users/faspex/faspex_packages. For the read, write, and browse settings, check the Override boxes and select true.

    You can also add and configure the faspex user for Connect Server by modifying aspera.conf, instead of using the application GUI. For details, see Setting Up Users.

  6. Modify aspera.conf.

    The aspera.conf file is found in the following location:

    C:\Program Files [(x86)]\Aspera\Enterprise Server\etc\aspera.conf

    Below is a typical aspera.conf file. Yours may differ, particularly if you have installed other Aspera products. Copy any absent portions from the example below. Modify the following settings, as necessary:

    • Add the Faspex package directory as a docroot. In the file below, look for the <absolute> tag to see how the docroot has been defined in this installation, and adjust yours accordingly.
    • Look for the <server_name> tag, and ensure that server_ip_or_name has been replaced with the name or IP address of your server.
    • Look for <persistent_store> in the <central_server> section, and be sure that it is set to enable (the default value).
    • Look for the <dir_allowed> setting for the faspex user, and ensure that it's set to true.

    <?xml version='1.0' encoding='UTF-8'?>
    <CONF version="2"> 
    
    <central_server>
      <address>127.0.0.1</address>
      <port>40001</port>
      <compact_on_startup>enable</compact_on_startup>
      <persistent_store>enable</persistent_store>
      <persistent_store_on_error>ignore</persistent_store_on_error>
      <persistent_store_max_age>86400</persistent_store_max_age>
      <event_buffer_overrun>block</event_buffer_overrun>
    </central_server>
    <default>
      <file_system>
        <pre_calculate_job_size>yes</pre_calculate_job_size>
      </file_system>
    </default>
    <aaa>
      <realms>
        <realm>
          <users>
            <user>
              <name>faspex</name>
              <file_system>
                <access>
                  <paths>
                    <path>
                      <absolute>C:\faspex_packages</absolute>
                      <show_as>/</show_as>
                      <dir_allowed>true</dir_allowed>
                    </path>
                  </paths>
                </access>
                <directory_create_mode>770</directory_create_mode>
                <file_create_mode>660</file_create_mode>
              </file_system>
              <authorization>
                <transfer>
                  <in>
                    <value>token</value>
                  </in>
                  <out>
                    <value>token</value>
                  </out>
                </transfer>
                <token>
                  <encryption_key>af208360-dbdd-4033-a35b-2370941f37e9</encryption_key>
                </token>
              </authorization>
            </user>
          </users>
        </realm>
      </realms>
    </aaa>
    <http_server>
      <http_port>8080</http_port>
      <enable_http>1</enable_http>
      <https_port>8443</https_port>
      <enable_https>1</enable_https>
    </http_server>
    <server>
      <server_name>server_ip_or_name</server_name>
    </server>
    </CONF>

    After modifying aspera.conf, restart Aspera Central and Aspera NodeD services.

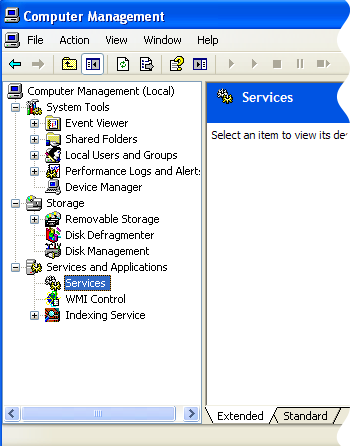
    You can restart these services from the Windows Computer Management window, accessible from Manage > Services and Applications > Services.

  7. Verify that you have a valid transfer server license installed.

    Verify that the transfer server has a valid Faspex-enabled license for Connect Server. To check this from the command line, run ascp -A and review the enabled settings list. For example:

    Enabled settings: connect, mobile, cargo, node, proxy, http_fallback_server, 
    group_configuration, shared_endpoints, desktop_gui

    If the list includes connect and http_fallback_server, you have a Faspex-enabled server license.

    You can also check the license from the Connect Server desktop client GUI. The License dialog (Tools > License) includes the fields Connect Clients Enabled and Http Fallback Server Enabled. If both are set to Yes, you have a Faspex-enabled license.

    Because this Faspex configuration uses Connect Server as a remote transfer service, it requires the Aspera Node API. For this reason, whenever you update your Connect Server license (see Updating the Product License), you must reload the asperanoded service afterwards. Reload the asperanoded service by running asnodeadmin.exe, found in the following location:

    OS Version File Location
    32-bit Windows C:\Program Files\Aspera\Enterprise Server\bin\asnodeadmin.exe
    64-bit Windows C:\Program Files (x86)\Aspera\Enterprise Server\bin\asnodeadmin.exe
    > asnodeadmin.exe --reload 
  8. Set up the node user.

    Set up the node user and associate it with the faspex user by running the asnodeadmin command, as in the following example--where node-admin is the node user, s3cur3_p433 is the node user's password, and faspex is the system user. Then run asnodeadmin again to reload asperanoded.

    > asnodeadmin.exe -a -u node-admin -p s3cur3_p433 -x faspex
    > asnodeadmin.exe --reload 
  9. Install the Connect key.

    First, locate your Connect key:

    C:\Program Files [(x86)]\Aspera\Enterprise Server\var\aspera_id_dsa.pub

    Then, create a .ssh folder (if it does not already exist) in the faspex user's home folder:

    OS Version Folder Location
    Windows XP C:\Documents and Settings\faspex\.ssh
    Windows Vista, Windows 7+ C:\Users\faspex\.ssh

    Use a text editor to create (or modify) the following file, without the file extension, in the .ssh folder:

    authorized_keys

    Add the faspex user's key string into this file and save it. Note that some text editors add a .txt extension to the filename automatically. Be sure to remove the extension if it was added to the filename.

  10. Ensure the firewall is set up correctly on your transfer server
    For details, see Configuring the Firewall.
  11. Configure your remote transfer server in the Faspex Web GUI.

    Follow the instructions in Aspera Faspex Admin Guide: Transfer Server for configuring your remote transfer server in the Faspex Web GUI underServer > File Storage.