Before Upgrading

Steps to take before upgrading your Aspera product.

The installer for Aspera Connect Server automatically checks for a previous version of the product on your system. If a previous version is found, the installer automatically removes it and upgrades your computer to the newer version.

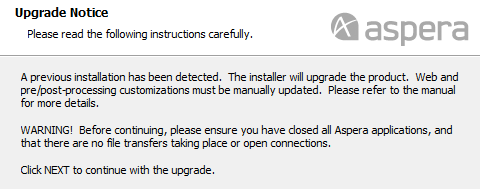
On a Windows system, the installer displays the following message when an older version of the product is detected:

Although the installer performs your upgrade automatically, we highly recommend completing the tasks below before starting the installation/upgrade process. If you do not follow these steps, you risk installation errors or losing your former configuration settings. Skip any steps that do not apply to your specific product version.

Note: You cannot upgrade directly between different Aspera transfer products (such as from Point-to-Point to Client, or from Point-to-Point to Enterprise Server). To upgrade, you need to back up the configuration, uninstall the product, and perform a fresh install of the new version of the product. If you are upgrading your Enterprise Server to Connect Server, refer to the topic Upgrading from Enterprise Server.

  1. All Versions - Verify existing product version

    Depending on your current product version, the upgrade preparation procedure may differ. In the Windows Command Prompt ( Start menu > All Programs > Accessories > Command Prompt ), execute this command:

    > ascp -A

    This displays the product name and version number.

    Warning:

    When upgrading from 2.7.X to 3.X on Windows, please be aware that user names are now case sensitive.

  2. All Versions - Confirm your Aspera service account.

    If you have already installed Aspera Enterprise Server, Connect Server, Point-to-Point or Client on your computer, then there exists a user account that has been designated to run the services for Aspera products. By default, the user name for the Aspera services account is svcAspera; however, this is not a requirement and you can select a different user to run the services. When you install additional Aspera products or perform an upgrade to an existing Aspera product, you must identify the same account name and password that you set for your first Aspera product installation.

    To confirm which user is designated as your Aspera service account in Windows XP, 2003, Vista and 7, right-click on My Computer and select Manage > Services and Applications > Services. In Windows 2008, go to the Server Manager and select Configuration > Services. The account designated for each Aspera service is listed. Please make note of this account for the installation of additional Aspera products or product upgrades. If you have forgotten your Aspera service account password or would like to change the designated Aspera service account, please follow the instructions described in the topic Updating Aspera Service Account.

  3. All versions - Stop all fasp transfer-related applications and connections.

    Before upgrading the application, close the following applications and services:

    • ascp connections
    • SSH connections
    • The SSHD service and any SSHD processes. To stop the SSHD service, go to the Computer Management window, which is accessible via Manage > Services and Applications > Services. Then, kill any SSHD processes (using the Windows Task Manager).
    • The Connect Server application
    • asperasync service
  4. All versions - Verify the website that runs Web UI

    It is recommended that you set up the new Connect Server Web UI on the same website that your current Web UI is running on. During the installation, you will be able to select the website to use.

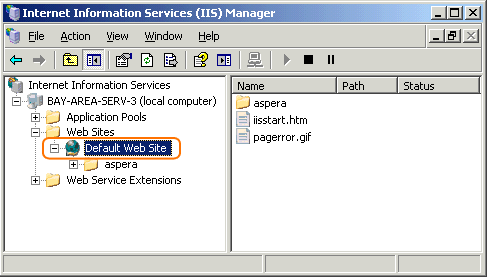
    To find out which web site is running Web UI, go to Control Panel > Administrative Tools > Internet Information Services (Manager). In the left panel, navigate into the (Computer name) > Web Sites. The website that runs Web UI should contain the "aspera" folder.

    Find out which website is running Web UI.
  5. All versions - Back up the files

    Depending on the version of your previous installation and the operating system, back up the files in the specified locations:

    Aspera Version Folder
    2.5+
    Note: If you have installed the product in a different location, change the path accordingly.

    32-bit Windows Default Path:

    • C:\Program Files\Aspera\Enterprise Server\etc\ (Configuration files, Shared Remote Hosts)
    • C:\Program Files\Aspera\Enterprise Server\var\(Prepost scripts, Connect Server)
    64-bit Windows Default Path:
    • C:\Program Files (x86)\Aspera\Enterprise Server\etc\(Configuration files, Shared Remote Hosts)
    • C:\Program Files (x86)\Aspera\Enterprise Server\var\(Prepost scripts, Connect Server)
    Individual User Files' Default Path:
    • <APPDATA>\Aspera\Enterprise Server\ (Individual user's remote hosts and hot folder info.)

    Note: Use this command in a Command Prompt window to find out the current user's <APPDATA> path:
    > echo %APPDATA%
    2.2.x and earlier 32-bit Windows:
    • C:\Program Files\Aspera\FASP\etc\ (Configuration files)
    • C:\Program Files\Aspera\FASP\var\(Prepost scripts, Connect Server)
    • C:\Program Files\Aspera\Aspera Scp\etc\(Remote Hosts an Hot Folders info)
    64-bit Windows:
    • C:\Program Files (x86)\Aspera\FASP\etc\ (Configuration files)
    • C:\Program Files (x86)\Aspera\FASP\var\(Prepost scripts, Connect Server)
    • C:\Program Files (x86)\Aspera\Aspera Scp\etc\ (Remote Hosts and Hot Folders info)

    If a previous version of Connect Server (Aspera Web) was set up and customized on your computer, back up the customized Connect Server installation in the following location and use it as a template to modify the new one:

    C:\Inetpub\wwwroot\aspera\
  6. Version 2.1.x - Verify Aspera's configuration file (aspera.conf) version

    If you are upgrading from Connect Server version 2.1.x and have HTTP Fallback configured, you may need to modify aspera.conf file to avoid upgrading errors. Open aspera.conf with a text editor:

    Platform Path
    32-bit Windows C:\Program Files\Aspera\FASP\etc\aspera.conf
    64-bit Windows C:\Program Files (x86)\Aspera\FASP\etc\aspera.conf

    Remove the version="2" from the opening tag <CONF>:

    <CONF version="2">
    ...
  7. Version 2.2.x and earlier - Restore the saved "Remote Endpoints"
    This is a post-install step.

    Since 2.5, a connection (a.k.a. "endpoint") can be either shared with all users, as in previous versions, or kept exclusive to the user who created it.

    When you upgrade a product 2.2.x or earlier, on the first launch of the application, existing connections will be imported only for that user. It is recommended that you launch it as an administrator account after the upgrade, so that you may import the connections and share them with other users.

    Note:

    When you have finished the upgrade procedure, to share the imported connections with other users, launch the application and go to Connections. Select a created connection and navigate into the Connection tab. Check Share this connection with all users on this computer for each connection to share. Refer to Managing Connections for more information.

    Check the option to share the connections with other system users.