Faspex supports the Lightweight Directory Access Protocol (LDAP) and can be configured to connect to a directory service. The following directory service databases are supported:
- 389/Red Hat/Fedora Directory Server
- Apple Open Directory
- Microsoft Active Directory (AD)
IMPORTANT NOTE: In a multi-server environment, a slave that is not connected to the directory server will always authenticate via the master.
Follow the steps below to configure Faspex for LDAP.
-
Enter directory service details
Go to .
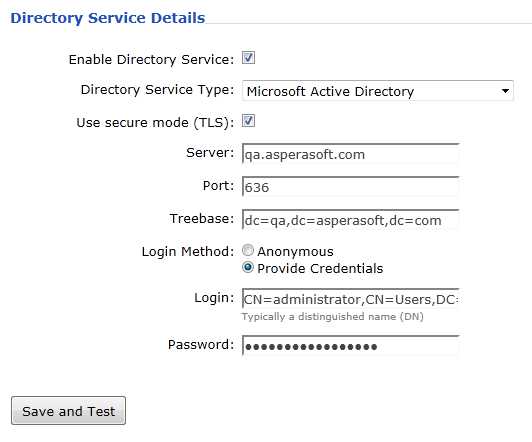
To configure your directory service to work with Faspex, check Enable Directory Service and input your configuration details (example displayed below).
Option Description Directory Service Type Select from one of the following options: - 389/Red Hat/Fedora Directory Server
- Apple Open Directory
- Microsoft Active Directory (AD)
Use secure mode (TLS) NOTE: Aspera highly recommends turning this setting on to secure your server. By default, LDAP traffic is transmitted unsecured. You can make LDAP traffic confidential and secure by enabling TLS. The port number will automatically change to 636 when TLS is enabled. Server The directory server's address. Port The directory server's port number. By default, unsecured LDAP uses port 389, unsecured global catalog uses port 3268, and global catalog over SSL uses port 3269. If TLS is enabled, then the port number will automatically change to 636. Treebase The search treebase (e.g. dc=myCompany,dc=com for myCompany.com) Login Method - Anonymous
- Provide Credentials
If Provide Credentials is selected, then you are required to input your directory service login and password below.
Distinguished Name Directory service user name, which is typically a Distinguished Name (DN) (e.g. CN=Administrator,CN=Users,DC=myCompany,DC=com). Password Directory service password. When finished, click Save and Test. If Faspex successfully connects to your directory server, you will see the following information:
Connected: YES
Authenticated: YES
Success
-
Import directory service groups
IMPORTANT NOTE: When Faspex Server imports AD groups, it is bounded by the AD server parameter "MaxValRange." If you would like to import a larger AD group, then please change the "MaxValRange" parameter on your AD server.
When importing a directory service group, all users listed under that group are added into Faspex. To import a group, go to Accounts and select .
IMPORTANT NOTE: You cannot import Directory Service groups that have the same name, regardless of whether or not they are on the same DS server. All Directory Service groups must have unique names.
In the Import Group From Directory Service screen, enter the directory service group you wish to add. Typing three characters or more brings up the group list with matching keywords.
To specify user settings and permissions for this group, click the Edit settings and permissions link.
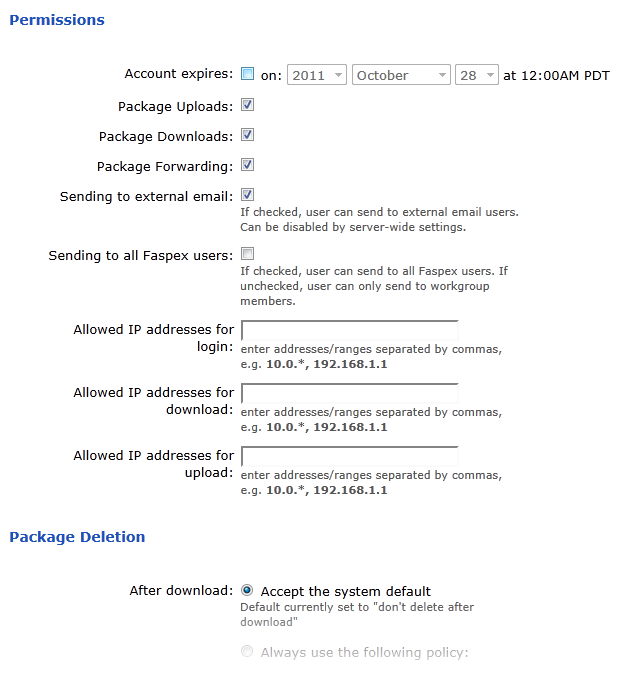
- Permissions
-
Option Description Account expires Enable if you would like this account to expire on the specified date. Package Uploads Enable to allow the user to send file packages. Package Downloads Enable to allow the user to download packages that have been received. A user who does not have this marked will still receive packages, but will not be able to download the files. Package Forwarding Enable to allow the user to forward received file packages to other users. The package will be made accessible to the forwarded users within their Faspex accounts. Sending to external email Enable to allow the user to send a download link to external emails addresses (which are not Faspex users). Sending to all Faspex users Enable to allow the user to send packages to all Faspex users (as opposed to only being able to send packages to the user's workgroup members). Allowed IP addresses for login Specify the IP address(es) that a Faspex user can login from to view his or her account. A wildcard (*) can be used in this option (e.g., 192.168.10.*., which allows the user to login from 192.168.10.1, 192.168.10.2, etc.). Separate multiple email addresses with commas (,). Allowed IP addresses for download Specify the IP address(es) that a Faspex user can login from to download packages. A wildcard (*) can be used in this option (e.g., 192.168.10.*., which allows the user to login from 192.168.10.1, 192.168.10.2, etc.). Separate multiple email addresses with commas (,). Allowed IP addresses for upload Specify the IP address(es) that a Faspex user can login from to upload packages. A wildcard (*) can be used in this option (e.g., 192.168.10.*., which allows the user to login from 192.168.10.1, 192.168.10.2, etc.). Separate multiple email addresses with commas (,). - Package Deletion
- Options available after downloading a package:
Option Description Accept the system default Follow Faspex Server's default auto-deletion settings. The current setting is displayed in the description. To update the default setting, refer to Package Storage. Always use the following policy Override the system default with the selected policy: - Do nothing
- Delete files after any recipient downloads all files
- Delete files after all recipient download all files
Allow user to set own delete setting on a package-by-package basis Provide the policy settings in the user's New Package screen. The user can determine the file package's expiration rule when preparing it. - Advanced Transfer Settings
-
Faspex uses the transfer settings from the Aspera Central Server section by default. However, when Override default settings is checked, you can set user-specific transfer settings, which will take precedence over the server-wide settings.
Option Description Initial Transfer Rate Specify the initial upload and download transfer rate. When the option Lock minimum rate and policy is checked, the user will not be able to adjust transfer policy or minimum transfer rate. Maximum Allowed Rate Specify the initial upload and download transfer rate.
Click when finished. When adding directory service groups, Faspex searches for groups recursively to import users. For example, if group A contains Group 1, importing Group A also imports Group 1's members. Once imported, the directory service group's members are added to your Faspex Server and the import page is updated with a link to view/edit the new group.
Click the View link to go back to the Accounts screen. Your imported DS users will appear in the accounts list, along with the type column identification DS.
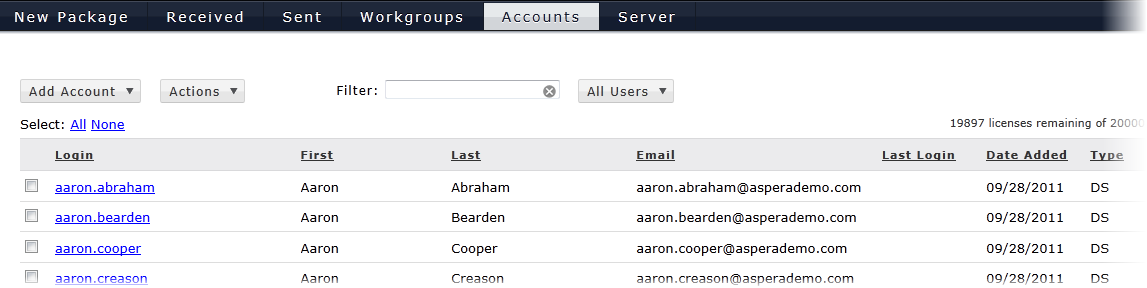
To filter your accounts screen to only see directory service-imported groups, select .
You can administer a directory service group by checkmarking the corresponding row and clicking on the Actions button. The Actions button contains the following functions:
- Manually Sync with the directory server. Note that Faspex auto-syncs with the directory server every hour.)
- Deactivate and Activate disables or enables selected groups, respectively.
- Remove deletes the group.
IMPORTANT NOTES:
- Directory service syncing is accomplished through a Faspex background service that must be kept running.
- When removing an directory service group, users in that group will be deactivated instead of removed.
- When a user exists in multiple directory service groups, removing one of the groups doesn't affect the user. The user is deactivated only all his or her directory service groups are removed.
- An activated directory service group will show as "Active" in the status column. If it shows otherwise, click View Operation History to read the Active Directory operation log and identify the problem.
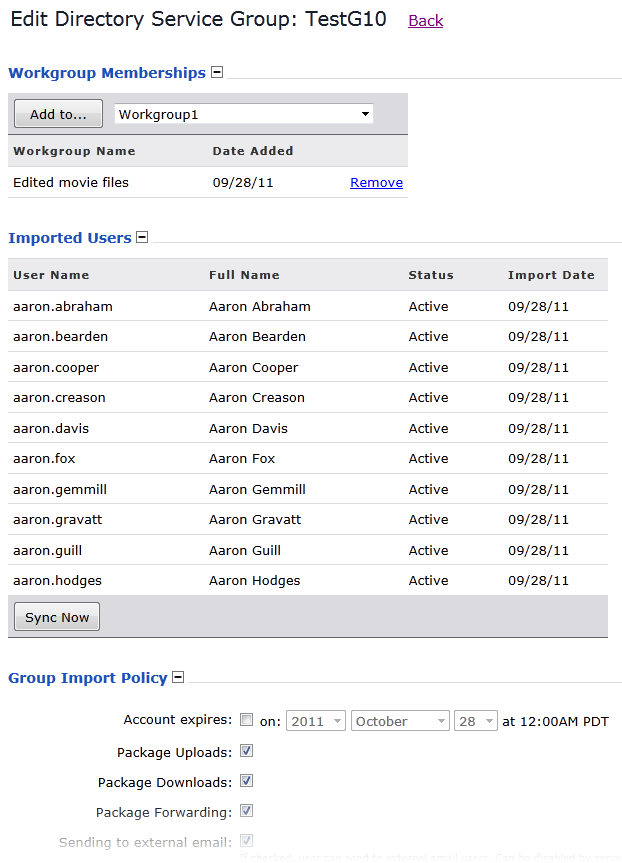
To view the members of the DS group, update its workgroup memberships, or edit the DS users' Faspex settings and permissions, click the corresponding hyperlink to go to the Edit Directory Service Group screen.