Configuring for Aspera on Cloud

To add an IBM Aspera High-Speed Transfer Server as a node to Aspera on Cloud, it must be configured for the Aspera Node API, which Aspera on Cloud uses to connect to the node, retrieve file system information, and initiate transfers. Requests to the Node API are authenticated with Node API credentials (a node username and password) that are associated with a local system account. All transfers and system operations on the node that are intiated through Aspera on Cloud are run under the system account.

To add a server as an Aspera on Cloud node, you create the system user on the server, configure the system user as an Aspera transfer user, associate the transfer user with a node username and password, and configure the server to work with Aspera on Cloud. Aspera on Cloud users access the Node API and Aspera on Cloud nodes using access keys, which are created on the server or in the Aspera on Cloud UI.

System Requirements:

  • High-Speed Transfer Server version 3.7.4 or later (3.8.0 or later strongly recommended).
  • The public DNS name of the system must be accessible from all internal and external clients, as well as the computer itself.
  • The system clock is synchronized with an NTP server. See your OS documentation for instructions.
  • Valid SSL certificates that are in .pem format and that are signed by a globally recognized Certificate Authority. For more information, see Installing SSL Certificates.

Set Up and Configure a Transfer User

  1. Create a system user.
  2. Restrict user permissions with aspshell.
    By default, all system users can establish a FASP connection and are only restricted by file permissions. Restrict the user's file operations by assigning them to use aspshell, which permits only the following operations:
    • Running Aspera uploads and downloads to or from this computer.
    • Establishing connections in the application.
    • Browsing, listing, creating, renaming, or deleting contents.

    These instructions explain one way to change a user account or active directory user account so that it uses the aspshell; there may be other ways to do so on your system.

    1. Go to Apple menu > System Preferences > Users & Groups.
    2. Click Click the lock to make changes and enter admin credentials.
    3. Right-click the user account and select Advanced Options.
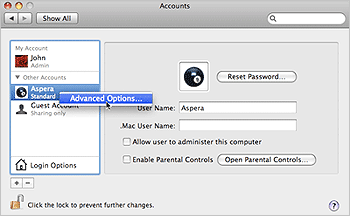
      Open an account's advanced options.
    4. Replace the default value (/bin/bash) in the Login Shell field with /Library/Aspera/bin/aspshell.
    Note: If you use SSH with Open Directory for authentication: To make aspshell the default shell for domain users, open server.app, go to Users, select the users that are used for transfer, and change the shell to /Library/Aspera/bin/aspshell.
  3. Ensure that the user has read and write privileges to the local directories or mounts that Aspera must access.
  4. Set a file restriction for the user, rather than a docroot.
    The file restriction allows access only to the specified storage. To set a docroot restriction, run the following command:
    $ asconfigurator -x "set_user_data;user_name,username;file_restriction,|path"

    Where the "|" is a delimiter, and the restriction path syntax depends on the storage:

    Storage Type Format Example
    local storage For Unix-like OS:
    • specific folder: file:////folder/*
    • drive root: file:////*
    For Windows OS:
    • specific folder: file:///c%3A/folder/*
    • drive root: file:///c*
    Amazon S3 and IBM Cloud Object Storage - S3 s3://*
    Azure azu://*
    Azure Files azure-files://*
    Azure Data Lake Storage adl://*
    Swift swift://*
    Alibaba Cloud oss://*
    Google Cloud gs://*
    HDFS hdfs://*

    For example, to set a restriction for xfer to S3 storage, the command is as follows:

    $ asconfigurator -x "set_user_data;user_name,xfer;file_restriction,|s3://*"
  5. Configure the transfer user for token authorization.
    $ asconfigurator -x "set_user_data;user_name,xfer;authorization_transfer_in_value,token;authorization_transfer_out_value,token;token_encryption_key,key"

    Aspera recommends that the key be a random string of at least 20 characters.

  6. Assign the SSH public key associated with IBM Aspera Connect to xfer.
    IBM Aspera Connect uses the default Aspera key pair. Run the following commands to create the .ssh directory, copy the default public key into that directory and rename it authorized_keys, and set permissions on the file, run the following commands:
    $ mkdir /Users/xfer/.ssh
    $ cp /Library/Aspera/var/aspera_tokenauth_id_rsa.pub /Users/xfer/.ssh/authorized_keys
    $ chmod 700 /Users/xfer/.ssh
    $ chmod 600 /Users/xfer/.ssh/authorized_keys
    $ chown -R xfer:xfer /Users/xfer/.ssh
  7. Create a node username and associate it with the system user xfer.
    Run the following command with root or administrator permissions:
    $ /opt/aspera/bin/asnodeadmin  -a -u node_user -p node_user_passwd -x xfer

    For example:

    $ /opt/aspera/bin/asnodeadmin  -a -u nuser-001 -p 472830x4n -x xfer
    Note: The node username password must meet the password requirements set in Aspera on Cloud.
  8. List the node usernames to confirm that your command was successful.
    $ /opt/aspera/bin/asnodeadmin -l

Configure the Server as a Aspera on Cloud Node

  1. Configure the entitlement, if you do not have a separate license for the server.
    Run the following commands to start the ALEE service, restart the Aspera NodeD service, and register your entitlement:
    $ sudo /Library/Aspera/bin/asalee-config.sh enable
    $ sudo launchctl stop com.aspera.asperanoded
    $ sudo launchctl start com.aspera.asperanoded
    $ sudo /Library/Aspera/bin/alee-admin register customer_id entitlement_id
  2. If you configured an entitlement on your server and are behind a strict firewall, whitelist the IP addresses that are used by the ALEE service.
    The ALEE service uses the SafeNet environment to manage and recognize entitlements, including the following components and their domain names:
    Name Domain Name
    Sentinel Cloud yellow pages services yps-ws.sentinelcloud.com
    Sentinel Cloud backend pdx02-cloud.prod.sentinelcloud.com
    The IP addresses associated with these domain names change every few months. To retrieve the IP addresses, run the following commands:
    $ dig +short yps-ws.sentinelcloud.com
    $ dig +short pdx02-cloud.prod.sentinelcloud.com
  3. Ensure SSHD is running on port 33001.
    For information on configuring TCP ports, see Securing Your SSH Server. You must also manually configure the <WEB> section of aspera.conf; see the IBM Aspera High-Speed Transfer Server Admin Guide: Configuring Your Web UI Settings.
  4. Configure a file extenstion to identify files that are still being transferred.
    To set an extension for files that are partially transferred, such as .partial, run the following command:
    $ asconfigurator -x "set_node_data;partial_file_suffix,.partial"

    The extension is removed once the file transfer is complete.

  5. Enable activity logging and activity event reporting by running the following command:
    $ asconfigurator -x "set_server_data;activity_logging,true;activity_event_logging,true"
  6. Configure the HTTPS service to use port 443 by running the following command:
    $ asconfigurator -x "set_server_data;https_port,443"
  7. Enable recursive counts by running the following command:
    $ asconfigurator -x "set_server_data;files_recursive_counts_workers,value"

    For value, enter a number from one to eight. Lower values (one or two) result in slower updates but less load on Redis. Higher values (four to eight) increase the load on Redis and the machine should have twice as many cores. Aspera recommends starting with a value of five, and adjusting if needed.

    If your Redis database is very large and you set a high number of recursive counts workers, you may encounter out-of-memory problems. To avoid this issue, increase the time between background Redis save events and number of key changes by running the following command:

    $ asconfigurator -x "set_server_data;db_config_save,time key_changes"

    The default value is 900 1, which sets the background save schedule for every 15 minutes (900 seconds) if at least one key changes. To set this change, you must shut down the Redis database (it is restarted in the next step) by running the following command with root or Administrator privileges:

    $ /opt/aspera/bin/asnodeadmin --db-shutdown
  8. Restart the Aspera Central, Aspera NodeD, and Aspera HTTPD services.
    Run the following command in a Terminal window to restart asperacentral:
    $ sudo launchctl stop com.aspera.asperacentral
    $ sudo launchctl start com.aspera.asperacentral
    Run the following commands to restart asperanoded:
    $ sudo launchctl stop com.aspera.asperanoded
    $ sudo launchctl start com.aspera.asperanoded
    Run the following commands to restart asperahttpd:
    $ sudo launchctl stop com.aspera.asperahttpd
    $ sudo launchctl start com.aspera.asperahttpd

Securing the Aspera NodeD Service Behind a Proxy

If your Aspera server must expose the Aspera NodeD service to the internet, such as when setting it up as a Aspera on Cloud node, Aspera recommends protecting it with a reverse proxy. Normally, asperanoded runs on port 9092, but nodes that are added to Aspera on Cloud must have asperanoded run on port 443, the standard HTTPS port for secure browser access. Configuring a reverse proxy in front of asperanoded provides additional protection (such as against DOS attacks) and resource handling for requests to the node's 443 port.

Adding the Node to Aspera on Cloud

Once you have created a system user on the server, configured the user for Aspera, associated it with a node username, configured the server, and verified your SSL certificates, you may add it as a node in the Aspera on Cloud UI. In the process you are asked for an existing access key and secret, or you can create a new one. If you prefer to manually create an access key on the server, see the instructions in Access Key Authentication.