Securing Your SSH Server

Keeping your data secure is critically important. Aspera strongly recommends taking additional steps to set up and configure your SSH server to protect against common attacks. These steps include the following:
  • Changing the TCP port.
  • Configuring transfer server authentication.

Aspera also recommends restricting user access to the server. For more information, see Setting Up Users .

Changing and Securing the TCP Port

Generally, SSH servers listen for incoming connections on TCP Port 22. As such, Port 22 is subject to numerous unauthorized login attempts by hackers who are attempting to access unsecured servers. An effective deterrent is to close Port 22 and run the service on a seemingly random port above 1024 (and up to 65535). To standardize the port for use in Aspera transfers, Aspera recommends setting the TCP port to 33001. The OpenSSH suite included in the installer uses TCP/22 as the default port for SSH connections. Remote Aspera clients attempt to establish an SSH connection with the server on port 33001. However, if the connection fails, the client retries the connection on port 22.

Aspera recommends opening TCP/33001 and disabling TCP/22 to prevent security breaches of your SSH server.

  • Open TCP/33001 and keep TCP/22 open until users are notified that they should switch to TCP/33001.
  • Once users are notified, block TCP/22 and allow traffic only on TCP/33001.

Prerequisites:

  • Before changing the default port for SSH connections, verify with your network administrators that TCP/33001 is open.
  • Before closing port TCP/22, notify users of the change.

Notifiying Users - How to Specify TCP/33001

Aspera recognizes that disabling the default SSH connection port (TCP/22) may affect your client users. When you change the port, ensure that you advise your users on how to configure the new port number, from the GUI (if available and used) and from the command line.

  • GUI: To change the SSH port in Desktop Client, click Connections and select the entry for the server whose ports are changing. On the Connection tab, click Show Advanced Settings and enter the SSH port number in the SSH Port (TCP) field.
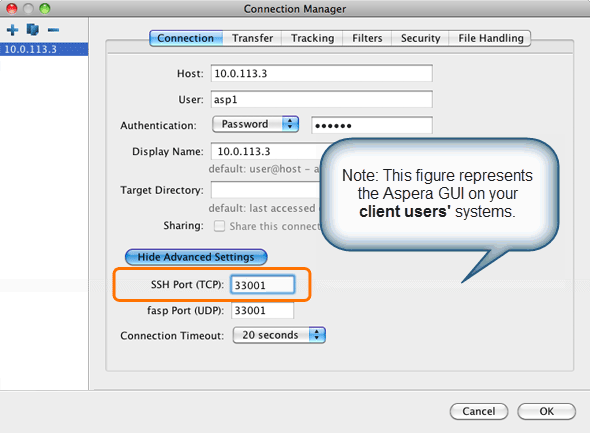
    Client specifing your computer's SSH Port.
  • Command line: Clients running FASP transfers from the command line can specify the port by using the -P 33001 option.

Changing to TCP/33001

The following steps require root privileges.

  1. Open the services file.
    /etc/services
  2. Add the TCP/33001 SSH port.
    1. You cannot put two entries of the same name in the /etc/services file, so add a second SSH process to the /etc/services file (such as ssh2), as shown in the following example:
      
      ssh   22/tcp      # SSH Remote Login Protocol 
      ssh2  33001/tcp   # SSH Remote Login Protocol (secure port) ...
    2. Make a copy of /System/Library/LaunchDaemons/ssh.plist to /Libary/LaunchDaemons/ssh2.plist. Then edit ssh2.plist to use the second SSH port, as shown in bold text in the following example:
      
      <key>Sockets</key>
           <dict>
              <key>Listeners</key> 
              <dict>
                  <key>SockServiceName</key>
                  <string>ssh</string>
                  <key>Bonjour</key>
                  <array>
                      <string>ssh</string>
                      <string>sftp-ssh</string>
                  </array>
              </dict>
              <key>Alternate Listeners</key>
              <dict>
                  <key>SockServiceName</key>
                  <string>ssh2</string>
              </dict>
           </dict>
    3. Save your changes to ssh2.plist then load the file by running the following command:
      $ sudo launchctl load -w /Library/LaunchDaemons/ssh2.plist
    4. Restart the SSH service to activate your changes.
      Restarting your SSH server does not affect currently connected users. Go to System Preferences > Sharing. Unselect and then re-select Remote Login from the left panel. Under Allow access for, select All users, or specify individual user accounts for the FASP connections.
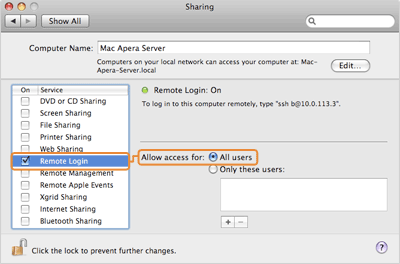
      Enable the remote login on 10.6+
    Note: When changing the SSH port, you must also update the SshPort value in the <WEB...> section of aspera.conf. For details, see Configuring your Web UI Settings.

    Once your client users have been notified of the port change to TCP/33001, modify /etc/services so that the only open SSH port is TCP/33001.

    Once this setting takes effect:

    • Aspera clients must set the transfer port to 33001 in the GUI or specify -P 33001 for command line transfers.
    • To remotely access the server, server administrators should use ssh -p 33001.
  3. Disable non-admin SSH tunneling.
    These instructions require that OpenSSH 4.4 or newer is installed on your system in order to use the Match directive. Match allows you to selectively override certain configuration options when specific criteria (based on user, group, hostname, or address) are met.

    Open your SSH Server configuration file, sshd_config, with a text editor. Add the following lines to the end of the file (or modify them if they already exist):

    AllowTcpForwarding no
    Match Group root 
    AllowTcpForwarding yes

    Depending on your sshd_config file, you might have additional instances of AllowTCPForwarding that are set to the default Yes. Review your sshd_config file for other instances and disable if necessary.

    Disabling TCP forwarding does not improve security unless users are also denied shell access, because they can still install their own forwarders. Review your user and file permissions, and see Setting Up Transfer Users for instructions on modifying user shell access.

  4. Disable root login.
    CAUTION:
    This step disables root access. Make sure that you have at least one user account with sudo privileges before continuing, otherwise you may not have access to administer your server.
    By default, OpenSSH allows root logins. However, disabling root access helps maintain a more secure server. Aspera recommends disabling root access by commenting out PermitRootLogin yes in the sshd_config file and adding PermitRootLogin No.
    #PermitRootLogin yes 
    PermitRootLogin no

    Administrators can use the su command when root privileges are necessary.

  5. Restart the SSH server to apply new settings.
    Restarting your SSH server does not affect currently connected users.

    Click Apple menu > System Preferences > Sharing. Clear and then reselect Remote Login from the left panel. In the Allow access for: option, select All users, or specify individual user accounts for the FASP connections.

  6. Review your logs periodically for attacks.
    You can view the state of active TCP connections by running the netstat command:
    $ netstat -an -p tcp

    Typical output shows multiple, different IP addresses connected to specific ports:

      TCP    10.0.111.200:53402     72.21.81.109:80        CLOSE_WAIT
      TCP    10.0.111.200:53865     173.194.202.188:5228   ESTABLISHED
      TCP    10.0.111.200:53876     10.0.9.16:445          TIME_WAIT
      TCP    10.0.111.200:55164     208.85.40.20:443       ESTABLISHED
      TCP    10.0.111.200:55335     207.200.35.240:443     ESTABLISHED
      TCP    10.0.111.200:55444     67.199.110.81:443      ESTABLISHED
      TCP    10.0.111.200:56278     104.24.11.90:443       ESTABLISHED

    If your server is under attack, you might see output similar to the following, in which the same IP address attempts to connect to contiguous ports (hundreds or thousands of times) and the connection is timing out (reporting a status of TIME_WAIT):

      TCP    10.0.111.200:53402     72.21.81.109:60974      TIME_WAIT
      TCP    10.0.111.200:53865     72.21.81.109:60975      TIME_WAIT
      TCP    10.0.111.200:53876     72.21.81.109:60976      TIME_WAIT
      TCP    10.0.111.200:55164     72.21.81.109:60977      TIME_WAIT
      TCP    10.0.111.200:55335     72.21.81.109:60978      TIME_WAIT
      TCP    10.0.111.200:55444     72.21.81.109:60979      TIME_WAIT
      TCP    10.0.111.200:56278     72.21.81.109:60980      TIME_WAIT

    If you see this, review your logs to determine the source and cause.

    Open the system log, which is located in /var/log/system.log.

    Look for invalid users in the log, especially a series of login attempts with common user names from the same address, usually in alphabetical order. For example:

    ...
    Mar 10 18:48:02 sku sshd[1496]: Failed password for invalid user alex from 1.2.3.4 port 1585 ssh2
    ...
    Mar 14 23:25:52 sku sshd[1496]: Failed password for invalid user alice from 1.2.3.4 port 1585 ssh2
    ...

    If you identify attacks, take the following steps:

    • Double-check the SSH security settings in this topic.
    • Report attackers to your ISP's email address for abuse reports (often abuse@your_isp.com).

Configuring Transfer Server Authentication With the Host-Key Fingerprint

For transfers initiated by a web application (such as Faspex, Shares, or Console), the client browser sends the transfer request to the web application server over an HTTPS connection. The web application requests a transfer token from the target server. The transfer is executed over a UDP connection directly between the client and the target server and is authorized by the transfer token. Prior to initiating the transfer, the client can verify the server's authenticity to prevent server impersonation and man-in-the-middle (MITM) attacks.

To verify the authenticity of the transfer server, the web application passes the client the trusted SSH host key fingerprint of the transfer server. The client confirms the server's authenticity by comparing the server's fingerprint with the trusted fingerprint. In order to do this, the host key fingerprint or path must be set in the server's aspera.conf.

  1. Set the host key fingerprint or path in the transfer server's aspera.conf file.
    Note: Server SSL certificate validation (HTTPS) is enforced if a fingerprint is specified in aspera.conf and HTTP fallback is enabled. If the transfer "falls back" to HTTP and the server has a self-signed certificate, validation fails. The client requires a properly signed certificate.

    If you set the host key path, the fingerprint is automatically extracted from the key file and you do not extract it manually.

    Retreiving and setting the host key fingerprint:

    1. Retrieve the server's SHA-1 fingerprint.
      $ cat /etc/ssh/ssh_host_rsa_key.pub | awk '{print $2}' | base64 -D | shasum
    2. Set the SSH host key fingerprint in aspera.conf. (Go to the next step to set the host key path instead).
      $ asconfigurator -x "set_server_data;ssh_host_key_fingerprint,fingerprint"

      This command creates a line similar to the following example of the <server> section of aspera.conf:

      <ssh_host_key_fingerprint>7qdOwebGGeDeN7Wv+2dP3HmWfP3 
      </ssh_host_key_fingerprint>

    Setting the host key path: To set the SSH host key path instead of the fingerprint, from which the fingerprint will be extracted automatically, run the following command:

    # asconfigurator -x "set_server_data;ssh_host_key_path,ssh_key_filepath"

    This command creates a line similar to the following in the <server> section of aspera.conf:

    <ssh_host_key_path>/etc/ssh/ssh_host_rsa_key.pub
    </ssh_host_key_path>
  2. Restart the node service to activate your changes.
    Run the following commands to restart asperanoded:
    $ sudo launchctl stop com.aspera.asperanoded
    $ sudo launchctl start com.aspera.asperanoded