IBM Aspera Enterprise Server must be configured to work as a transfer server for IBM Aspera for Microsoft
SharePoint. These instructions assume that you have already set up your Microsoft SharePoint
environment and configured (provisioned) it for SharePoint apps.
Note: In order to use IBM Aspera Enterprise Server as the transfer server for Aspera for SharePoint, you must run Enterprise Server
on Windows 2012 or 2012 R2; or on Linux. Aspera recommends you run
Enterprise/Connect Server on a Linux host.
The basic steps are:
- Install the transfer server.
- Create a system user on the transfer server host.
- Create a directory to be the transfer user's docroot.
- Create the SSH key for the system user.
- Add the new system user as a transfer user to Enterprise/Connect Server.
- Specify a docroot for the new transfer user.
- Modify aspera.conf.
- Ensure that the firewall is set up correctly on your transfer server host.
- Verify your transfer server license.
- Set up a node user.
- Configure the Aspera for SharePoint application.
These steps are described in detail below.
All steps must be performed as root.
-
Install the transfer server.
If you haven't already, follow the steps in
Installation and Upgrades to
install
Enterprise Server.
The
transfer server that you use with Aspera for SharePoint must be installed on a host
separate from your Microsoft SharePoint environment hosts.
-
Create a system user on the transfer server.
The system user authenticates the actual
ascp transfer and must be
an operating system account.
Run the following command to (1) create the
system user sharepoint; (2) configure it to use the Aspera secure shell,
aspshell; and (3) create the group sharepoint and assign
the new system user to it.
# /usr/sbin/useradd -r sharepoint -s /bin/aspshell-r -g sharepoint
-
Create a directory to be the system user's docroot.
This must be a location owned by the system
user.
You
will use this location later in the configuration process, at Step 6.
-
Create the .ssh
directory and
public key file for the system user.
The standard location for the public key is in the
user's home directory:/home/sharepoint/.ssh/authorized_keys.
The
Aspera-provided key file is located in:
/opt/aspera/var/aspera_tokenauth_id_rsa.pub
- On the command line, run the following to create the
user's public key directory (if it does not already exist):
# mkdir /home/aspera_user_1/.ssh
- Run the following commands to create the file
authorized_keys (if it does not already exist), and append the
key text to it.
# cat /opt/aspera/var/aspera_tokenauth_id_rsa.pub >> /home/sharepoint/.ssh/authorized_keys
- Run the following commands to change the directory and
file's ownership to system user sharepoint, to allow access by the
sharepoint group, and to set permission bits:
# chown -R sharepoint:sharepoint /home/sharepoint/.ssh/authorized_keys
# chmod 600 /home/sharepoint/.ssh/authorized_keys
# chmod 700 /home/sharepoint
# chmod 700 /home/sharepoint/.ssh
-
Add the sharepoint system user as a transfer user to Enterprise/Connect
Server.
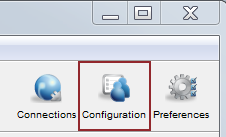
- Launch the Enterprise Server desktop application as administrator, and click
Configuration.
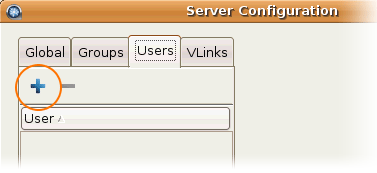
- In the Server Configuration dialog, select the
Users tab. Then click the
 button.
- In the Add User dialog that appears, type sharepoint
and click OK. The system user sharepoint is then added
to the user list.
-
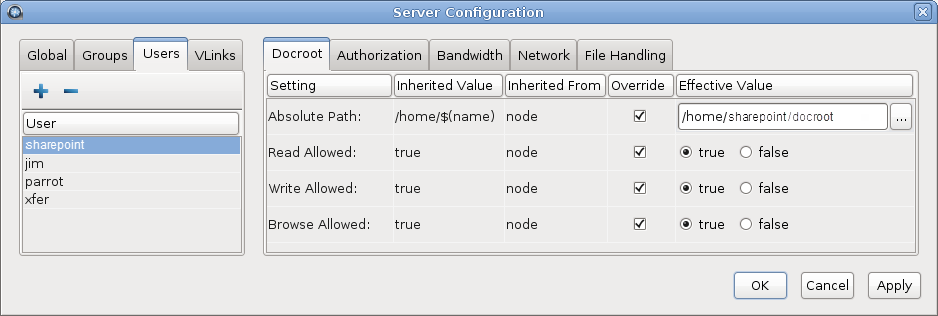
Specify a docroot for the new transfer user sharepoint.
Still in the
Server Configuration dialog,
select the
Users tab and do the following:
- Make sure sharepoint is selected in the user list.
- Open the Docroot tab in the right-hand panel.
- Set the following on the Docroot tab:
| Row |
Override Setting |
Effective Value Setting |
| Absolute Path |
selected (checked) |
/Users/sharepoint/ or whatever location you created
in Step 3 |
| ad Allowed |
selected (checked) |
true |
| Write Allowed |
selected (checked) |
true |
| Browse Allowed |
selected (checked) |
true |
-
Configure the server.
In a
Terminal
window, run the following commands to set the server name with the name or IP address of
your server, enable persistent storage (persistent storage is enabled by default), ensure
the transfer user has browse privileges, and enable token authorization for the transfer
user, and enable HTTP and
HTTPS:
# asconfigurator -x "set_server_data;server_name,server_ip_or_name"
# asconfigurator -x "set_central_server_data;persistent_store,enable"
# asconfigurator -x "set_user_data;username,username;dir_allowed,true"
# asconfigurator -x "set_user_data;user_name,username;authorization_transfer_in_value,token"
# asconfigurator -x "set_user_data;user_name,username;authorization_transfer_in_value,token"
# asconfigurator -x "set_user_data;user_name,username;token_encryption_key,encryption_key"
-
Restart the Aspera Central, Aspera NodeD, and Aspera HTTPD services to activate your
configuration changes.
Run the following command in
a Terminal window to restart
asperacentral:# systemctl restart asperacentral
or for Linux systems that use
init.d:# service asperacentral restart
Run the following commands to
restart
asperanoded:# systemctl restart asperanoded
or for Linux systems that use
init.d:# service asperanoded restart
Run the following commands to
restart
asperahttpd:# systemctl restart asperahttpd
or for Linux systems that use
init.d:# service asperahttpd restart
-
Ensure that the firewall is set up correctly on your transfer server host.
-
Verify your transfer server license is Connect-enabled.
- From the command line: In a Terminal window, run the following command and inspect the
output, which lists the enabled
settings:
# ascp -A
Enabled settings: connect, mobile, cargo, node, proxy, http_fallback_server,
group_configuration, shared_endpoints, desktop_gui
If
the list includes connect, you have a Connect-enabled server
license.
- In the Enterprise Server GUI: Click Tools > License and if
Connect Clients Enabled is set to Yes,
then you have a Connect-enabled license.
When you update your Enterprise Server license (see Updating the Product License), you must reload
the asperanoded service afterwards by running the following command:
# /opt/aspera/bin/asnodeadmin --reload
-
Configure the transfer user with a Node API username and password.
- Run the asnodeadmin command to create the node_sharepoint
node user, assign it a password, and associate it with the sharepoint transfer
user:
# /opt/aspera/bin/asnodeadmin -a -u node_sharepoint -p s3cur3_p433 -x sharepoint
- Reload the asperanoded service:
# /opt/aspera/bin/asnodeadmin --reload
- Verify the node user. Run the following command:
# /opt/aspera/bin/asnodeadmin -l
The
output for this command should resemble the
following:
List of node user(s):
                user       system/transfer user                    acls
====================    =======================    ====================
      sharepointnode                 sharepoint    []
              spnode              aspera_user_1    []
-
Configure the transfer server in the Aspera for SharePoint application.
Add the transfer server to your Aspera for SharePoint installation, mapping it to a
document library. For details, see the
IBM Aspera for Microsoft SharePoint Administrator's Guide.
Note: The transfer
server must be installed, configured, and running before you configure it in Aspera for
SharePoint.