Adding your organization's computers as managed nodes in Console.
In Console, a node is defined as an Aspera-transfer-enabled computer. A node can be added as a managed node (typically a local system) or an unmanaged node. The following table displays tasks that can be performed on each node type:
| Type | Permissions |
|---|---|
| Managed Node | Initiate transfers with; monitor; configure |
| Unmanaged Node | Initiate transfers with |
To add a managed node, prepare an account with Administrator or Root permissions on the node machine and follow the steps below.
-
Create a node in Console
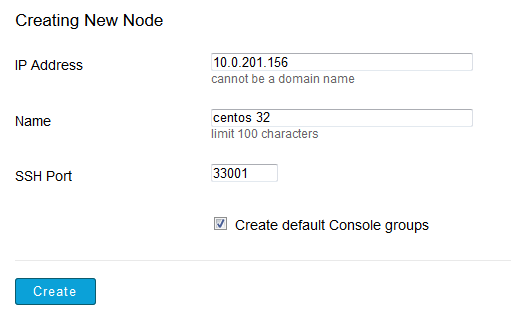
In Aspera Console, go to .

Within the Creating New Node screen, enter your managed node's IP address, name and SSH port. Enable the Create default Console groups checkbox if you would like to create the three default Console groups (i.e., Transfer Admin, Transfer Initiator and Transfer Monitor), which are defined below.
- Nodes in the Transfer Admin group can manage transfers, including initiating, cancelling and deleting transfers.
- Nodes in the Transfer Initiator group can only initiate transfers.
- Nodes in the Transfer Monitor group can only monitor transfers.
When finished, click Create.
Important: When adding the Console server itself as a managed node, don't specify 127.0.0.1 as the ip address unless it is the ONLY node you are planning to add to the console. Even then it is not recommended. Do this only if your network or firewall configuration interferes with Console communicating with its own external address. -
Prepare a user to run the Aspera Central service (Windows node-only)
Important:
This step is necessary when you are setting up a Windows node and using a non-local user to run the Aspera Central service.
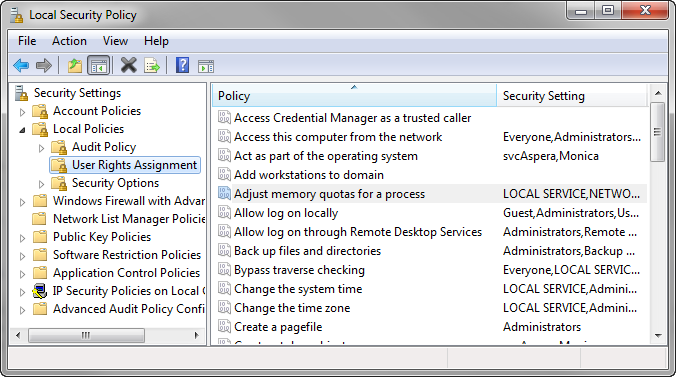
Aspera Console communicates with nodes through the Aspera Central service. When you are adding a node that runs Windows and you are using a non-local user to run Aspera Central on the node (i.e. an Active Directory user), the user must have special permissions configured to allow Console to manage the node. On the Windows node machine, navigate to and launch Local Security Policy. Within the Local Security Policy window, select in the left panel, and add the newly-created user to the following policies (by double-clicking each policy):
- Adjust memory quotas for a process
- Backup files and directories
- Replace a process level token
- Restore files and directories
-
Set the Aspera Central service to run as the new user
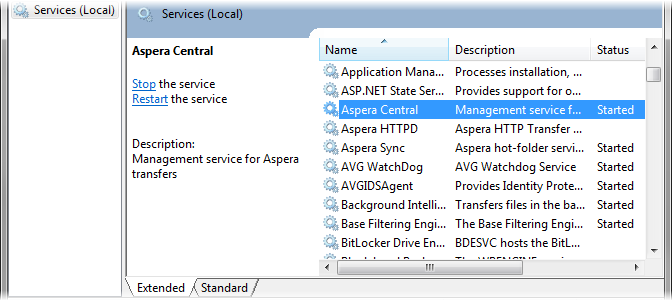
Navigate to and click Services. Double-click Aspera Central in the right panel.
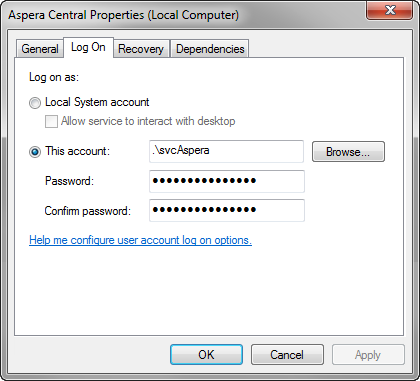
Within the Aspera Central Properties window, click the Log On tab and, under the Log on as: section, select and select the user account that you just created.
-
Prepare an Administrator's account on the node machine
To utilize Console's node configuration feature on the node machine, you must do the following:
- Create an an Administrator's account on the node machine.
- Add the Admin account to your Aspera transfer product.
- Provide the admin account's credentials to Console.
Follow the instructions below for your managed node's specific operating system.
Platform Instructions Windows On a managed Windows node, prepare an administrator's account and open your Aspera product's user interface (). Click Configuration to view the Server Configuration. 
Under Server Configuration, click the Users tab, then
 , and finally, enter your administrator's account
details.
, and finally, enter your administrator's account
details.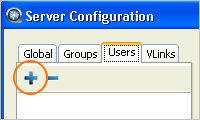
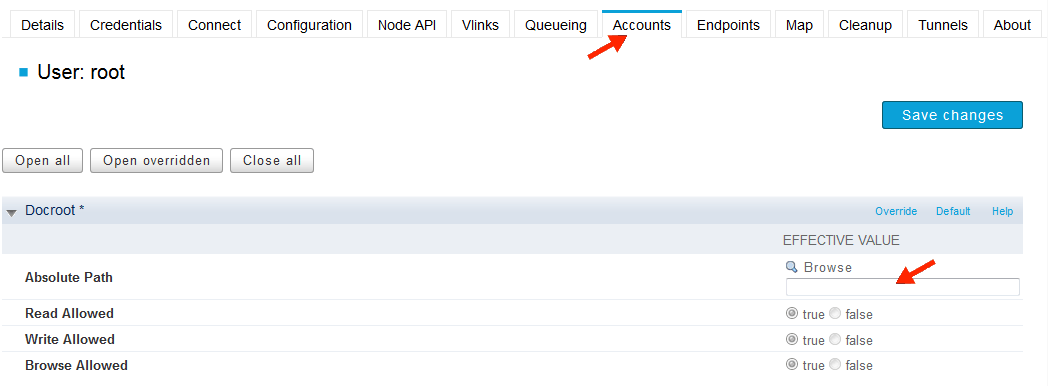
Once you have added the account, go to the user's docroot settings by clicking the Docroot tab.
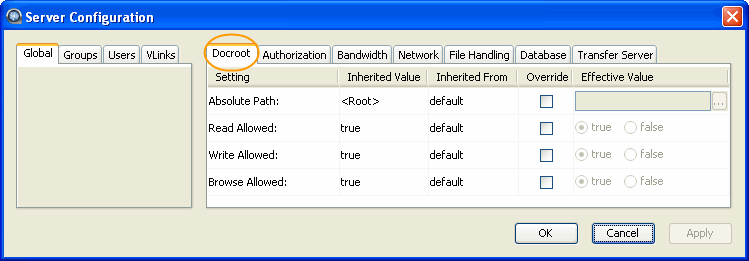
Check Override for Absolute Path and leave it blank. By doing so, the user can override default docroots under the node- or group-level setting.
OS X 10.7 (Lion) and 10.8 (Mountain Lion) On a managed Mac OS 10.7 node, you must enable the root user account. From the Apple menu choose System Preferences > View > Users & Groups. Click on the lock and then enter an administrator account and password. Click Login Options (bottom of left panel). Then click Edit or Join (at the bottom right). Click Open Directory Utility. In the Directory Utility window, click the lock and enter an administrator account and password. From the Edit menu, choose Enable Root User. Enter the root password you wish to use in both the Password and Verify fields, and click OK. 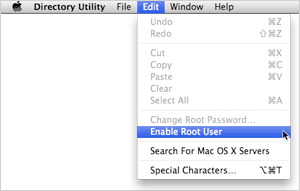
OS X 10.6 On a managed Mac OS 10.6 node, you must enable the root user account. From the Apple menu choose System Preferences > View > Accounts. Click on the lock and then enter an administrator account and password. Click Edit or Join (at the bottom right). Click Open Directory Utility. In the Directory Utility window, click the lock and enter an administrator account and password. From the Edit menu, choose Enable Root User. Enter the root password you wish to use in both the Password and Verify fields, and click OK.
OS X 10.5 On a managed Mac OS 10.5 node, you must enable the root user account. Go to and click Directory Utility. Within the Directory Utility, first unlock it to allow changes, and then click . You must also set a password.
OS X 10.4 On a managed Mac OS 10.4 node, you must enable the root user account. Go to and click NetInfo Manager. Within the NetInfo Manager, first unlock it to allow changes, and then click . Locate the property passwd, and assign a new password. 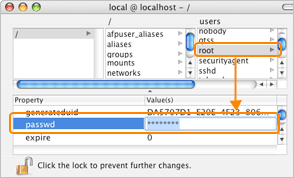
RedHat, Solaris, FreeBSD On a managed RedHat, Solaris or FreeBSD node, you must create an administrative user account that has permissions to run OpenSSH and to write to the file aspera.conf. The aspera.conf file can be found in the directory /opt/aspera/etc. Once you have located aspera.conf, open it with a text editor and add the administrative user, along with a blank docroot. In the example below, the user is asp1. <?xml version='1.0' encoding='UTF-8'?> <CONF version="2"> <aaa><realms><realm> <users> <user> <name>asp1</name> <file_system> <access> <paths><path><absolute> </absolute></path></paths> </access> </file_system> </user> ... </users> </realm></realms></aaa> ... </CONF>Isilon OneFS On a managed Isilon OneFS node, you must create an administrative user account that has permissions to run OpenSSH and to write to the file aspera.conf. The aspera.conf file can be found in the following location: /ifs/.ifsvar/aspera/etc/aspera.conf. Once you have located aspera.conf, open it with a text editor and add the administrative user, along with a blank docroot. In the example below, the user is asp1. <?xml version='1.0' encoding='UTF-8'?> <CONF version="2"> <aaa><realms><realm> <users> <user> <name>asp1</name> <file_system> <access> <paths><path><absolute> </absolute></path></paths> </access> </file_system> </user> ... </users> </realm></realms></aaa> ... </CONF> -
Within Console, enter the node machine's administrative credentials and create
an admin account
Once the node machine's administrative credentials have been created, log in to Console and navigate to Nodes. Here, click the edit link for the respective node. On the Node Maintenance screen, select Credentials and then Edit Credentials. Note that you may use password or public key authentication. If you elect to use public key authentication, then you must have your SSH private key configured in Console. For additional instructions, please refer to the topic SSH Key Configuration. For public key authentication, check Use SSH Key and select your uploaded key. To authenticate by password, enter the account's password.

Once the node's administrative credentials have been entered into Console, go to the Accounts tab, click Add User, and enter the administrative account information. Overwrite the Absolute Path field and leave it blank (empty value).
Note:Aspera strongly recommends that the node administrative user not be used to perform transfers. For node management functions, the admin user must not have a docroot, because it would limit access to resources outside the docroot. On the other hand, to ensure the security of the node, any transfer user should have limited access to the node, and should therefore always have a docroot.
-
Connect the node to Console
Once the node's administrative account has been added to Console, go to the Connect tab and complete the form below. When finished, click Connect node to Console.
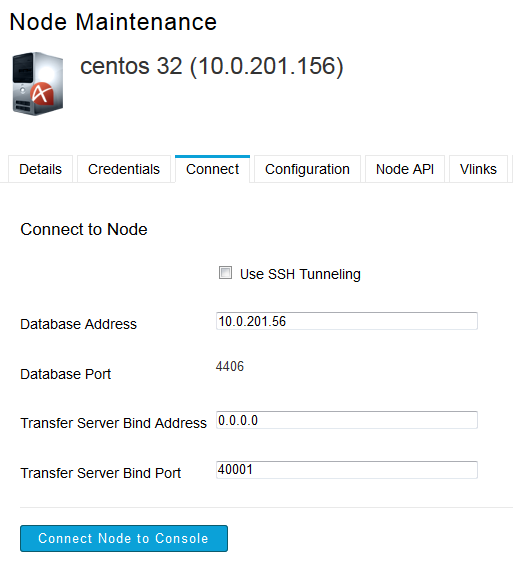
Item Description Use SSH Tunneling Connect Console to the node via an SSH tunnel. SSH Tunneling is only supported on nodes running Aspera Enterprise Server 2.7+. Database Address Enter Console's database address. Database Port Display the Console database's port number. Transfer Server Bind Address Enter an IP address for Aspera Central to bind its connections. Transfer Server Bind Port Enter a port for Aspera Central to bind its connections. -
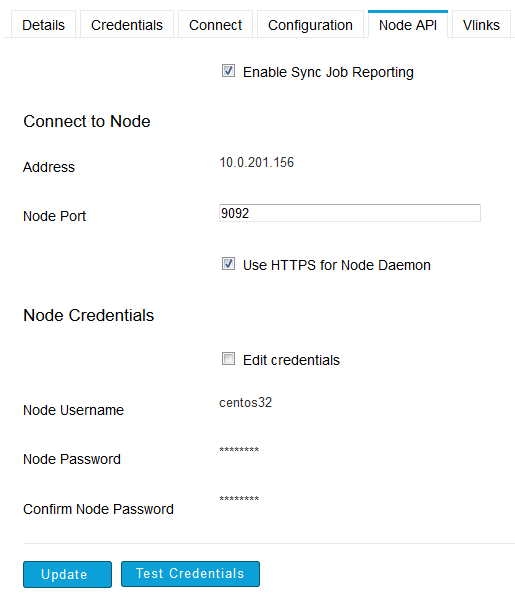
(For nodes running Enterprise Server v3.1.5+) Configure Node API
Settings
If your managed node is running Enterprise (or Connect) Server v3.1.5+, then you can configure Console to poll the Aspera Node API. This allows you to turn on Aspera Sync job reporting. To configure this feature, select the Node API tab (note that this tab will not appear for nodes running Enterprise Server version 3.1 and older). You need to have the following information available to set up the Node API connection:
- Node API service port (either HTTP or HTTPS)
- Node credentials, including the Node API username and password
If you do not have this information, nor have you set up the Node API on your managed node, please refer to your server's Admin Guide.
Next, on your managed node, update aspera.conf to allow Aspera Sync activity logging. For information on where to find the managed node's aspera.conf file, please refer to your server's Admin Guide. Once you have opened aspera.conf, add the following setting within the <default /> section:
<CONF version="2">
...
<default>
	...
	<async_activity_logging>true</async_activity_logging>
	...
</default>
...
</CONF>
After saving and closing aspera.conf, restart the node service (see restart command below for your server's operating system).
Linux and Solaris:
# /etc/init.d/asperanoded restartIsilon:
# isi_for_array -s -q /etc/rc.d/asperanoded restartMac OS X:
$ sudo launchctl stop com.aspera.asperanoded
$ sudo launchctl start com.aspera.asperanoded
Windows 32-bit
C:\Program Files\Aspera\Enterprise Server\bin> sc stop asperanoded
C:\Program Files\Aspera\Enterprise Server\bin> sc start asperanoded
Windows 64-bit
C:\Program Files (x86)\Aspera\Enterprise Server\bin> sc stop asperanoded
C:\Program Files (x86)\Aspera\Enterprise Server\bin> sc start asperanoded
After initiating a sync session, go to the Console Activity page to monitor the job. Note that Sync Job reporting (from the Sync Jobs screen) may not appear immediately.
-
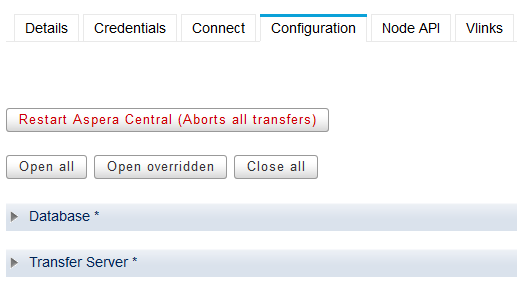
Restart Aspera Central
After saving your settings, click the Restart Aspera Central button to restart Aspera Central on the node.Note:
All ongoing transfers will be terminated.
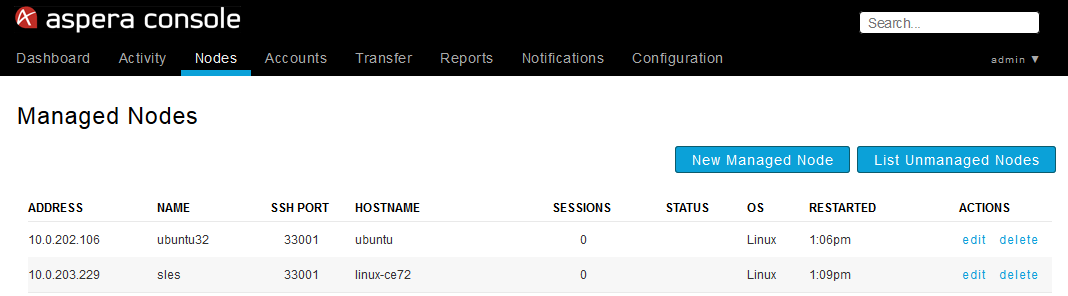
At this point, a connection should be established between Console and your managed node. To verify the connect, select Nodes within the Console menu and locate the node within the table. If the node is connected, the Hostname, Sessions, OS and Restarted fields will be populated.
If you see an error message (e.g. "DB Logger Never Connected"), then it is recommended that you perform the steps above again, or contact Technical Support for assistance.