Transfer Server Address for the Web Server
For a streamlined installation, your transfer server address, by default, is 127.0.0.1, because IBM Aspera Faspex on Demand is installed on the same machine as your transfer server (i.e., IBM Aspera Enterprise Server or IBM Aspera Connect Server v3.0+). To run your transfer server on a different machine, you need to tell the Faspex web server where that machine is located so that Faspex can gather transfer statistics and display them via the Web UI. Consider the configuration in the following example:

In the image below, the New Node screen has been filled in for the above configuration:

| Field | Description | Sample Value |
|---|---|---|
| Name | Unique name to identify the remote node. | "Machine B" |
| Use SSL | To encrypt the connection to the node using SSL, enable this box. For details, see Setting up SSL for Faspex Nodes. | Enabled, by default. |
| Verify SSL Certificate | To verify the SSL certificate, enable this box. | Enabled, by default. |
| Host | The node's hostname or IP address. CAUTION: To avoid connectivity
problems, do not specify a hostname that contains
underscores.
|
In this example, Faspex can access the transfer node at "10.0.0.0". (Depending on your setup, this value could be different.) |
| Port | The node's port number. | HTTPS 9092. (Depending on your setup, this value could be different.) |
| Username | The node API username that was created when Enterprise Server or Connect Server 3.0+ was set up on the node machine. | "node-admin" |
| Password | The node API password that was created when Enterprise Server or Connect Server 3.0+ was set up on the node machine. | "s3cur3_p4ss" |
| Storage type | Specify whether you are connecting to a node using Windows Azure or Windows Azure SAS storage. If you are not connecting to such a node, choose Default. For more information on adding an Azure node | Default |
Once you have entered this information, you can test the node connection by clicking the Test Connection link. If you have a group of users that needs to use a different transfer address (as in the example configuration above), this can be set in the Advanced Configuration area as described below. Otherwise, at this point, you can click Create to add the transfer server node to your Faspex configuration. For information about adding file storage to this node, see Adding File Storage on your Remote Server.
- HTTP/HTTPS enabled and set to defaults (8080 + 8443) AND firewall port open on 8080/8443.
- HTTP/HTTPS enabled and set to standard ports (80 + 443) AND firewall port open on 80/443.
Additionally, the transfer server's fallback settings must match the Aspera Faspex fallback settings; otherwise, Faspex will return a "Package creation failed" error. This includes ensuring that the transfer server has HTTP/HTTPS fallback enabled; and that (within the Web GUI) Faspex has and (for HTTPS fallback) turned on. For security, Aspera highly recommends using HTTPS fallback. If HTTPS fallback is enabled on the transfer server, then encrypted transfers must be enabled in the Faspex Web GUI.
Transfer Server Address for Users
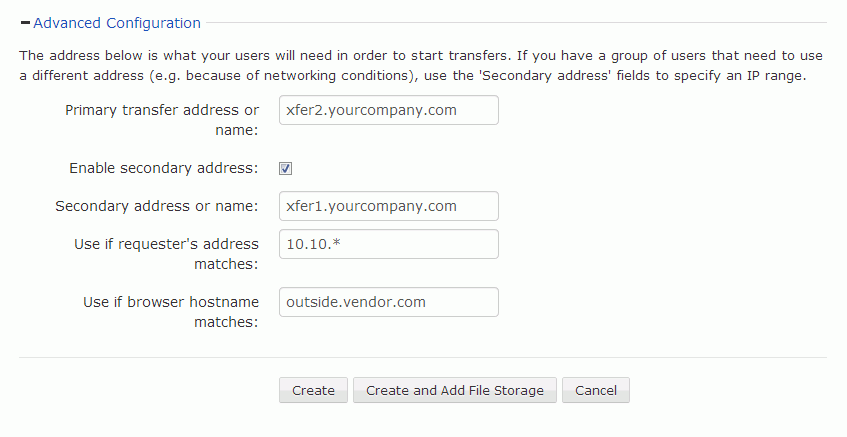
In the example configuration above, the Aspera transfer server is accessible by different host names for both internal and external users. Thus, we can complete the "Advanced Configuration" section as follows:
- Your Web server communicates with the transfer node using 10.10.10.10.
- Your internal users communicate with the transfer node using xfer2.yourcompany.com.
- Your external users communicate with the transfer node using xfer1.yourcompany.com. In addition to specifying a secondary address/name, you can also set conditions for when the secondary address is to be used (e.g., if the requester's IP address matches X.X.X.X or the browser hostname matches outside.vendor.com).

| Field | Description | Sample Value |
|---|---|---|
| Primary transfer address or name: | IP address or host name your users will need in order to start transfers, if different from the Host address or name specified in Basic Configuration. If the host IP address for the transfer server is 127.0.0.1, that is, the node is on the same machine as the web application, users will need the external address of the node, which you would specify here. | "xfer2.yourcompany.com" |
| Enable secondary address: | Check this box if you have a group of external users who must access the transfer node through a secondary IP address or domain name. | Disabled, by default. |
| Secondary address or name: | The secondary address or name. | "xfer1.yourcompany.com" |
| Use if requester's address matches: | Set a condition that the requester's IP address must match this range for the secondary transfer address to be used. The value can be a partial string with wild cards; e.g., 10.0.176.*. | "10.10.*" |
| Use if browser hostname matches: | Set a condition that the requested browser hostname or IP address must match this value for the secondary transfer address to be used. For an IP address, the value can be a range of addresses; e.g., 10.0.176.*. | "outside.vendor.com" |