To connect to a remote computer or to a server in the cloud, you need to add it in the Connection Manager. The sections below describe how to:
- Open the Connection Manger
- Use the Connection Manager to create or modify connections, with a full connection configuration reference
- Connect to a remote host
- Import and export connections
- You (username) have permissions to access the cloud storage and the necessary authentication information (depending on the type of cloud storage).
- To transfer files with an S3 storage device using an S3 direct connection, you cannot have a local docroot, which will cause a transfer to fail. Be sure to confirm your docroot settings before attempting a transfer.
Opening the Connection Manager
Start the application. . Run the following command:
# asperascp
In the upper-right corner, click Connections to open the Connection Manager.
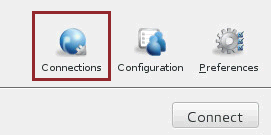
This opens the Connection Manager dialog.
Using the Connection Manger
Click  to create a new connection. You can also use
  to duplicate a selected connection (to copy all information into a new
profile) and
to duplicate a selected connection (to copy all information into a new
profile) and  to delete a connection profile.
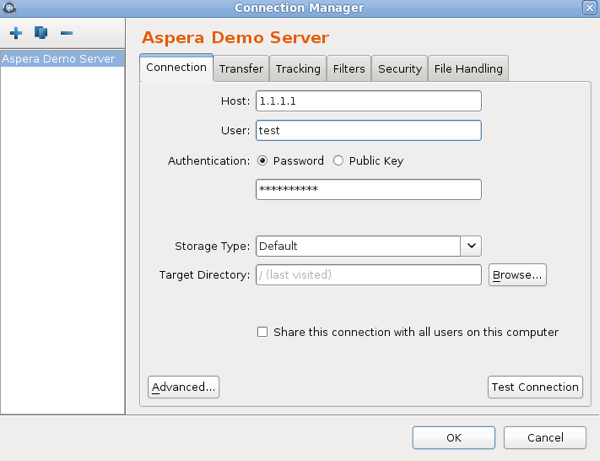
When you create a new connection, the Create Connection dialog pops up in which you select the type of connection. Select Create a standard connection if you are not using the Aspera Transfer Service (ATS) to authenticate a connection to cloud storage.
- Select Create a standard connection for all connections that do not use the Aspera Transfer Service (ATS) to connect to cloud storage.
- Select Create a connection with a new Aspera Transfer Service (ATS) Access Key to create a connection to cloud storage and generate a new ATS access key to authenticate the connection. Select the storage type from the drop-down menu, and enter the required authentication information (depending on storage type). Entering a name is optional; it can be edited in the Connection Manager.
- Select Create a connection with an existing ATS Access Key to create a connection to cloud storage with an existing Aspera access key. Enter the Aspera access key ID and secret. Entering a name is optional; it can be edited in the Connection Manager.
To name or rename a connection, click the orange connection profile name at the top of the screen to open the Rename Connection dialog. You can also launch the Rename Connection dialog by clicking once on an already selected connection name in the left panel of the Connection Manager. When you have entered the new name, save it by clicking OK (once in the Rename Connection dialog and again in the Connection Manager).
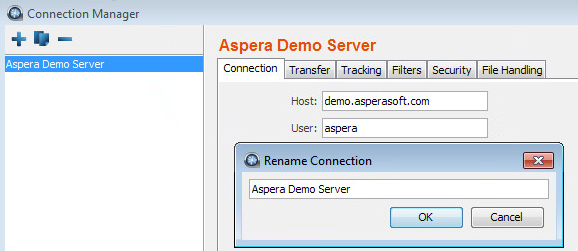
The Connection Manager includes the following configuration tabs:
| Tab | Description |
|---|---|
| Connection | Host information, such as the address, login credentials, and connection ports. |
| Transfer | Transfer session-related options, such as the transfer speed and retry rules. |
| Tracking | Options for tracking the transfer session, including the confirmation receipt and the email notifications. |
| Filters | Create filters to skip files that match certain patterns. |
| Security | Enable the transfer encryption and the content protection. |
| File Handling | Set up resume rule, preserve transferred file attributes, and remove source files. |
The following tables describe the configuration options in these tabs.
Connection
| Option | Description |
|---|---|
| Host | Required The server's address, such as 192.168.1.10 or companyname.com. |
| User | The login user for the server. |
| Authentication | Choose password or public key authentication. To use key-based authentication, see Creating SSH Keys in the GUI. |
| Storage Type | The default option is local storage. Use the drop-down menu to configure object
storage. Connecting to object storage requires an ALEE-enabled Aspera server
on the remote storage. Object storage types include the following:
Note: You can only choose special storage if you have full
access to that storage on the cloud-based machine.
|
| Target Directory (or Bucket Path or Path for most cloud storage) | The default directory when connecting to this computer. When left blank, browsing the remote host brings up either the user account's document root (docroot), or the last-visited folder. When a path is set, connecting to the host always brings up the exact directory. |
| Share this connection ... | Select to share this connection with other users on your computer. When a connection is authenticated through Public Key, the SSH keys used by this connection should be shared as well. For more information, see Creating SSH Keys in the GUI. |
| Advanced Settings > SSH Port (TCP) | The TCP network port. Default: 33001. Note that if connecting on 33001 fails, the application attempts to establish a connection on port 22. If the connection on 22 succeeds, the setting is updated to 22. |
| Advanced Settings > fasp Port (UDP) | The UDP network port: Default: 33001. |
| Advanced Settings > Connection Timeout | Time out the connection attempt after the selected time. |
| Test Connection | Click this button to test the connection to the remote server with the settings you configured. An alert box opens and reports whether the connection is successful. |
Transfer
| Option | Description |
|---|---|
| Transfer Name | Select from the following options: Automatically generate allows the user interface to generate the transfer name; Automatically generate and add prefix uses auto-generated name with a customizable prefix; Specify uses the user-specified name. |
| Policy | Select the FASP transfer policy.
|
| Speed | Select to specify the transfer rate. The target rate is constrained by the global bandwidth in the Preferences window. Refer to Global Bandwidth Settings. |
| Retry | Select to automatically retry the transfer after a recoverable failure
for a set amount of time, in seconds, minutes or hours. You may set the
initial and maximum retry intervals by clicking the More
Options button.
For example, if the retry is set for 180 seconds, the initial interval is 10 seconds, and the maximum interval is 60 seconds, then the transfer will retry at 10, 30, 70, 130, and 180 seconds after the first try, such that the interval progression is 10, 20, 40, 60, 60, and 50 seconds. The last interval is not the maximum because the retry period ends with a final retry. As another example, if the retry is set for 600 seconds, the initial interval is 30 seconds, and the maximum interval is 120 seconds, then the transfer will retry at 30, 90, 210, 330, 450, 570, and 600 seconds after the first try, such that the interval progression is 30, 60, 120, 120, 120, 120, and 30 seconds. Again, the last interval is not the maximum because the retry period ends with a final retry. |
| Show Advanced Settings | Click the Show Advanced Settings button to
reveal the following options:
|
Tracking
| Option | Description |
|---|---|
| Generate delivery confirmation receipt | Select this option to create the delivery receipt file in the specified location. |
| Send email notifications | Send out email notifications based on specified events (start, complete, and error).See Using Transfer Notifications for more information. |
Filters
Click Add and enter the pattern to exclude files or directories with the specified pattern in the transfer. The exclude pattern is compared with the whole path, not just the file name or directory name. Two special symbols can be used in the setting of patterns:
| Symbol | Name | Description |
|---|---|---|
| * | Asterisk | Represents zero to many characters in a string, for example *.tmp matches .tmp and abcde.tmp. |
| ? | Question mark | Represents one character, for example t?p matches tmp but not temp. |
For more information on filter rule syntax, see Applying Filters to Include and Exclude Files.
Security
| Option | Description |
|---|---|
| Encryption | Select Encrypt data in transit to encrypt files during transfer. Encryption may decrease performance, especially at higher transfer speeds and with slower computers. |
| Content Protection | Select Encrypt uploaded files with a password to
encrypt the uploaded files with the specified password. The protected file
has the extension .aspera-env appended to the file name.
Select Decrypt password-protected files downloaded to prompt for the decryption password when downloading encrypted files. |
File Handling
| Option | Description |
|---|---|
| Resume | Select Resume incomplete files to enable the resume feature.
Select the file comparison method from the When checking files
for differences dropdown menu:
Under When a complete file already exists at the destination, select an overwrite rule when the same file exists at the destination. By default, files on the destination are overwritten if different from the source. |
| File Attributes |
Note: Access, modification, and source access times cannot be preserved for
node and Shares connections that are using cloud storage.
|
| Source Handling | Select Automatically delete source files after transfer to
delete the files that transferred successfully from the source. Select
Delete empty source subdirectories to also remove
the folder. Select Automatically move uploaded source files to a directory after transfer and specify the location on the source machine to which they should be moved. Only a path to an existing location on the client can be specified. |
Connecting to a Remote Host
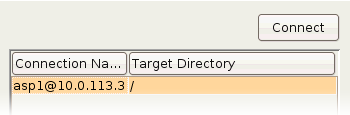
To connect to this remote host, double-click the connection in the Connection panel, or select it and click Connect.
Importing and Exporting Connections
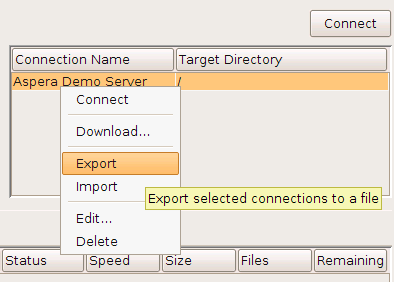
You can also export and import your connection list to and from a text file. To export your connection list, right-click the remote server panel and select Export. To import your connection list, right-click the remote server panel and select Import. Both options are shown below (with "export" selected).
- Exported and imported connections do not include passwords. Because the password encryption uses a per-user/per-machine cryptographic key, the encrypted passwords cannot be used on other machines. Since the passwords are not transferred, they must be re-entered once the connection has been imported.
- If you are exporting a connection that uses keys, then you will need to back up those keys manually and import separately.
- A shared connection that is exported or imported by a non-administrator will import as a regular connection (not as a shared connection).
- Email templates are not exported with the connection.